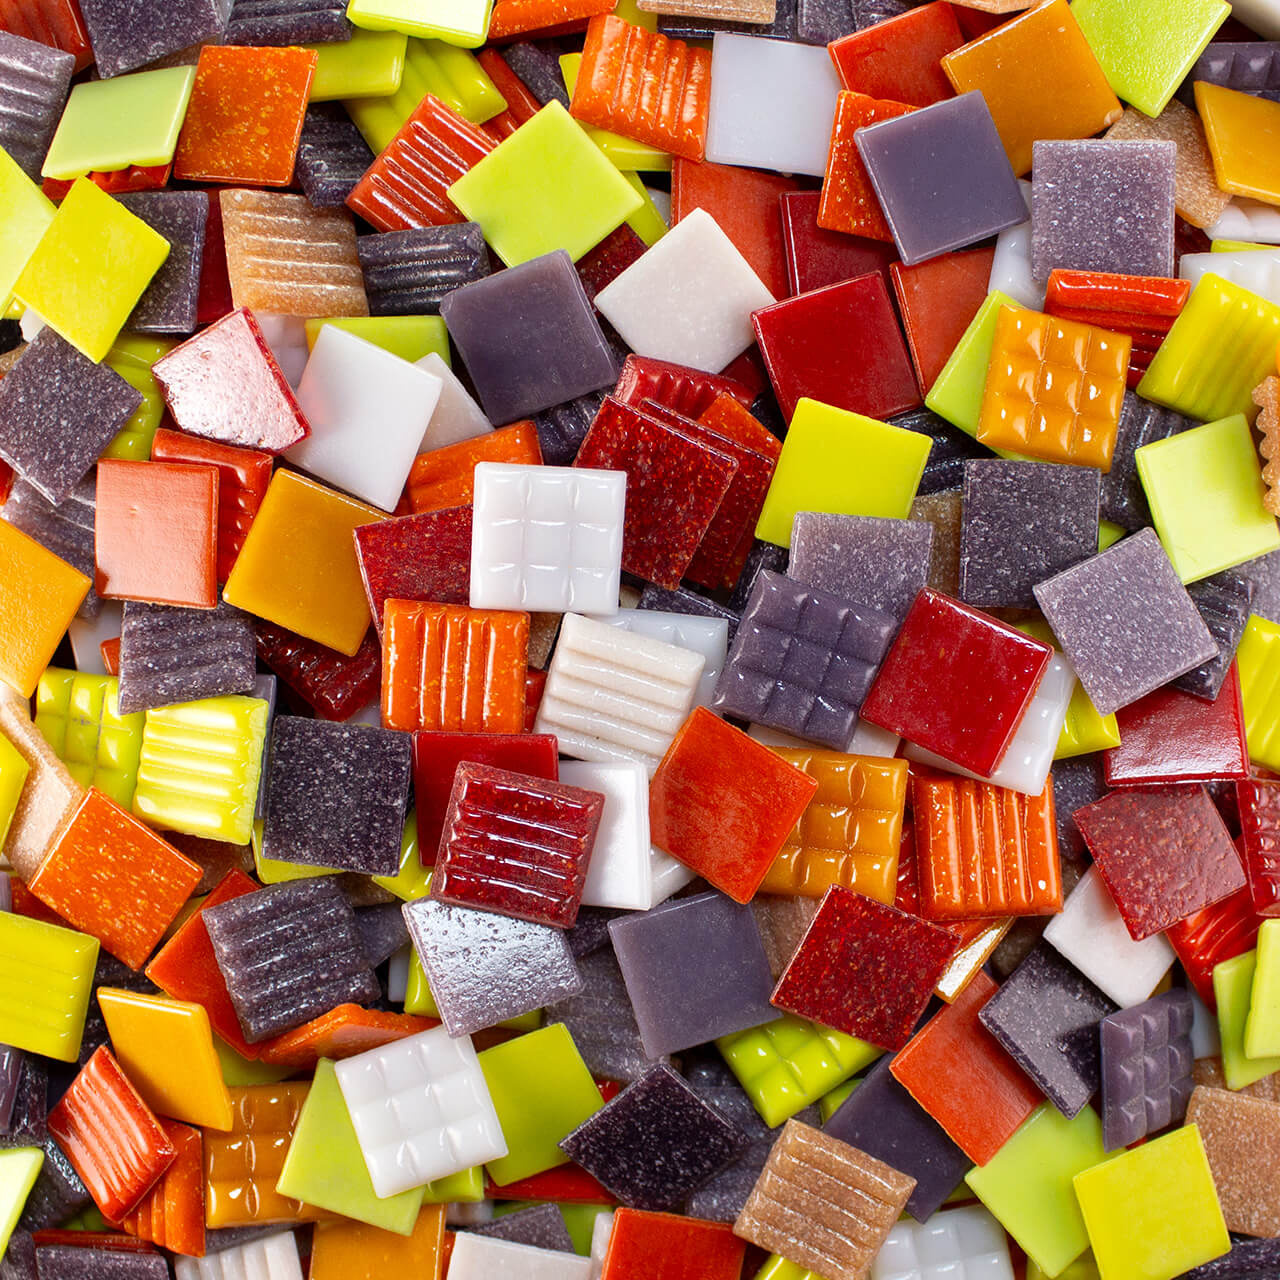
Our Sunset Glass Mosaic Tile Mix is a bright assortment of vitreous glass tile in shades of red, orange, yellow, pink, and purple. Add vibrant warmth to your mosaic with lemon yellow, papaya orange, and pastel pink. Burnt peach, violets and primary red add depth and dimension.
This 1-lb mix combines Morjo™ Vitreous tile with smooth, low-grain Lojee-Nojee™, creating a vivid range of color and texture that samples both brands. See our Red Orange Yellow and Pink Purple Morjo™ Vitreous assortments for comparison.
For a mini version of this mix, check out our Juicebox assortment.
Sunset Glass Mosaic Tile Mix 3/4-Inch
Price is per 1 pound (roughly 145+ tiles).
Tile dimensions: 3/4 inch x 3/4 inch (20mm x 20mm).
Tile thickness: 4mm (1/8 inch nominal).
Material: glass
Coverage: each pound covers 0.69 square feet.
Coverage: 218 loose tiles cover 1 sq ft. with grout spacing of 1/16 inch.
Frost-proof, impervious to liquid.
Suitable for indoor or outdoor use.
Sunset Assortment Colors:
Lojee-Nojee™:
B51N-purple tint 1
B77N-pink cream
D60N-cadmium yellow light
D62N-indian yellow orange
Morjo™ Vitreous (MV20):
A082-faint pink
A086-salmon
A090-lemon yellow*
A094-orange
REDS: A095-orange red*, A096-primary red*, A098-grainy red
Each pound covers 0.69 square feet assuming a standard grout spacing of 1/16 inch. To cover 1 square foot, 218 tiles are required. Note that cutting tiles generates some scrap, so you may want to budget 5% extra.
Compatibility
Because the 3/4 inch size (20mm) and 1/8 inch nominal thickness (4mm) is industry standard, you can combine these tiles with a wide variety of brands.
Cutting Glass Tile
We recommend the Mosaic Glass Cutter for cutting all types of glass mosaic tile including these. Note, however, that there is a limit to how small they can be cut. Due to their tapered edges, small pieces will tend to tip over. We advise cutting halves and quarters and diagonal triangles, and not much smaller than that. For creating outlines and other details, check out our Rectangle Border Tiles or our Outliners Mosaic Sticks™.
Mounting Tile
Weldbond adhesive works well for mounting dry indoor mosaics. However, to permanently set outdoor and wet mosaics, use thinset mortar.
Use in Mosaic Art
The affordability, ease of use and durability of these tiles makes them suitable for outdoor projects such as garden décor. The pigment quality also lends itself equally well to photorealistic mosaic images and fine art.
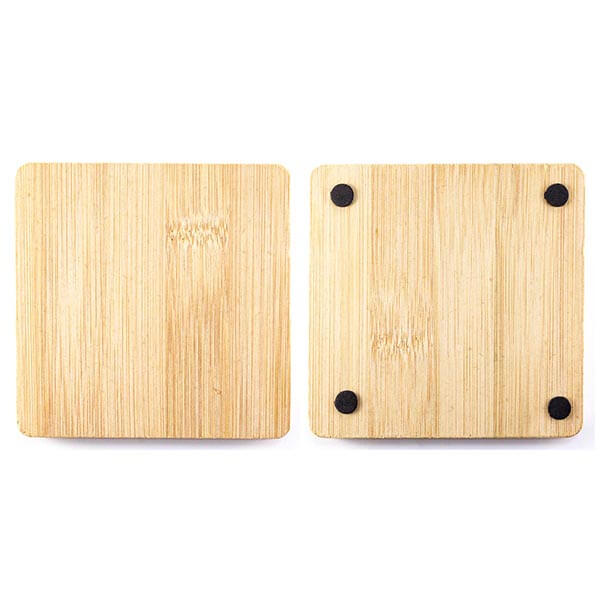
Our Mosaic Coaster Base – Square Bamboo has a square base that is ~3.93 inches (100 millimeters) wide and ~0.39 inches (10 millimeters) thick. The bamboo material of this square coaster provides it with both durability and a unique finish. The built in coaster bumpers underneath provide a tactile grip that reduces sliding. Unlike our other Mosaic Coaster Base varieties our Mosaic Coaster Base – Square Bamboo has rounded corners for a softer appearance.
Note that the wood is not recessed to form a border for your mosaic. Instead, your mosaic should extend to the edge of the coaster so that the finished coaster looks like a fragment of an ancient mosaic. This is easiest to do when you use tile without a heavy embossed pattern on the underside, and for this reason, we recommend the 8mm Morjo Recycled Glass Mosaic Tile for use with the coasters.
Weldbond adhesive or another high quality PVA glue is recommended for attaching tiles to the coaster base, and there are several options for grouting your mosaic coaster. You can press the tiles closely together instead of leaving a gap, but that requires much more time and effort than leaving an irregular gap and then grouting the mosaic. With an irregular grout gap of 1/16 inch or less, you can use almost every piece of tile you cut because it does not have to be exact. You can also use regular sanded grout to grout it.
Mosaic Art Projects Using Coaster Bases
Product Specifications
1 piece of bamboo square coaster base
wood pattern is natural and varies by piece.
width: ~3.93 inches (100 millimeters)
thickness: ~0.39 inches (10 millimeters)
coaster bumpers on bottom side
bare wood face
rounded corners
Compatibility
Any type of glass mosaic tile could be used with these, but there is no border on the coaster, so your mosaic will go all the way to the edge. If you use a type of glass tile that has coarse embossing or bevels on the underside, then these might look odd at the edge of the mosaic. It is also more difficult to cut a tile into small pieces if the bottom has an embossed pattern. For these reasons, the coasters are best covered with stained glass or the 8mm and 12mm sizes of recycled glass mosaic tile by Morjo. We prefer Morjo to stained glass because stained glass tends to form sharper edges when cut. Whatever tile you decide to use, make sure you file off any sharp edges at the sides of the mosaic using a rough stone or marble file.
Instructions For Using The Coaster Bases For Detailed Mosaic Art
The coaster bases can be used any way you want, including simple projects for children with tiles glued randomly with variable grout spacing, and these make great first-time projects because they are small and do not require as much time and material. However, it is possible to create a more sophisticated mosaic design on the coaster using these instructions. Due to the limited space provided by the coaster, one of the most important steps is making sure you can cut tile small enough to render the smallest detail of your design and modifying your design if necessary:
Find a design or picture. Google Images is a great source of photos, images, patterns, models to draw from.
Draw a simple cartoon outline of your design.
Try cutting up some tile and arranging it on the cartoon to see how it looks.
Pay special attention to the smallest detail in your design.
If it is not possible to cut tile that small, or the pieces seem too tedious to work with, then simplify your design.
Note that when you start using glue, it will be easier to arrange small pieces because they will not move around as unexpectedly.
Tweezers also help.
Once you have you have verified that your design is not too detailed to be rendered in tile, then sketch the cartoon on the coaster in pencil.
You can darken your pencil sketch with a Sharpie brand marker so that glue does not rub it off once you start working.
Wipe Weldbond glue over the face of the coaster and allow to dry to seal the wood. Use a very thin coat to avoid warping the coaster from the moisture in the glue! Remember, the reason you are sealing the coaster in the first place is to avoid warping it later when you use lots of glue for the tiles. Use two light coasts and allow to dry thoroughly between coats.
Start tiling your design from the center and working to the edges.
Leaving an irregular grout gap of 1/16 inch or less is much easier than fitting the tile tightly together.
At the edge of the coaster, cut the tile so that it fits flush with the edge. You can place a tile on the coaster, mark where it should be cut with a
Sharpie marker before gluing and then make the cut.
Use the fine side of a marble file or a piece of rough stone to rub the edge of the cut tile so that the edge is not as sharp.
After the glue has completely dried (preferably for 48+ hours) grout your mosaic with sanded grout.
How Much Tile Do I Need For The Coaster Base?
The top surface of a ~3.93 inch square coaster base has only ~15.44 square inches (~0.11 square feet) in area. This means you could cover it with ~56 to ~72 pieces of the 12mm Morjo or ~112 to ~161 pieces of the 8mm Morjo depending on how you cut and space the tile. In either case, you might want to order more than that to account for the cutting waste, possibly twice as much if you are fitting the tile exactly with no grout gap.
How To Make Mosaic Art
For more advice on designing your mosaic project or mounting, cutting, and grouting tile, please see our page of Mosaic Frequently Asked Questions or our Mosaic Information Guide, which lists instructional pages described by topic. We also post new articles about making mosaics at our How to Mosaic Blog.
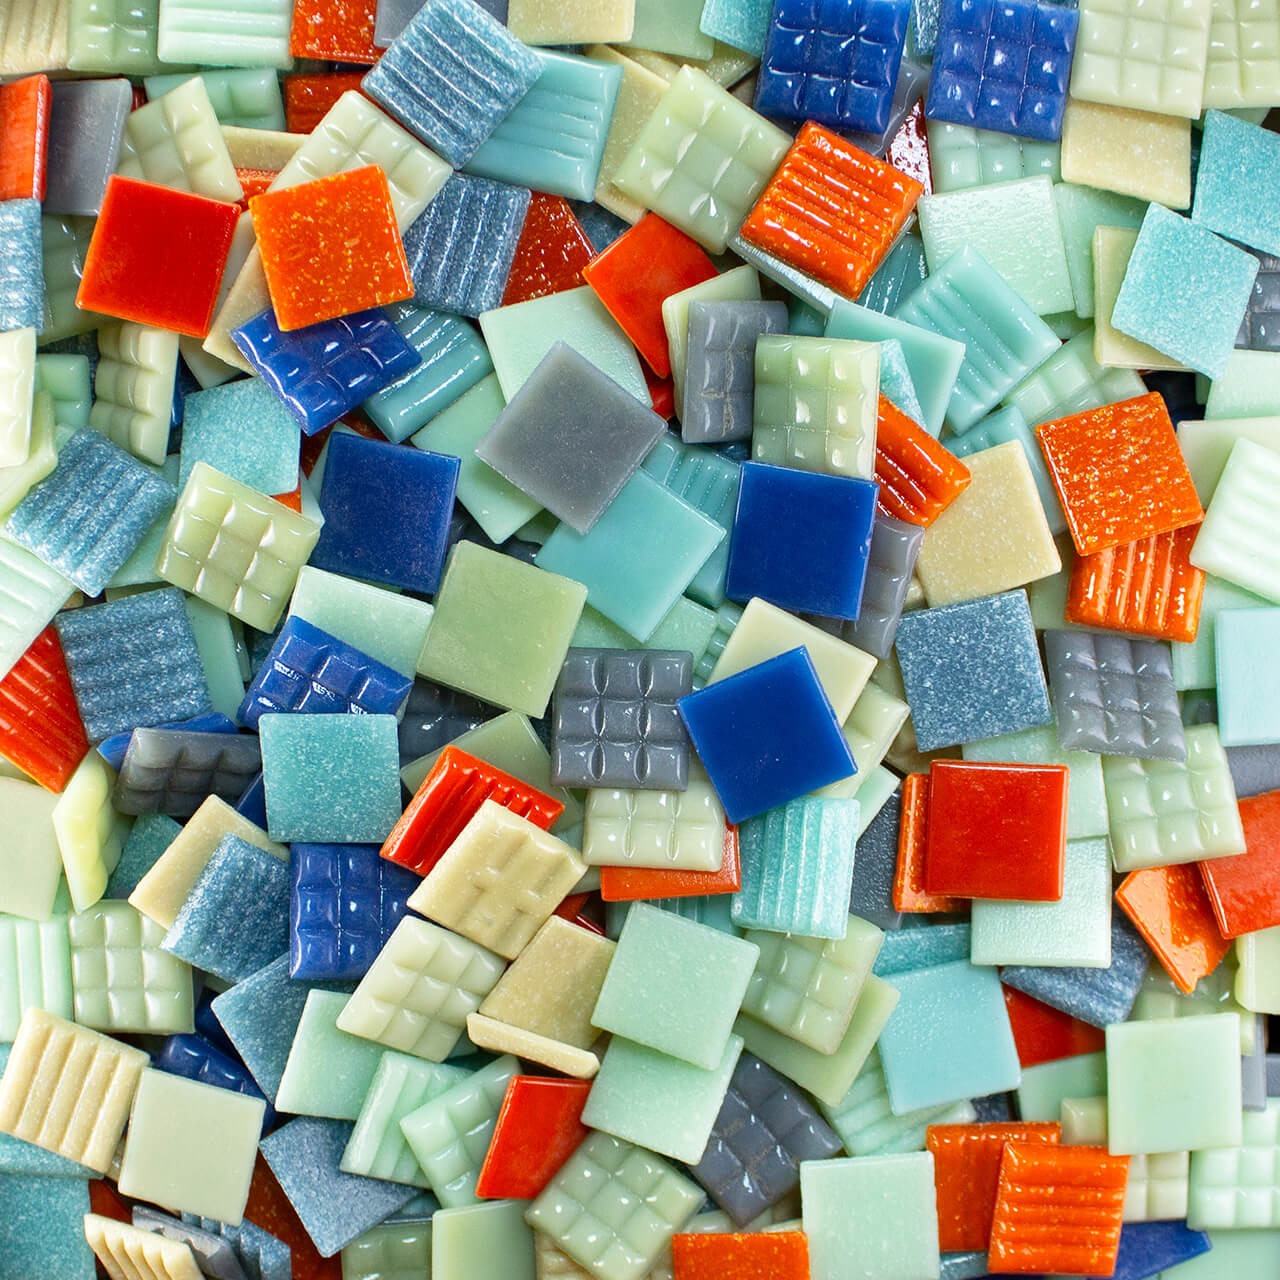
Our Painted Desert Glass Mosaic Tile Mix is a beautiful desert-themed glass tile assortment with warm earth tones, stone greys and blues, light sky teals and fire orange. This mix includes a combination of Morjo™ Vitreous and low-grain Lojee-Nojee™ tile, which adds textural variety and a great way to sample both brands.
These tiles are hard and durable enough for outdoor installation, yet they can quickly be cut into halves, quarters and triangles with little force using a pair of mosaic glass cutters. The grooved side bonds adhesive more securely and also makes for easier cutting. To plan your design, use a mounting grid.
For a mini version of this mix, check out our Albuquerque assortment.
Tile dimensions: 3/4 inch x 3/4 inch (20mm x 20mm).
Tile thickness: 4mm (1/8 inch nominal).
Material: glass
Coverage: each pound covers 0.69 square feet.
Coverage: 218 loose tiles cover 1 sq ft. with grout spacing of 1/16 inch.
Frost-proof, impervious to liquid.
Suitable for indoor/outdoor use.
Product Coverage
Each pound covers 0.69 square feet assuming a standard grout spacing of 1/16 inch. Coverage for 1 square foot requires 218 tiles. Note that cutting tiles generates some scrap, so you may want to budget 5% extra.
Compatibility
Because the 3/4 inch size (20mm) and 1/8 inch nominal thickness (4mm) is industry standard, you can combine these tiles with a wide variety of brands.
Cutting Glass Tile
We recommend the Mosaic Glass Cutter for cutting all types of glass mosaic tile including these. Note, however, that there is a limit to how small they can be cut. Due to their tapered edges, small pieces will tend to tip over. We advise cutting halves and quarters and diagonal triangles, and not much smaller than that. For creating outlines and other details, check out our Rectangle Border Tiles or our Outliners Mosaic Sticks™.
Mounting Tile
Weldbond adhesive works well for mounting dry indoor mosaics. However, to permanently set outdoor and wet mosaics, use thinset mortar.
Use in Mosaic Art
The affordability, ease of use and durability of these tiles makes them suitable for outdoor projects such as garden décor. The pigment quality also lends itself equally well to photorealistic mosaic images and fine art.
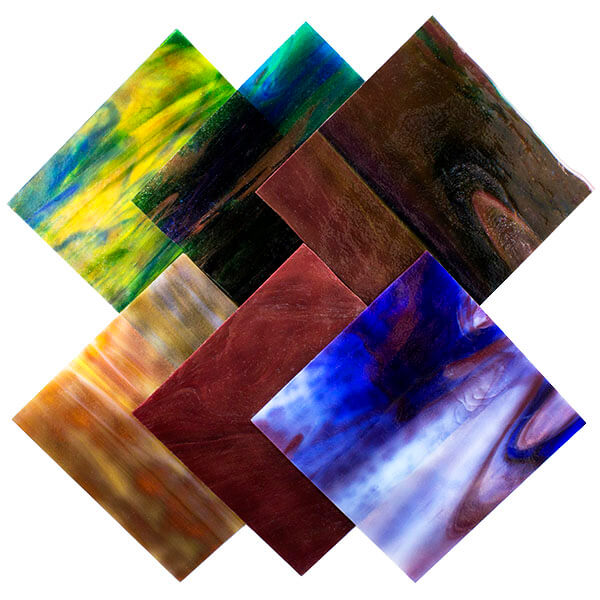
True Dichro Stained Glass by Youghiogheny will appear to change in color and opacity as the ambient light changes throughout the day or based on the type of light source. Dichroic glass will look best in traditional stained glass projects, or in glass-on-glass mosaic art where light can shine through the piece. Made in the USA.
Dichroic Stained Glass is sold in 6-inch sheets like the rest of our stained glass. Some sheets will have a rippled end along one side of the glass. Some colors have a wavy characteristic to them, while others are mostly flat. The thickness varies between 3 and 4 millimeters depending on the color.
Finish
The dichroic stained glass has a finish that is very similar to the High Strike glass we sell in the main stained glass category.
Youghiogheny Dichroic Stained Glass Sheet 6-Inch
STAINED GLASS VARIES IN COLOR AND PATTERN BY SHEET. Do not order if you cannot tolerate variation.
Sales unit: 6×6-inch square piece
Squares are hand-cut using a straight edge and not always perfectly square.
This is cutting stock for making small mosaic tiles; not intended for use as finished mosaic tile.
Thickness: 3 mm or 1/8th of an inch
Pigments: colorfast metal oxide.
Coverage: 1 sheet covers approximately 1/4 square feet.
frost proof
impervious to liquids
Suitable for indoor and outdoor installation.
NOT suitable for floors. More fragile than glass tile.
Stained glass can have sharper edges than regular molded glass mosaic tile, so care must be used in cutting, handling, and grouting. Stained glass varies in color and pattern by sheet. Do not order if you cannot tolerate variation.
Product Coverage
Each 6-inch square sheet covers approximately 1/4 square feet when uncut. When you cut it up, you will gain additional coverage from the grout gap, but you will also lose some coverage in the form of cutting waste.
Compatibility
Sheet thickness is 3mm or approximately 1/8 inch, which is NOMINALLY the same as most of the glass mosaic tile we sell. That being said, mixed-media mosaics and even mosaic table tops are routinely made from dissimilar materials with even greater differences in thickness.
Cutting True Dichro Stained Glass for Mosaics
True Dichro stained glass can be cut quickly with minimal force using our Mosaic Glass Cutters. Use this wheeled cutter for irregular rectangle and triangle shapes. For long straight cuts and curved cuts, use the Pistol-Grip Cutter to score the glass, and a pair of Running Pliers to apply pressure and snap it. Finally, you can also use cutting oil to lubricate cutters for more precision.
Use as Cutting Stock vs. Whole Tile
We hand cut stained glass sheets using a straight edge, and so there is variation in size and straightness. We sell these square sheets as cutting stock for making small mosaic tiles, not as single finished tiles. Some sheets may have a rippled edge along one side of the glass – this is the outer edge of the larger sheet we cut into squares.
Mounting Dichroic Stained Glass
First, before mounting always rinse stained glass with detergent to remove any traces of cutting oil residue. Even if you don’t use cutting oil, it may be present from the manufacturer. For dry indoor mosaics, Weldbond adhesive works well for mounting stained glass. However, for outdoor and wet mosaics, we recommend you use thinset mortar.
Smoothing Sharp Edges
Stained glass often has sharper edges than molded glass mosaic tile when cut. At our studio, we use a marble file or a rubbing stone to knock off any razor edges remaining after cutting.
Safety Notes
We have chosen Youghiogheny stained glass for its beautiful quality and pigment density which makes it suitable for mosaic artwork. However, while it is non-porous and suitable for outdoor mosaic art including benches, tables, and garden décor, it is not recommended for tiling floors. If a mosaic becomes damaged on a surface where it could cut someone, then use the fine edge of a marble file to smooth the edge until you can replace the tile. This also applies to mosaics made with molded tile.
Rendering in Mosaic Art
Traditional stained glass art often makes use of custom-cut pieces that define entire figures or components. In mosaic art, the approach is different: figures and components are almost always built up from multiple tiles unless the object in question is particularly small. It is best to stick to one approach or the other for a particular piece of art.
American Made Stained Glass
True Dichro is made by Youghiogheny in Connellsville, Pennsylvania on the Youghiogheny River. Youghiogheny makes quite possibly the most beautiful glass made in the world, including Italy. This is a great opportunity to buy an American-made product and support high labor and environmental standards at a price that is competitive with molded glass tile made in China.
How To Make Mosaic Art
For more advice on designing your mosaic project or mounting, cutting, and grouting tile, please see our page of Mosaic Frequently Asked Questions or our Mosaic Information Guide, which lists instructional pages described by topic. We also post new articles about making mosaics at our How to Mosaic Blog.
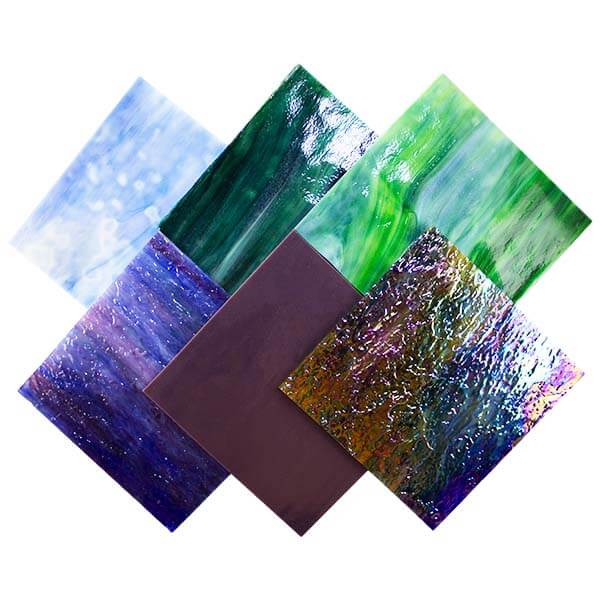
Uroboros stained glass is a special line of hand-rolled glass that is now being produced by Youghiogheny as URO by Yough.
Uroboros stained glass is sold in 6-inch sheets like the rest of our stained glass and is similar in most respects. It’s 3mm thick, has a wavy surface, and may have a rippled edge on one side. The surface of URO glass is very similar to the surface of the High Strike glass we sell, which is denoted by an HS in the color number. Another similarity with the HS glass is the presence of a mottled appearance on different parts of the glass.
What makes URO by Yough glass different is the depth of color that can be seen when it is back-lit. This glass looks great when used on the face of a traditional mosaic, but it really stands out when used in a glass-on-glass mosaic, or in a traditional stained glass application such as a window or sun-catcher.
Uroboros “URO by Yough” Stained Glass Sheet 6-Inch
STAINED GLASS VARIES IN COLOR AND PATTERN BY SHEET. Do not order if you cannot tolerate variation.
Sales unit: 6×6-inch square piece
Squares are hand-cut using a straight edge and not always perfectly square.
This is cutting stock for making small mosaic tiles; not intended for use as finished mosaic tile.
Thickness: 3 mm or 1/8th of an inch
Pigments: colorfast metal oxide.
Coverage: 1 sheet covers approximately 1/4 square feet.
frost proof
impervious to liquids
Suitable for indoor and outdoor installation.
NOT suitable for floors. More fragile than glass tile.
Stained glass can have sharper edges than regular molded glass mosaic tile, so care must be used in cutting, handling, and grouting. Stained glass varies in color and pattern by sheet. Do not order if you cannot tolerate variation.
Product Coverage
Each 6-inch square sheet covers approximately 1/4 square feet when uncut. When you cut it up, you will gain additional coverage from the grout gap, but you will also lose some coverage in the form of cutting waste.
Compatibility
Sheet thickness is 3mm or approximately 1/8 inch, which is NOMINALLY the same as most of the glass mosaic tile we sell. That being said, mixed-media mosaics and even mosaic table tops are routinely made from dissimilar materials with even greater differences in thickness.
Cutting URO Stained Glass for Mosaics
URO stained glass can be cut quickly with minimal force using our Mosaic Glass Cutters. Use this wheeled cutter for irregular rectangle and triangle shapes. For long straight cuts and curved cuts, use the Pistol-Grip Cutter to score the glass, and a pair of Running Pliers to apply pressure and snap it. Finally, you can also use cutting oil to lubricate cutters for more precision.
Use as Cutting Stock vs. Whole Tile
We hand cut URO sheets using a straight edge, and so there is variation in size and straightness. We sell these square sheets as cutting stock for making small mosaic tiles, not as single finished tiles. Some sheets may have a rippled edge along one side of the glass – this is the outer edge of the larger sheet we cut into squares.
Mounting URO Stained Glass
First, before mounting always rinse stained glass with detergent to remove any traces of cutting oil residue. Even if you don’t use cutting oil, it may be present from the manufacturer. For dry indoor mosaics, Weldbond adhesive works well for mounting stained glass. However, for outdoor and wet mosaics, we recommend you use thinset mortar.
Smoothing Sharp Edges
Stained glass often has sharper edges than molded glass mosaic tile when cut. At our studio, we use a marble file or a rubbing stone to knock off any razor edges remaining after cutting.
Safety Notes
We have chosen Youghiogheny stained glass for its beautiful quality and pigment density which makes it suitable for mosaic artwork. However, while it is non-porous and suitable for outdoor mosaic art including benches, tables, and garden décor, it is not recommended for tiling floors. If a mosaic becomes damaged on a surface where it could cut someone, then use the fine edge of a marble file to smooth the edge until you can replace the tile. This also applies to mosaics made with molded tile.
Rendering in Mosaic Art
Traditional stained glass art often makes use of custom-cut pieces that define entire figures or components. In mosaic art, the approach is different: figures and components are almost always built up from multiple tiles unless the object in question is particularly small. It is best to stick to one approach or the other for a particular piece of art.
American Made Stained Glass
URO by Yough is made by Youghiogheny in Connellsville, Pennsylvania on the Youghiogheny River. Youghiogheny makes quite possibly the most beautiful glass made in the world, including Italy. This is a great opportunity to buy an American-made product and support high labor and environmental standards at a price that is competitive with molded glass tile made in China.
How To Make Mosaic Art
For more advice on designing your mosaic project or mounting, cutting, and grouting tile, please see our page of Mosaic Frequently Asked Questions or our Mosaic Information Guide, which lists instructional pages described by topic. We also post new articles about making mosaics at our How to Mosaic Blog.
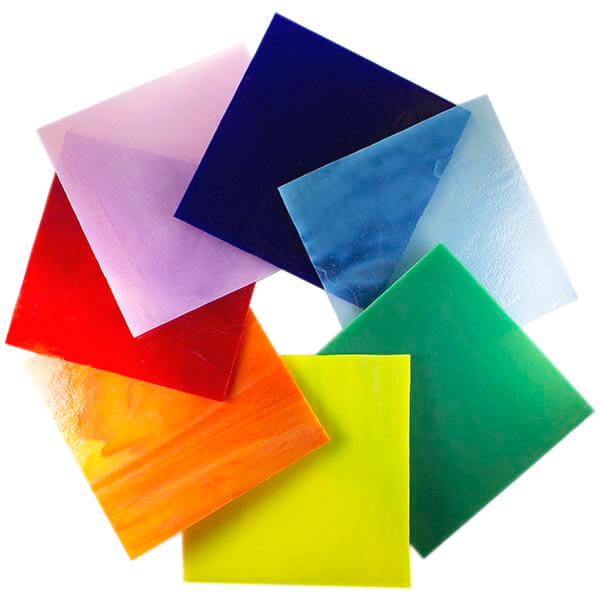
Y96 Quick Shapes Fusible Stained Glass stained glass shapes by Youghiogheny are water-jet cut shapes that can be used in mosaic art or fusing and slumping projects with 96 COE glass. Made in the USA.
Y96 Quick Shapes are sold in packs with 10 pieces in varying sizes. This is the same type of glass as our Fusible 6-inch Sheets.
COE 96
Y96 Fusible Stained Glass uses standard COE 96 fusing schedules available online.
The glass is tested using a dilatometer and examined with a polariscope to ensure it meets the set standard.
This glass can of course also be used in regular stained glass mosaic artwork. There is no requirement that it must be fired and fused; the glass is already beautiful.
Firing Schedule
The manufacturer specifies the following guidelines.
Full Fuse • From room temp to 1000F at 300 degrees per hour, hold 10 minutes • From 1000F to 1250F at 300 degrees per hour, hold 20 minutes • From 1250F to 1425F at 300 degrees per hour, hold 15 minutes • Crash from 1425F to 950F, hold 60 minutes • From 950F to 800F at 200 degrees per hour, hold 10 minutes • From 800F to 150F at 300 degrees per hour • Natural cooling to room temperature Please adjust hold times for the size of your project. Remember, this is only a guide.
Tack Fuse • From room temp to 1000F at 300 degrees per hour, hold 10 minutes • From 1000F to 1250F at 300 degrees per hour, hold 20 minutes • From 1250F to 1350F at 300 degrees per hour, hold 10 minutes • From 1350F to 950F AFAP, hold for 60 mins • From 950F to 800F at 200 degrees per hour, hold 10 minutes • From 800F to 150F at 300 degrees per hour • Natural cooling to room temperature Please adjust hold times for the size of your project. Remember, this is only a guide.
Slump Fuse • From room temp to 1000F at 300 degrees per hour, hold 30 minutes • From 1000F to 1225F**** at 200 degrees per hour, hold 10 minutes • From 1225F**** to 950F fairly quickly, hold for 60 mins • From 950F to 800F at 200 degrees per hour, hold 30 minutes • From 800F to 150F at 300 degrees per hour • Natural cooling to room temperature
Please adjust hold times for the size of your project. Remember, this is only a guide.
REQUIRES EYE CONTACT — REMEMBER THIS IS ONLY A GUIDE
Y96 Quick Shapes Fusible Stained Glass
STAINED GLASS VARIES IN COLOR AND PATTERN BY PIECE. Do not order if you cannot tolerate variation.
Price is for one pack of shapes, 10 pieces per pack, in 4 different sizes as seen in the photos.
Shapes were cut by water jet. Some of the edges may have micro chipping.
Thickness: 3 mm or 1/8th of an inch
Pigments: colorfast metal oxide.
APPARENT PIGMENT DENSITY, HUE, AND OPACITY MAY CHANGE IF FIRED
NOT suitable for floors. More fragile than glass tile.
Compatibility
Tile thickness is 3mm or approximately 1/8 inch, which is NOMINALLY the same as most of the glass mosaic tile we sell. That being said, mixed-media mosaics and even mosaic table tops are routinely made from dissimilar materials with even greater differences in thickness.
With fusing and slumping projects this glass should only be used with other COE 96 glass.
Use In Mosaic Art
Stained Glass is non-porous and can be used outdoors, but we don’t recommend it for flooring. These shapes are meant to be used as accents or for patterns.
Stained glass is made for use in decorative windows and not as tiling. We have thought long and hard about what the safety and usage implications are of using stained glass for tile, and there is one issue that seems particularly important: If a mosaic becomes damaged where there is sharp broken broken glass mounted to a surface where it could cut someone, then use the fine edge of a marble file to smooth the edge until you can replace the tile. This also applies to mosaics made with molded tile.
For dry indoor mosaics, stained glass can be mounted using Weldbond adhesive, but thinset mortar should be used for outdoor and wet mosaics. In either case, stained glass should be rinsed with detergent to remove any traces of cutting oil.
Smoothing Sharp Edges
Stained glass often has sharper edges than molded glass mosaic tile when cut. At our studio, we use the fine edge of a marble file or a rubbing stone to knock off any razor edges remaining after cutting.
American Made
Youghiogheny stained glass is made in Connellsville, Pennsylvania on the Youghiogheny River. This is quite possibly the most beautiful glass made in the world, including Italy. This is a great opportunity to buy an American-made product and support high labor and environmental standards at a price that is competitive with molded glass tile made in China.
How To Make Mosaic Art
For more advice on designing your mosaic project or mounting, cutting, and grouting tile, please see our page of Mosaic Frequently Asked Questions or our Mosaic Information Guide, which lists instructional pages described by topic. We also post new articles about making mosaics at our How to Mosaic Blog.
Youghiogheny Y96 Fusible Stained Glass stained glass is affordable and can be used in mosaic art or fusing and slumping projects with 96 COE glass. Our selection of solid colors is ideal for use in mosaic artwork on opaque backing surfaces. Made in the USA.
Y96 Fusible Stained Glass is sold in 6-inch sheets like the rest of our stained glass. Some sheets will have a rippled end along one side of the glass. The thickness is remarkably uniform at exactly 3 millimeters, which is about 1/8th of an inch.
COE 96
Y96 Fusible Stained Glass uses standard COE 96 fusing schedules available online.
The glass is tested using a dilatometer and examined with a polariscope to ensure it meets the set standard.
This glass can of course also be used in regular stained glass mosaic artwork. There is no requirement that it must be fired and fused; the glass is already beautiful.
Firing Schedule
The manufacturer specifies the following guidelines.
Full Fuse • From room temp to 1000F at 300 degrees per hour, hold 10 minutes • From 1000F to 1250F at 300 degrees per hour, hold 20 minutes • From 1250F to 1425F at 300 degrees per hour, hold 15 minutes • Crash from 1425F to 950F, hold 60 minutes • From 950F to 800F at 200 degrees per hour, hold 10 minutes • From 800F to 150F at 300 degrees per hour • Natural cooling to room temperature Please adjust hold times for the size of your project. Remember, this is only a guide.
Tack Fuse • From room temp to 1000F at 300 degrees per hour, hold 10 minutes • From 1000F to 1250F at 300 degrees per hour, hold 20 minutes • From 1250F to 1350F at 300 degrees per hour, hold 10 minutes • From 1350F to 950F AFAP, hold for 60 mins • From 950F to 800F at 200 degrees per hour, hold 10 minutes • From 800F to 150F at 300 degrees per hour • Natural cooling to room temperature Please adjust hold times for the size of your project. Remember, this is only a guide.
Slump Fuse • From room temp to 1000F at 300 degrees per hour, hold 30 minutes • From 1000F to 1225F**** at 200 degrees per hour, hold 10 minutes • From 1225F**** to 950F fairly quickly, hold for 60 mins • From 950F to 800F at 200 degrees per hour, hold 30 minutes • From 800F to 150F at 300 degrees per hour • Natural cooling to room temperature
Please adjust hold times for the size of your project. Remember, this is only a guide.
REQUIRES EYE CONTACT — REMEMBER THIS IS ONLY A GUIDE
NOT suitable for floors. More fragile than glass tile.
Stained glass can be cut into small irregular tiles quickly and easily with our Mosaic Glass Cutter, but for long straight strips and square tiles and curved shapes, you can use the Pistol-Grip Cutter and Running Pliers. Stained glass can have sharper edges than regular molded glass mosaic tile, so care must be used in cutting, handling, and grouting. Stained glass varies in color and pattern by sheet. Do not order if you cannot tolerate variation.
Product Coverage
Each sheet covers approximately 1/4 square feet when uncut. When you cut it up, you will gain additional coverage from the grout gap, but you will also lose some coverage in the form of cutting waste.
Compatibility
Tile thickness is 3mm or approximately 1/8 inch, which is NOMINALLY the same as most of the glass mosaic tile we sell. That being said, mixed-media mosaics and even mosaic table tops are routinely made from dissimilar materials with even greater differences in thickness.
With fusing and slumping projects this glass should only be used with other COE 96 glass.
Cutting Tile
Stained glass and glass tile can be cut quickly with minimal force using our Mosaic Glass Cutters, and that is the tool we use in our studio to cut irregular rectangle and triangle shapes for use in our mosaics. For long straight cuts and curved cuts, the Pistol-Grip Cutter should be used to score the glass, and a pair of Running Pliers should be used to snap it.
Use In Mosaic Art
Stained Glass is non-porous and can be used outdoors, but we don’t recommend it for flooring. We don’t recommend buying these sheets for use as 6 inch tile either. The sheets are cut by hand using a straight edge, and so there is variation in size and the straightness of the cut. We sell the sheet as material for cutting into small mosaic tiles, not as a single finished tile.
Stained glass is made for use in decorative windows and not as tiling. We have thought long and hard about what the safety and usage implications are of using stained glass for tile, and there is one issue that seems particularly important: If a mosaic becomes damaged where there is sharp broken broken glass mounted to a surface where it could cut someone, then use the fine edge of a marble file to smooth the edge until you can replace the tile. This also applies to mosaics made with molded tile.
For dry indoor mosaics, stained glass can be mounted using Weldbond adhesive, but thinset mortar should be used for outdoor and wet mosaics. In either case, stained glass should be rinsed with detergent to remove any traces of cutting oil.
Rendering With Tiles
Stained glass art often makes use of custom-cut pieces that define entire figures or components. In mosaic art, the approach is different: figures and components are almost always built up from multiple tiles unless the object in question is particularly small. These two modes of rendering images are different aesthetically, and they aren’t compatible. From the years of customer artwork that we have reviewed, we have noticed that it is best to stick to one approach or the other for a particular piece of art and not combine them. Think of it this way: If most of your mosaic is made from individual tiles where no individual tile is a hand or face or tree, it can look strange to have one individual hand, face, or tree that is all one piece cut from a sheet of stained glass.
Smoothing Sharp Edges
Stained glass often has sharper edges than molded glass mosaic tile when cut. At our studio, we use the fine edge of a marble file or a rubbing stone to knock off any razor edges remaining after cutting.
American Made
Youghiogheny stained glass is made in Connellsville, Pennsylvania on the Youghiogheny River. This is quite possibly the most beautiful glass made in the world, including Italy. This is a great opportunity to buy an American-made product and support high labor and environmental standards at a price that is competitive with molded glass tile made in China.
How To Make Mosaic Art
For more advice on designing your mosaic project or mounting, cutting, and grouting tile, please see our page of Mosaic Frequently Asked Questions or our Mosaic Information Guide, which lists instructional pages described by topic. We also post new articles about making mosaics at our How to Mosaic Blog.
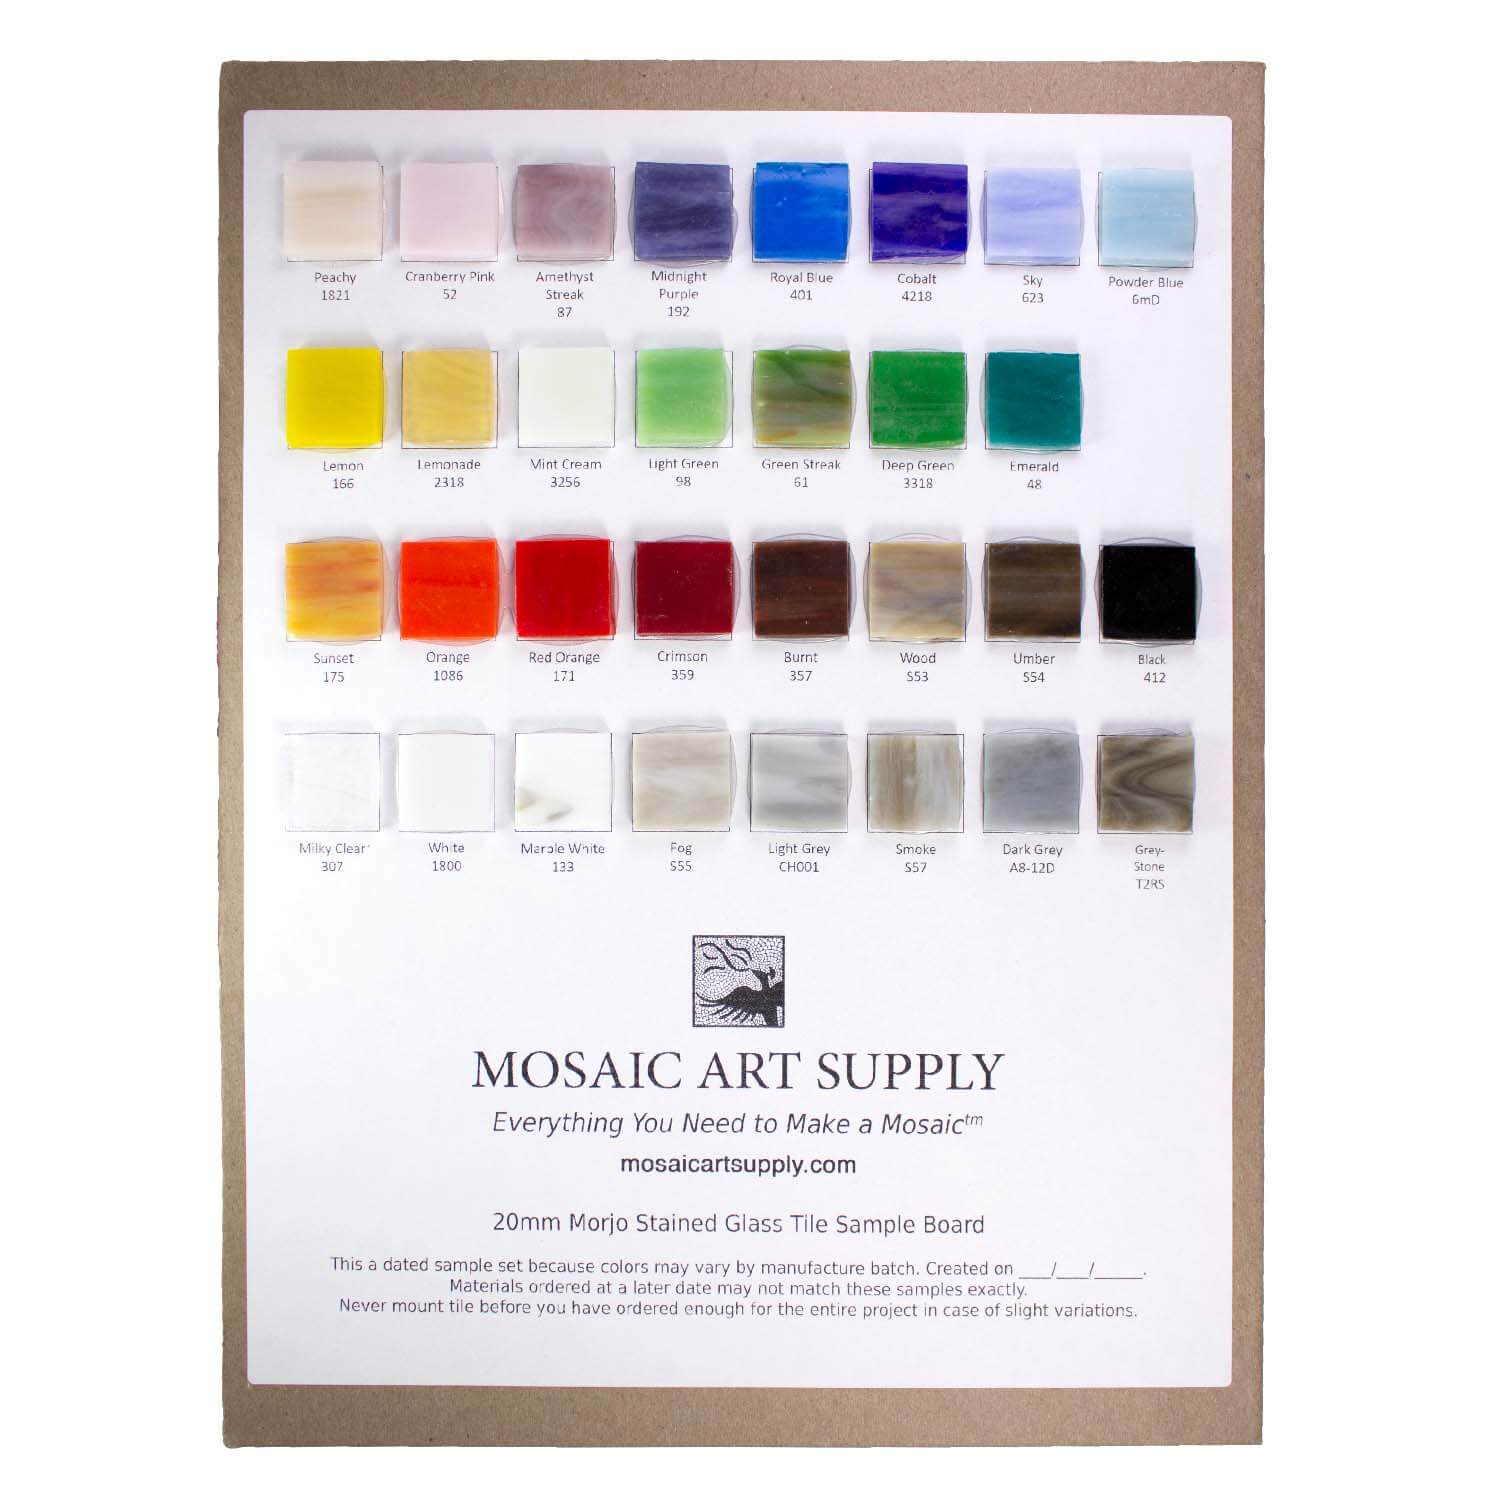
Sample Board Morjo™ THIN Stained Glass Mosaic Tiles 3/4 Inch comes with one of each tile in our color palette in the 3/4 inch (20mm) size. Here is more information about the tiles and how they are used:
Morjo™ THIN Stained Glass Mosaic Tiles 3/4 inch (20mm) are sold by the 1/2 pound, which is approximately 85 tiles. The nominal thickness is thinner than most of the glass tile we sell, but we have used these mixed with them with no problem.
Morjo™ Stained Glass Tile 20mm
Price is for 8 ounces of loose tiles.
Each tile is 20mm x 20mm (~3/4 inch x 3/4 inch).
Pigments: colorfast metal oxide.
Solid color throughout.
Coverage: one bag will cover approximately 0.42 square feet when using a standard grout gap of 1/16 inch.
Thickness: nominally 2.88mm, which is about 35% thinner than vitreous glass tile, but appears to be over 3mm.
Suitable for indoor and outdoor installation.
NOT suitable for floors.
Product Coverage
Each bag covers about 0.42 square feet when mounted with a standard grout spacing on approximately 1/16 inch. Use our tile estimator to calculate how much you need for your project.
Compatibility
Tile thickness is nominally 2.88 mm, which is about 35% thinner than most of the glass mosaic tile we sell, but the actual thickness is probably running more than 3mm. Mixed-media mosaics and even mosaic table tops are routinely made from dissimilar materials with even greater differences in thickness. It makes grouting a little more work but not too difficult, and it is a great way to add texture and visual interest to a mosaic.
Cutting Tile
This tile can be cut with minimal force using the Mosaic Glass Cutters that we sell.
Mounting Stained Glass Tiles
For dry indoor mosaics, stained glass can be mounted using Weldbond adhesive, but thinset mortar should be used for outdoor and wet mosaics.
Use in Mosaic Art
Using different materials in mixed-media mosaic is a great way to add texture, dimension, and visual interest.
Not For Floors
Morjo™Stained Glass Mosaic Tiles 3/4 inch is non-porous and can be used outdoors, but we don’t recommend it for flooring.
How To Make Mosaic Art
For more advice on designing your mosaic project or mounting, cutting, and grouting tile, please see our page of Mosaic Frequently Asked Questions or our Mosaic Information Guide, which lists instructional pages described by topic. We also post new articles about making mosaics at our How to Mosaic Blog.
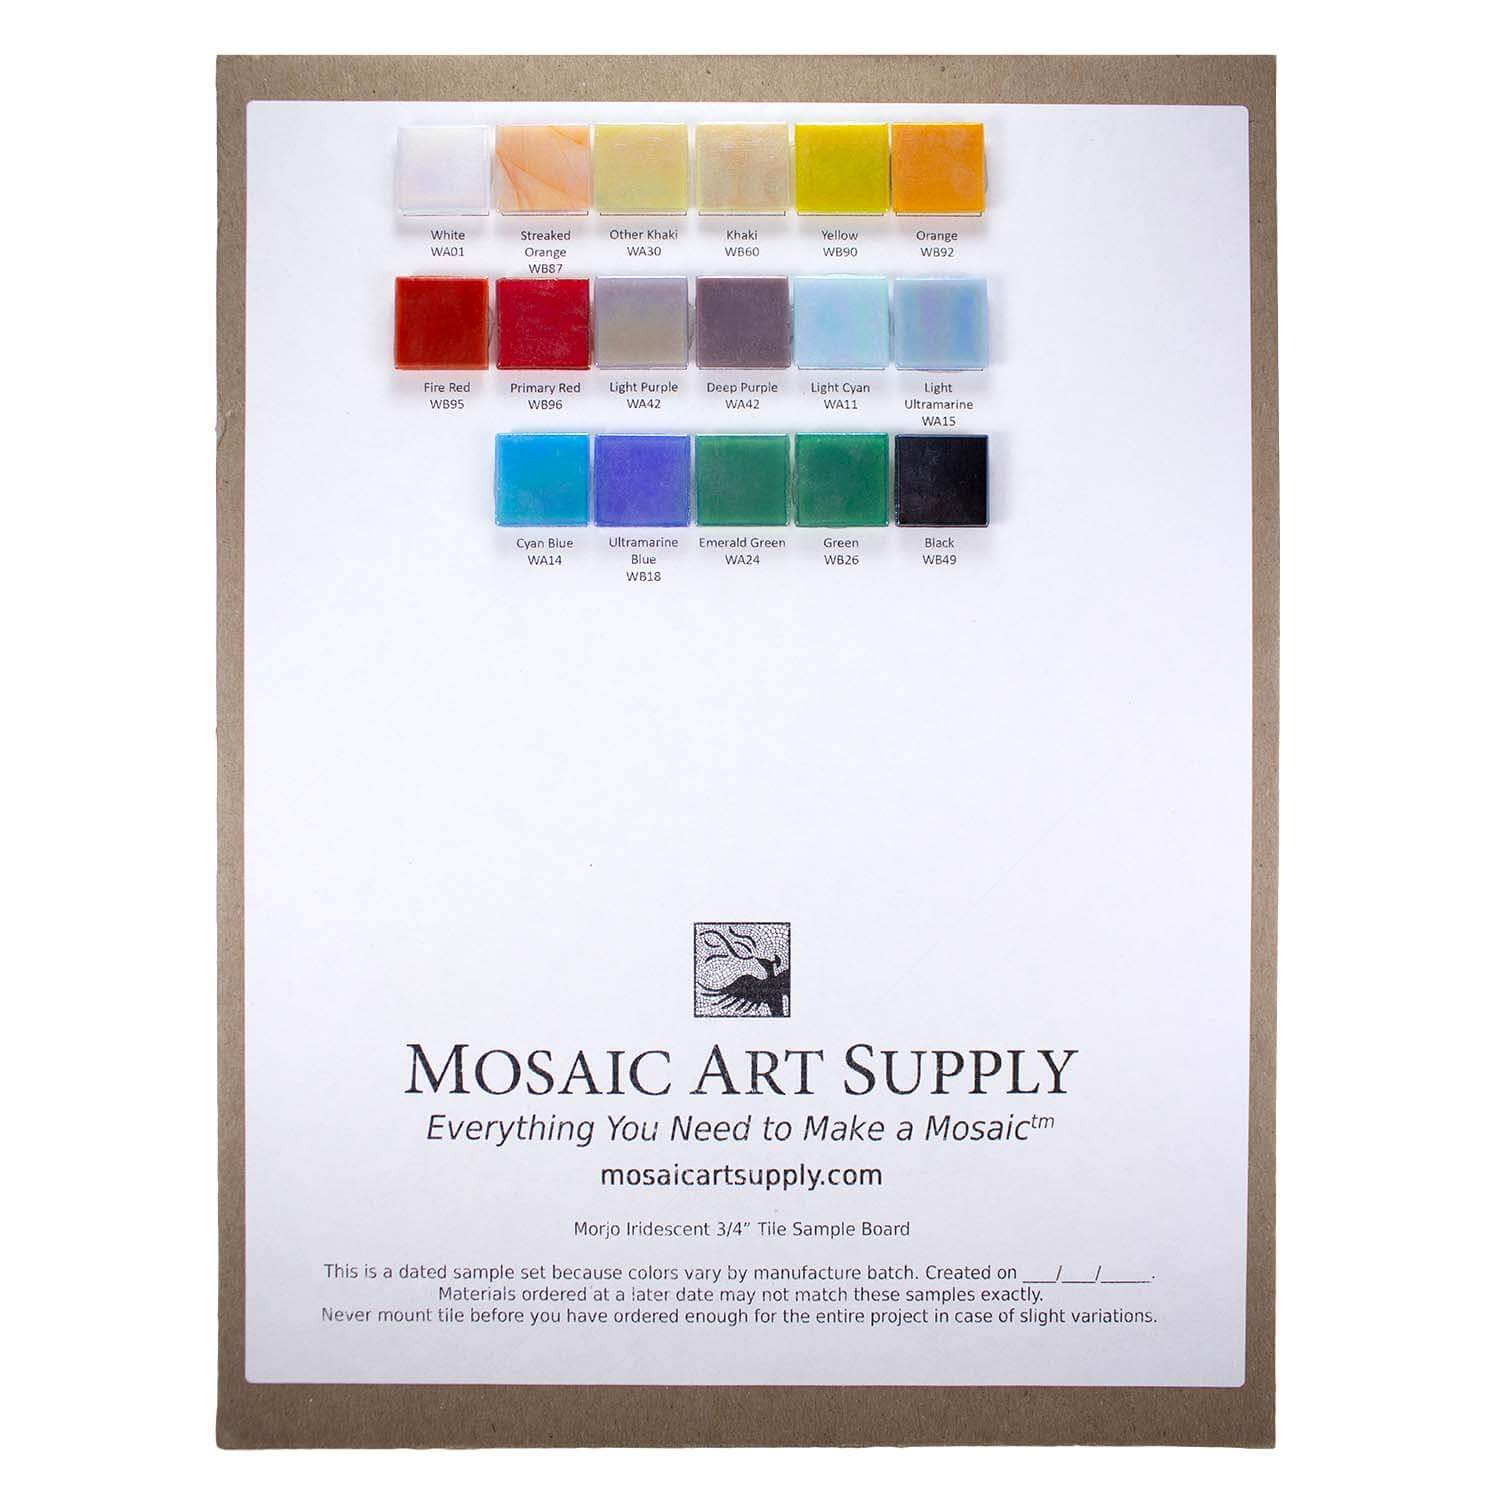
Sample Board Morjo™ Iridescent Glass Tiles 3/4 Inch comes with one of each tile in our color palette in the 3/4 inch (20mm) size. The Morjo™ brand or iridescent tiles are mildly iridized so that the underlying colors aren’t obscured, which is a plus when creating images. Here is more information about the tiles and how they are used:
Morjo™ Iridescent Glass Mosaic Tiles 3/4 inch (20mm) are sold loose by the half pound (approximately 75 pieces). The backs are plain colored glass with embossed ridges and grooves to help adhesives bond securely. The 3/4-inch width and ~1/8-inch thickness are standard dimensions, so you can mix and match these with many other brands of tile. All our glass tiles can be cut easily with the Mosaic Glass Cutter we sell.
MILDLY Iridized
Note that the iridescence is MILD and not so glossy that the underlying color is obscured. This is a definite plus because glass that is heavily iridized tends to look the same no matter what color the glass is underneath. These tiles show a significant amount of the underlying color and can be used to render polychromatic images.
Morjo™ Iridescent Glass Mosaic Tiles 3/4-Inch
Price is per 1/2 pound.
Tile dimensions: 3/4″ x 3/4″ (A standard size and compatible with vitreous tiles from most other manufacturers).
Tile thickness: 1/8″ nominal.
Coverage: each bag covers 0.35 sq ft. with a grout spacing of 1/16 inch.
Coverage: 218 loose tiles cover 1 sq ft. with a grout spacing of 1/16 inch.
Pigments: colorfast metal oxide.
Only the faces are iridized. The backs are standard finish and embossed with ridges for more secure bonding.
Each bag covers 0.35 square feet with a grout spacing of 1/16 inch. Use our tile estimator to calculate how much you need for your project.
Compatibility
Tile thickness is approximately 1/8 inch, which is the same as the other 3/8-inch and 3/4-inch glass mosaic tile we sell.
Cutting Tile
All the glass mosaic tile we sell can be cut quickly with minimal force using a Mosaic Glass Cutter.
Mounting Tiles
For dry indoor mosaics, stained glass can be mounted using Weldbond adhesive, but thinset mortar should be used for outdoor and wet mosaics.
How To Make Mosaic Art
For more advice on designing your mosaic project or mounting, cutting, and grouting tile, please see our page of Mosaic Frequently Asked Questions or our Mosaic Information Guide, which lists instructional pages described by topic. We also post new articles about making mosaics at our How to Mosaic Blog.
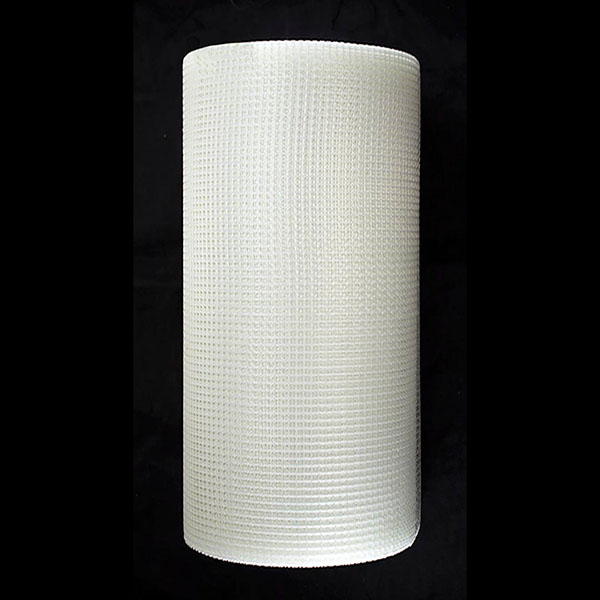
Mosaic Tile Mesh is 12 INCHES WIDE and 150 feet long in one continuous UNCUT piece. The mesh is made from woven fiberglass and is the same material that factories use for pre-mounting ceramic tile for rapid installation in walls, floors, and backsplashes. Artists use it in much the same way when laying up large designs, but the mesh is not needed for small mosaic art projects or surfaces such as tables where the tile can be glued directly to the surface.
Fiberglass mounting mesh is most useful for backsplashes and murals and floor medallions and other projects that are large or involve surfaces that can’t be monopolized for long periods of time. In these situations, the mosaic design is laid up on a worktable overs an extended period perhaps involving many different studio sessions, and then the finished design is installed in one session for attaching to the surface and a second session for grouting.
Tip: Even if your design is large, you will probably find it easier to cut the mesh up into 1 ft x 1 ft pieces and lay up your mosaic in these smaller sections. Anything larger than 3 ft x 3 ft is just too heavy and unwieldy to mount on a vertical surface.
Product Specifications
material: woven fiberglass mesh
unit weight: 4.3 oz/square meter (standard weight used for tile mounting)
width: 12 inches
length: 150 ft
alkali resistant
for use with glue or thinset.
Use a white PVA adhesive such as Weldbond to attach tiles to the mesh.
How to Use Mosaic Tile Mesh
Glue
Use a white PVA adhesive such as Weldbond to attach tiles to the mesh.
To avoid gluing your mesh to your work table, you should use a plastic table or cover the tray in plastic. Construction plastic or coroplast from the building store should work. If you have an old politician or real estate agent plastic advertisement sign from the side of the road you can probably use one of those.
Outdoor and Wet Installation
For outdoor and wet mosaics, it is best to avoid mesh and use mounting paper or mounting tape to temporarily face-mount the mosaic so that it can be pressed into thinset mortar without a layer of mesh and glue on the bottom. This is particularly important when your tiles are small. Mesh can be used in wet locations if glue is used sparingly and your tiles are large enough to safely cover the glue.
If you will be installing the mosaic outdoors or in a wet location, avoid completely covering the bottom of the tile with glue and keep the glue toward the center of the tiles. Leave the outer edges bare to bond directly to the thinset mortar used in final installation. Be careful not to get glue up the sides of the tile. If adhesive isn’t covered with grout, then water can wick underneath the grout over time and cause tiles to pop off. You should inspect the sheet of excess glue by misting it before it is installed. Any traces of glue on the sides and faces of the tile will start to turn white after a few minutes of being misted with water. Use a knife to scrape away any glue residues you see coming up the sides of the tile to face of the tile.
Working Size and Sections
Mesh covered with tile can be heavy and unwieldy, especially when mounted to a wall. You can lay strips of mesh side-by-side if you need a wider piece, but don’t try to vertically mount a one-piece mosaic larger than 3 foot x 3 foot. The standard practice is to lay up the mosaic on 1 foot x 1 foot pieces of mesh and match up the different sections when the mosaic is installed. Floor medallions 3 foot x 3 foot are sometimes made on one piece of mesh, but even though these are mounted horizontally, it still requires that the mosaic be carried on a piece of plywood and slid into place.
Final Mounting
To mount mesh sheets of mosaic to your surface, thinset mortar or adhesive should be spread on the surface with 1/4-inch notched trowel. We “butter” the bottom of the sheet with a little bit of the same adhesive in a thin coat before pressing the sheet into place. Make sure you allow the thinset or adhesive to cure for at least 24 hours before attempting to grout because grouting is a physical process that can easily knock tiles loose from uncured mounting.
Compatibility
The mesh is not used with tiles 3/8-inch or smaller because the holes in the mesh and the ridges on the bottoms of most glass tile make it difficult for small tile to sit level. For small tiles, you should use mounting paper to temporarily FACE-mount the tiles upside down. The product description for our mounting paper explains how that is done.
Use in Concrete Sculpture
The fiberglass mesh can also be used with other materials to make concrete sculptures for covering in mosaic.

 Sample Board Morjo™ THIN Stained Glass Mosaic Tiles 3/4 Inch comes with one of each tile in our color palette in the 3/4 inch (20mm) size. Here is more information about the tiles and how they are used:
Morjo™ THIN Stained Glass Mosaic Tiles 3/4 inch (20mm) are sold by the 1/2 pound, which is approximately 85 tiles. The nominal thickness is thinner than most of the glass tile we sell, but we have used these mixed with them with no problem.
Sample Board Morjo™ THIN Stained Glass Mosaic Tiles 3/4 Inch comes with one of each tile in our color palette in the 3/4 inch (20mm) size. Here is more information about the tiles and how they are used:
Morjo™ THIN Stained Glass Mosaic Tiles 3/4 inch (20mm) are sold by the 1/2 pound, which is approximately 85 tiles. The nominal thickness is thinner than most of the glass tile we sell, but we have used these mixed with them with no problem.
 Sample Board Morjo™ Iridescent Glass Tiles 3/4 Inch comes with one of each tile in our color palette in the 3/4 inch (20mm) size. The Morjo™ brand or iridescent tiles are mildly iridized so that the underlying colors aren’t obscured, which is a plus when creating images. Here is more information about the tiles and how they are used:
Morjo™ Iridescent Glass Mosaic Tiles 3/4 inch (20mm) are sold loose by the half pound (approximately 75 pieces). The backs are plain colored glass with embossed ridges and grooves to help adhesives bond securely. The 3/4-inch width and ~1/8-inch thickness are standard dimensions, so you can mix and match these with many other brands of tile. All our glass tiles can be cut easily with the
Sample Board Morjo™ Iridescent Glass Tiles 3/4 Inch comes with one of each tile in our color palette in the 3/4 inch (20mm) size. The Morjo™ brand or iridescent tiles are mildly iridized so that the underlying colors aren’t obscured, which is a plus when creating images. Here is more information about the tiles and how they are used:
Morjo™ Iridescent Glass Mosaic Tiles 3/4 inch (20mm) are sold loose by the half pound (approximately 75 pieces). The backs are plain colored glass with embossed ridges and grooves to help adhesives bond securely. The 3/4-inch width and ~1/8-inch thickness are standard dimensions, so you can mix and match these with many other brands of tile. All our glass tiles can be cut easily with the