Mosaic Art As Inspiration

Mallard Family mosaic art detail
Mallard Family: mosaic detail by Yetti Frenkel from “Here Comes the Sun” Mosaic mural for Union Crossing, created by Yetti Frenkel and Joshua Winer, October 2011.

Learn by Looking

The best art is ultimately derived from looking at nature, but nothing seems to inspire an artist more than looking at great artwork by other artists. The reasons are simple: There is the competitive urge to create something even better, but there is also the discovery of new ways of seeing or rendering, a humble realization that the artist has done something in a way that hasn’t occurred to the viewer before.

The amazing thing about art is that this phenomenon occurs all the time, including when experienced professional artists look at naive art or art made by little children.

When artists browse other artists, there is a cross-fertilization of ideas where the synthesis is greater than the sum of the parts. There is the thought, “I can’t wait to do that myself and do it in my own way.”

Mosaic art is particularly suited for casual study by other artists because unlike painting, there are no hidden layers or semi-translucent layers and everything is visible as it was laid down. While a novice might benefit from classes or books for learning the best way to cut tile or transfer patterns or apply grout, he or she can learn more or less everything there is to know about the design merely by looking at it, including that critical element of style that is andamento, which is best expressed as the arrangement of tile in parallel or concentric work lines to suggest motion.

Great Blue Heron mosaic art detail
Great Blue Heron: mosaic detail by Yetti Frenkel from “Here Comes the Sun” Mosaic mural for Union Crossing, created by Yetti Frenkel and Joshua Winer, October 2011.

Triangular Tesserae

Venus of the Fallen Leaves mosaic art
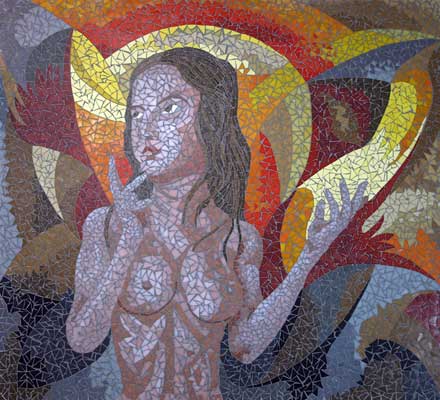
Venus of the Fallen Leaves mosaic art by David Cruise, 2012-2013. 35.75 inches x 39.75 inches, Vitreous glass mosaic tile on wood.
Fruit Bowl mosaic art
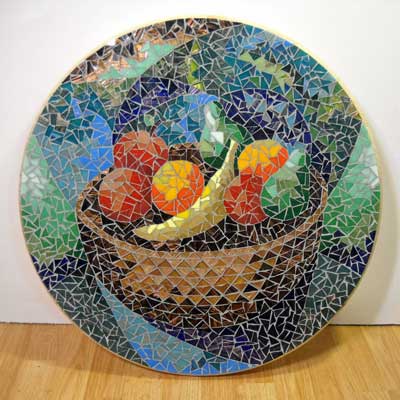
Fruit Bowl mosaic art by David Cruise, 2012. 24 inches diameter, Metallic, Vitreous glass mosaic tile on wood

Normally I dislike mosaics made with triangular tesserae because they seem to be used by artists who aren’t as concerned with using andamento (arrangement of tiles) in rows or concentric rings to create a sense of flow or motion, which is a great source of visual interest in mosaic artwork, but David Cruise’s work really caught my eye.

David creates visual interest in localized areas of his mosaics by using contrasting colors and by contrasting light and dark areas. Notice how light-and-dark contrast naturally catches the eye and makes different elements more distinct. I also like how the andamento of the triangular tesserae creates a woven basket texture in the fruit bowl, however unintentional that might have been.

It is also worth mentioning that you can have the tile close together with minimal grout or no grout (if your mosaic is indoors and not subject to moisture). If there is no groutline, the artist needs to be more conscious of varing his or her colors in order to call attention to individual tiles and break up visual monotony. This can be done by mixing two or three similar colors or shades of a color instead of using all the same color, which is what Yetti has done in the background areas of her magical mosaic. David uses this approach to show depth and shading in his apples and oranges and other fruit and the torso of the female figure.

Mixed-Media Mosaic

There isn’t any need to limit yourself to just one type of material in making a mosaic. Different types of glass, ceramic and stone can be used together in the same piece in what is known as mixed-media mosaic.

dragonfly mosaic art
Mosaic Dragonfly by Susanne Sorogon makes use of color-coordinated tesserae of differing materials.

More Great Mosaic Art

One of the largest collections of contemporary mosaic art online can be viewed at our Mosaic Artists Gallery. For a discussion of how to create photo-realistic mosaics and mosaic portraits, plus some great examples, see our page of Mosaic Portraits. For examples of mosaics that are whimsical and fresh without being tired or cliche, see our page of Fun Mosaic Art. For examples of using different types of materials in the same mosaic, check out our page of Mixed-Media Mosaic Art.

Mosaic Tile Factory

This page includes photos of our mosaic tile being produced and packaged at our supplier factories and at our own warehouse in Decatur, Georgia. Mosaic Art Supply’s warehouse was intended to be strictly a distribution center, but we quickly transitioned into small amounts of light manufacturing in order to produce blends and tile assortments.

Glass Mosaic Tile

The vast majority of the glass mosaic tile we sell is produced primarily as a building material and not as an art supply. This means the tile comes from the factory in full sheets that are 1 or 1.15 square feet, and we cut these sheets up into mini sheets to allow an artist to buy in smaller amounts. Note that we buy glass tile mounted on paper and not mesh because the paper is designed to be removed while the mesh is intended to be permanent. racks of glass mosaic tile

Marble Mosaic Tile

Here are some pictures of our marble tile being boxed for shipping at the factory in Shanghai. The factory produces mesh-mounted mosaic medallions and flooring, so the tile we buy from them is the same stone they would normally use in their finished mosaics: marble mosaic tile boxes 
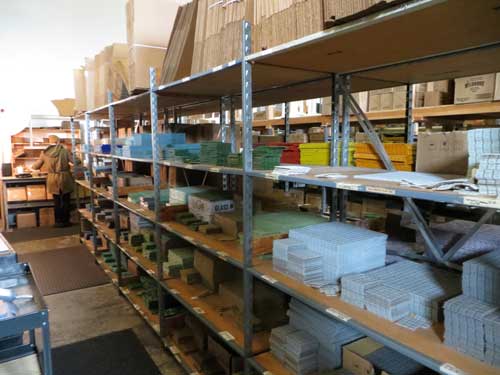
These are our 3/8″ marble mosaic tiles, which have a tumbled finish with natural colors that can be greatly enhanced merely by sealing with a stone enhancer instead of a regular tile and grout sealer. Building material stores usually sell both sealers. marble bars wrapped for shipping 
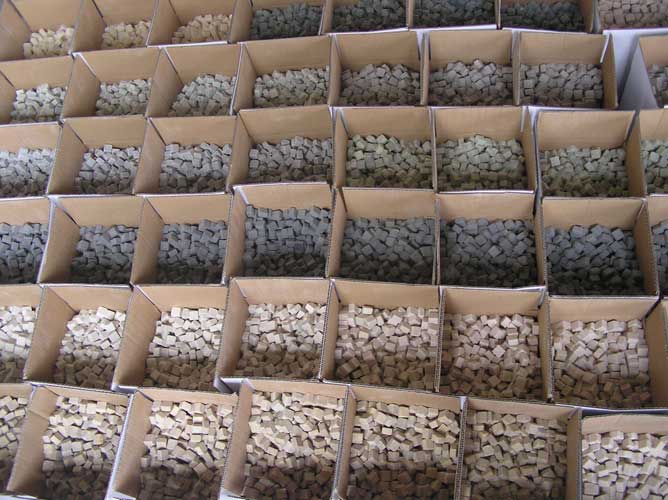
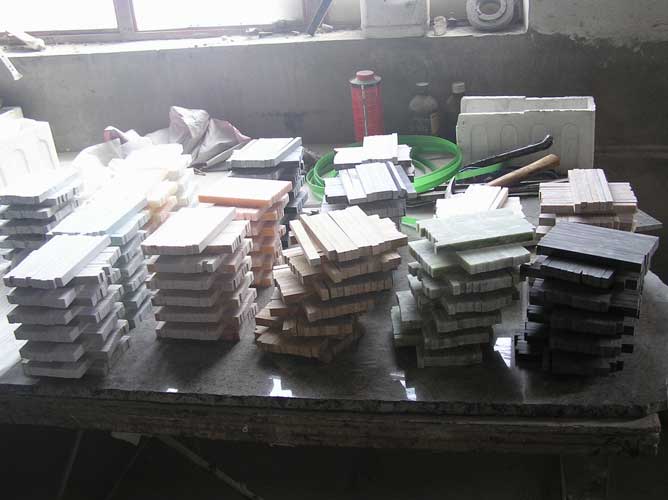
Marble bars have one polished face because they are usually used as edging tile for mosaic floors made from larger stone tiles. Our artists use the marble bars as raw material for hand-cut tile. over 2 tons arranged for shipping 
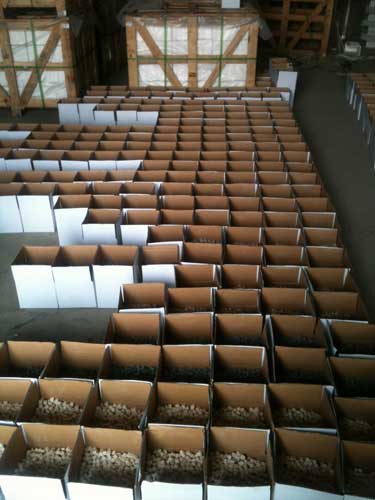
This photo shows just part of a two-ton shipment of stone being laid out for packing and crating.

Mosaic Tile Mounting Grid 3/4-Inch (20mm)

Mounting Grid for 3/4-Inch (20mm) Glass Mosaic Tiles is for temporarily mounting patterns of uncut tile to mounting paper for rapid installation using the indirect method. These are not needed for most projects. Most artists use cut tiles or glue each tile directly on the surface they are covering and do not need grids.

The grid mounts 225 glass mosaic tiles (3/4-inch size) on a 1.15 square foot piece of mosaic mounting paper in a uniform grid of 15 x 15 tiles with a standard grout gap of approximately 1/16 inch.

Note that sockets of the grid has bevels at the edges which match those on the bottom edges of glass mosaic tile, such as found on most varieties of 3/4-inch metallic glass and vitreous glass tile. In other words, the grid might not work as well for 3/4-inch tile which is completely flat on the bottom, such as might be found on stone tile or porcelain tile. With the flat-bottomed stuff, you might have to be a little more careful to keep the tiles from popping out as you apply the mounting paper.

Mosaic Tile Mounting Grid 3/4 Inch

  • grid size: 15 tiles x 15 tiles.
  • grid area: approximately 1.15 square foot.
  • grout gap: approximately 1/16 inch.
  • tile size: 3/4 inch (20mm).

The Indirect Method

Mosaic tile can be glued one at a time DIRECTLY to a surface, or you can lay your mosaic out on a temporary surface in what is called the “Indirect Method.” Temporary surfaces can include things like fiberglass mesh, paper, adhesive contact paper or trays filled with lime putty. Our grids were made to work with self-adhesive mounting tape or mounting paper that is glued to the faces of the tiles.

Why Use The Indirect Method

Why would you want to use the Indirect Method? It is easier to lay up your mosaic design at your work table than it is to lay it out on a floor or vertical wall. Also, you can work for days or weeks at your work table laying up the mosaic without tying up the location where the mosaic will actually be installed. Again, none of this is necessary for a beginner laying up a small craft project like a trivet or a mosaic mirror.

Use In Mosaic Art

The following is how to do the indirect method using our grids and mounting paper:

  1. Place glass mosaic tile into the grid face up, filling up the grid with your design.
  2. Dilute water-soluble glue such as Elmer’s Glue with 3 parts water to 1 part glue.
  3. Paint the water soluble glue onto the mounting paper using a small artists paint brush. Use a light coat to avoid wrinkling the paper.
  4. Lay mounting paper onto the face of the tile, careful to avoid wrinkles.
  5. Allow sheet to dry completely and remove from the grid.
  6. Spread thinset mortar or mosaic adhesive on the surface to be mosaiced.
  7. “Butter” the bottom of the sheet of tile with the same mortar or adhesive. Of coarse, you butter the bare glass bottoms of the tile, not the paper.
  8. Press the sheet of tiles into the adhesive-covered surface with the PAPER ON THE OUTSIDE.
  9. Allow the thinset or adhesive to cure for 24 hours.
  10. Mist the paper until it is soaked and peel it off the tiles.
  11. Grout the mosaic.

How To Make Mosaics

For more advice on designing your mosaic project or mounting, cutting, and grouting tile, please see our page of Mosaic Frequently Asked Questions or our Mosaic Information Guide, which lists instructional pages described by topic. We also post new articles about making mosaics at our How to Mosaic Blog.

BULK Mounting Paper – 1000 Sheets

BULK – 1 Full Box of 1000 Sheets of Mosaic Tile Mounting Paper

Original Product description for the smaller 10-sheet bundles follows below.

Mosaic Tile Mounting Paper 1000 sheets is for temporarily mounting mosaic designs for rapid installation using the indirect method. These are not needed for most projects. Most artists glue each tile directly on the surface they are covering and do not need mounting paper. The paper can be used with or without mounting grids and can be used with cut pieces of tile as well as whole tiles. The paper is 1.15 square feet. Note that the paper isn’t ordinary brown wrapping paper or even brown kraft paper. It is especially designed to resist wrinkling and tearing when wet, and anyone who has tried to use ordinary brown kraft paper for mosaic mounting can tell you this is essential.

BULK Mosaic Tile Mounting Paper 1000 Sheets

  • 1.15 square feet per sheet
  • resists tearing and wrinkling when wet
  • this paper is not self-adhesive (see instructions below)
  • 1000 sheets

The Indirect Method

Mosaic tile can be glued one at a time DIRECTLY to a surface, or you can lay your mosaic out on a temporary surface in what is called the “Indirect Method.” Temporary surfaces can include things like fiberglass mesh, paper, adhesive contact paper, or trays filled with lime putty. Our grids were made to work with self-adhesive mounting tape and mounting paper that is temporarily glued to the faces of the tiles.

Why Use The Indirect Method

Why would you want to use the Indirect Method? It is easier to lay up your mosaic design at your work table than it is to lay it out on a floor or a wall or some other vertical surface. Also, you can work for days or weeks at your work table laying up the mosaic without tying up the location where the mosaic will actually be installed. Again, none of this is necessary for a beginner laying up a small craft project like a trivet or a mosaic mirror.

Use In Mosaic Art

The following is how to do the indirect method using our grids and mounting paper:

  1. Place glass mosaic tile into the grid face up, filling up the grid with your design.
  2. Dilute water-soluble glue such as Elmer’s Glue with 3 parts water to 1 part glue.
  3. Paint the water soluble glue onto the mounting paper using a small artists paint brush. Use a light coat to avoid wrinkling the paper.
  4. Lay mounting paper onto the face of the tile, careful to avoid wrinkles.
  5. Allow sheet to dry completely and remove from the grid.
  6. Spread thinset mortar or mosaic adhesive on the surface to be mosaiced.
  7. “Butter” the bottom of the sheet of tile with the same mortar or adhesive. Of coarse, you butter the bare glass bottoms of the tile, not the paper.
  8. Press the sheet of tiles into the adhesive-covered surface with the PAPER ON THE OUTSIDE.
  9. Allow the thinset or adhesive to cure for 24 hours.
  10. Mist the paper until it is soaked and peel it off the tiles.
  11. Grout the mosaic.

How To Make Mosaics

For more advice on designing your mosaic project or cutting and grouting tile, please see our Mosaic Frequently Asked Questions page or our How To Mosaic blog or our Mosaic Information Guide.

Mosaic Glass Cutter (Wheeled)

The Mosaic Glass Cutter is the recommended hand tool for cutting glass mosaic tile. This tool cuts glass up to 3/8-inch thick with minimal crushing and splintering, and it easily cuts molded tile into quarters, halves and triangles. It is also great for nipping up small pieces of stained glass, although it is not a scoring tool for making long straight cuts in stained glass. This is a compression tool similar to an ordinary tile nipper in the sense that you squeeze tile between the blades. Note that the circular blades do not actually rotate. Replacement blades are available, although the blades should last for years if you don’t abuse them by attempting to cut materials other than glass.

You should not use ordinary tile nippers to cut glass tile. Ordinary tile nippers were made for glazed ceramic tile, and they tend to crush and splinter glass. For most artists, the mosaic glass cutters tend to pay for themselves in what they save in wasted tile.

Safety and Cutting Tile

  • Always wear safety glasses with side shields when using the cutters.
  • Make sure that you don’t cut glass around people not wearing safety glasses. Flying chips could potentially hit their eyes as easily as yours.
  • Never use a mosaic glass cutter to cut materials other than glass, especially hard porcelain. The wheel-shaped blades can shatter.
  • Be aware that cutting glass tile can produce sharp tiny slivers. Never sweep off a work surface with your bare hand. Use a vacuum or counter brush.

Product Specifications

  • steel hand plier with cushion grip
  • replaceable carbide steel cutting blades

How To Cut Glass Tile

Hold the cutter over a cardboard box or plastic dishpan to catch broken pieces and tiny slivers.

Hold vitreous glass tile upside down when cutting so that you can see the embossed pattern of ridges on the bottom. Make sure you position the blade so that the ridges do not interfere with it. It is easier to cut across a ridge or in a crease between two ridges than it is to try to cut with the blade on top of a ridge where it can slip off.

Efficient Cutting

It is much easier to cut up four or five pieces of tile and choose the one that fits best than it is to try to trim one piece to a certain shape or size. It is quicker too. Keep your rejects in a small pile and pay attention to the shapes that are in it. If you don’t use a certain size or shape as often, try to cut fewer pieces like that. This is much more effective than trimming a piece down to what you need, and it is a lot less tedious.

Replacement Springs

Replacement Springs are available, but your cutters are not defective or useless if the springs fall off. The springs tend to fall of all hand tools eventually, even the most expensive brands. Keep your pinky fingers inside the handle instead of outside with the rest of your fingers and use that to open the tool. This is basic shop/studio practice for using any type of plier tool, most of which do not come with springs in the first place.

How To Make Mosaics

For more advice on designing your mosaic project or mounting, cutting, and grouting tile, please see our page of Mosaic Frequently Asked Questions or our Mosaic Information Guide, which lists instructional pages described by topic. We also post new articles about making mosaics at our How to Mosaic Blog.