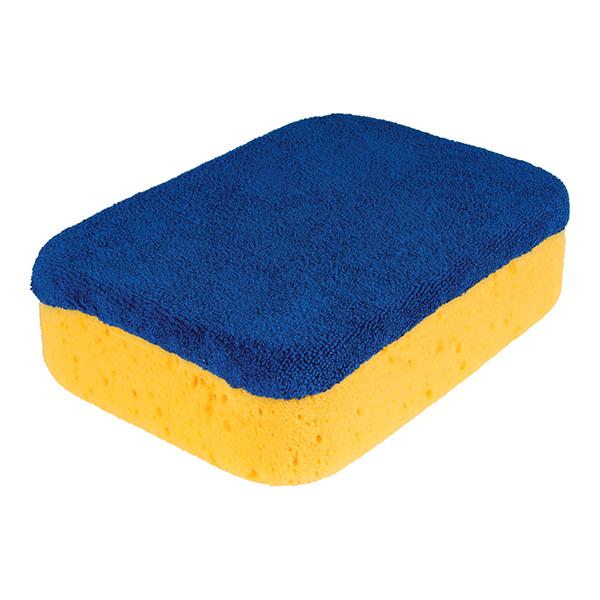
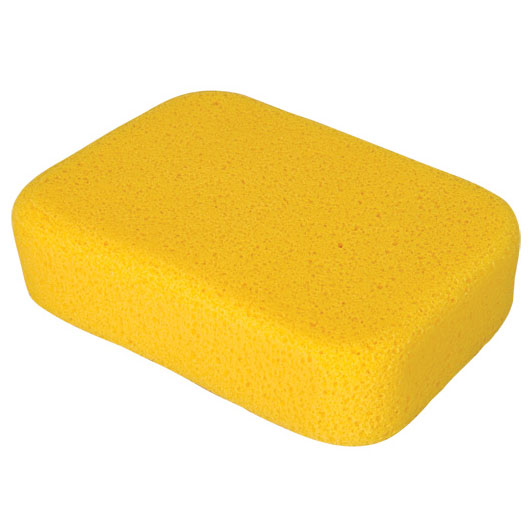
Grouting Sponge With Microfiber Hazing Surface is foam rubber like our regular Grouting Sponge, but it also has a microfiber terry cloth covering one side. The foam rubber sponge material has high water holding capacity and makes for efficient grouting and clean up. The microfiber side is excellent for removing grout haze toward the end of the grouting process and for polishing finished mosaics. These sponges are also great for washing and waxing cars and other household cleaning tasks.
Grouting Sponge With Microfiber Hazing Surface
foam rubber with one panel of microfiber polyester
width: ~5.5 inches
length: ~7.5 inches
thickness: ~2 inches
Grouting Tips
Grouting outdoors is best, especially some place you can run a water hose and don’t mind a little sand and residue being rinsed. Excess grout can kill grass or plants, so scoop up what you can and wash away what is left.
Grout and concrete harden by BINDING water not by drying out. If you let grout or concrete dry out while it is curing, then it will be soft and crumbly. This also happens if you did not add enough water to the grout when you mixed it up. Cover your mosaic with plastic if you are grouting in strong heat, sunlight, air conditioning, wind, or any other condition that accelerates drying.
Make sure you rinse all the water out of your sponge so that it is moist but not leaving drips of water when you rub it on the mosaic. You do not want to get drips of water in the grout in the gaps when you are rubbing the residue off the faces of the tile.
Do not pour left over grout or grout sludge down plumbing or drains. Grout is concrete and can harden under water. Even sand can clog drains. Instead, pour your grout and grout water into an old plastic container. After it hardens, you can pour off the water and dispose what is left as solid waste.
We use traditional grouts and NOT the new epoxy-grouts, and all our advice is written for traditional grout. If you use the new epoxy-base products, then make sure you read manufacturer recommendations for safety and disposal.
Safety
Always wear safety glasses with side shields when mixing and applying grout. Grouting is a physical process with lots of mixing and rubbing and wiping, and these motions cause pieces of sand and grit to fly unexpectedly.
Grout is mildly caustic and can irritate skin, sometimes severely if you have sensitive skin. The sand and rubbing required in grouting aggravate the problem. Wear heavy-duty rubber gloves while grouting to protect your skin.
Grout contains powdered silica (sand) and is slightly caustic due to the lime it contains. Avoid breathing the dust. Wear an ordinary dust mask rated N95 when mixing or use a misting water bottle to avoid creating dust.
How To Make Mosaics
For more advice on designing your mosaic project or mounting, cutting, and grouting tile, please see our page of Mosaic Frequently Asked Questions or our Mosaic Information Guide, which lists instructional pages described by topic. We also post new articles about making mosaics at our How to Mosaic Blog.
There is nothing unique about mosaic grouts. The grouts and sealers used for mosaic artwork are the same ones used for ordinary bathroom tiling, and the techniques of applying the grout are the same. If you are ever uncertain and need information in a pinch, you can ask questions at your local building material store or look at their book on how to tile or bathroom repair, which they usually keep on the same aisle where they sell grout and supplies or in the plumbing department or near the registers. The point is that grouting isn’t rocket science and most handymen and women have done it before.
How much grout you need depends on three things: the area of the mosaic = L x W, the thickness of the tiles and the gaps between the tiles. If the tiles are well-spaced (all gaps under 1/4″), then you should be able to cover the entire mosaic of 18″ x 18″ with 2 lbs of grout. This is assuming your tiles are under 3/8″ thick. I always set my mosaic on an old shower curtain or piece of plastic to catch all the wet grout that falls off the side as I’m spreading it. That way I can scoop it up all the dropped grout and re-use it. Otherwise you need a lot more grout because most of it is wasted when it falls on the dirty floor.
If the gaps between your mosaic tiles are greater than 1/8 inch, then you may need grout with sand in it, such as we sell. The sand reinforces the grout to prevent cracking if the gaps are greater than 1/8 inch. Note that standard grout gaps are usually about 1/16 inch.
How to grout a mosaic
Step 1: Preparation
Grout outdoors if at all possible to minimize dust contamination and clean up of wet grout. Wherever you work, set up a clean area to work in and make sure you have all the tools you will need. Usually you need a bucket of water, some kind of tray to mix the grout in, a mixing stick, a sponge, rubber gloves, a dust mask, and some paper towel or old rags. You can use latex gloves in a pinch if your mosaic is made from smooth tiles, but rubber gloves are recommended when you’re grouting any kind of tile that has sharp edges. Those edges will rip through latex gloves as you spread the grout around.
The mosaic needs to be fully dried before you begin. Wait at least 24 hours after gluing down the last tile before you grout your mosaic if you used Weldbond.
Set up a clean workspace for grouting.
Step 2: Mix the Grout
Wear a dust mask when you do this step. Estimate how much grout you need for the mosaic and pour it into the tray. In this example we used the cut-off bottom of an old plastic jug. If you don’t mix enough grout you can always mix some more. The grout container should indicate how much water to use. The dust generated in this process is very fine and can spread all over the place, that’s why it’s best to do this outside. If you do grout inside, just be sure to vacuum the area once you finish grouting.
Add water and stir the grout with a paint mixing stick.
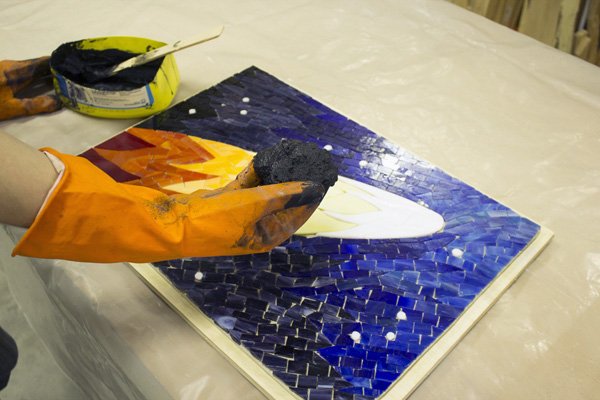
Step 3: Grout the Mosaic
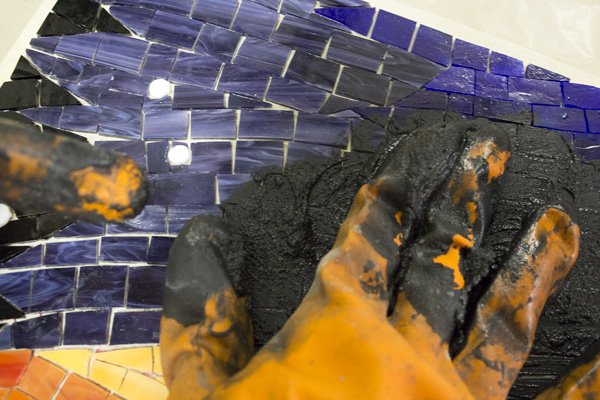
This is the least complicated step. You just need to grab a glob of grout and mush it into the mosaic. Keep doing this until all areas have been covered in grout.
Start with a big glob of grout.
Just smear it into the mosaic.
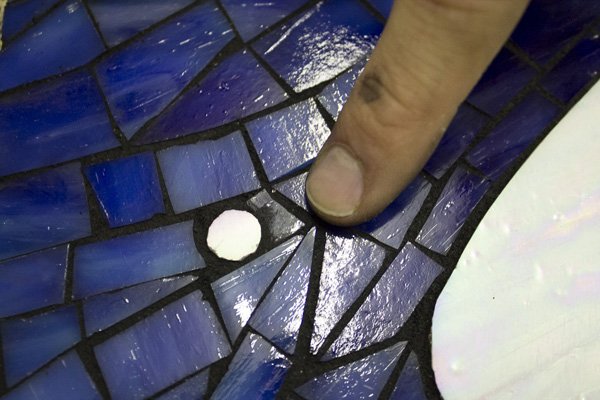
Step 4: Verify Total Grout Coverage
Before you haze the grout, you need to be sure that all of the cracks were completely filled. Look closely and ensure that there are no bubbles between the grout and the wood. Run your fingers along each crack and push the grout down in.
Make sure grout gets in every crack.
Now you’re ready to wipe off the excess.
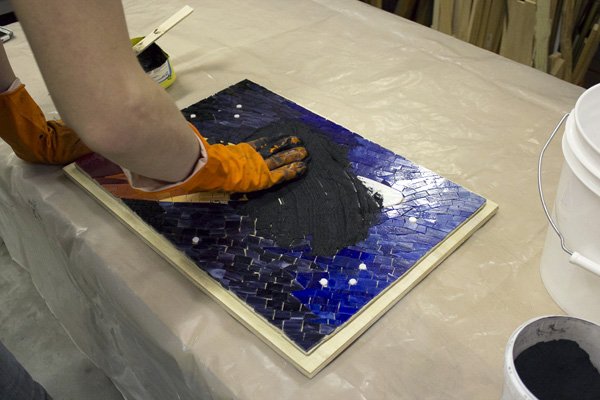
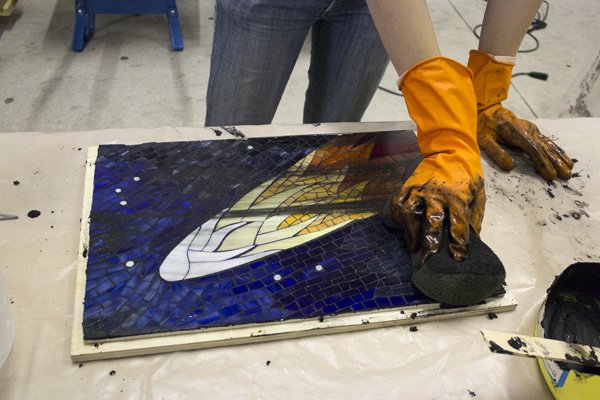
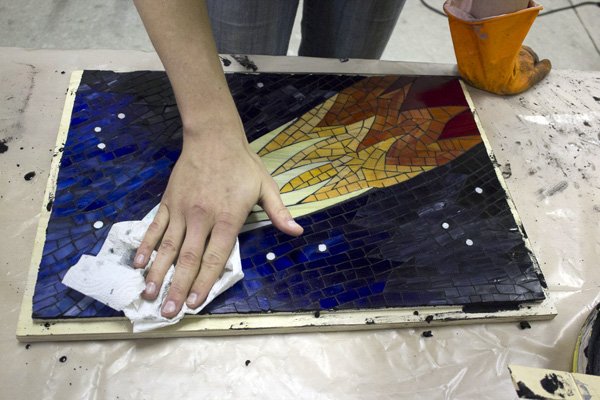
Step 5: Clean with Grout Sponge
For smaller projects you can sometimes omit this step and just use rags and paper towel to wipe off the excess grout, but for anything approaching 1 square foot in area or larger you want to do it with a sponge as demonstrated here.
Wipe a straight line in one direction.
Rinse the sponge when it’s covered in grout.
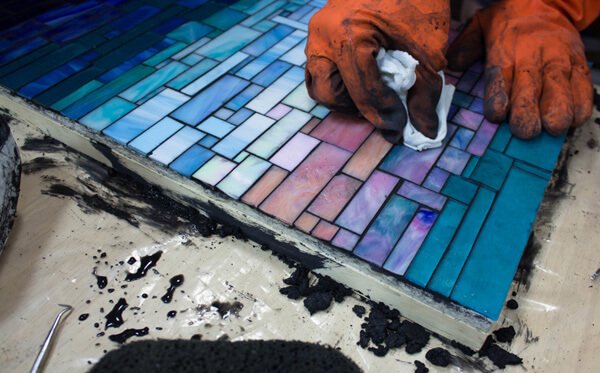
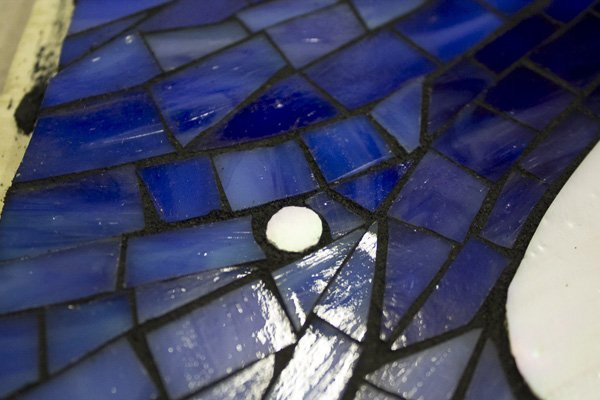
Step 6: Clean the Haze
The sponge will have cleared the bulk of the extra grout off, but there will probably be a thin grout haze left over. It’s okay to let the haze dry for a few minutes to make it more visible and easier to clean before you try to wipe it off. To clean it use a dry rag or paper towel. You should be able to clean an area of 1 square foot with only 1 or 2 paper towels.
A thin haze is still on the mosaic.
Polish the haze off using a paper towel or rag.
Step 7: Final Touchups
Look around for areas where grout is built up on any tiles. This usually happens where tiles are of different thicknesses. This can be done with a rag or paper towel wrapped around your finger. Make sure the grout is roughly flush with, or slightly lower than the tiles around it.
Grout is built up around this tile.
The same spot wiped clean.
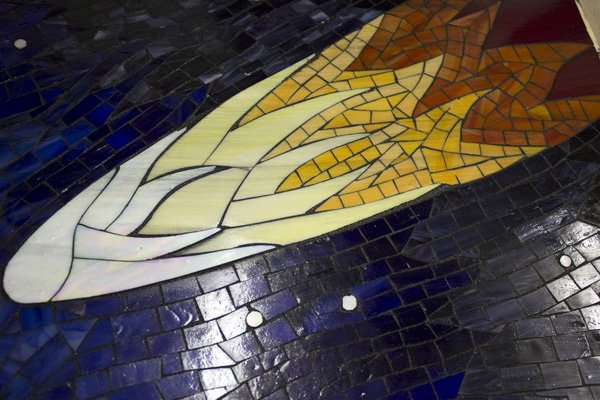
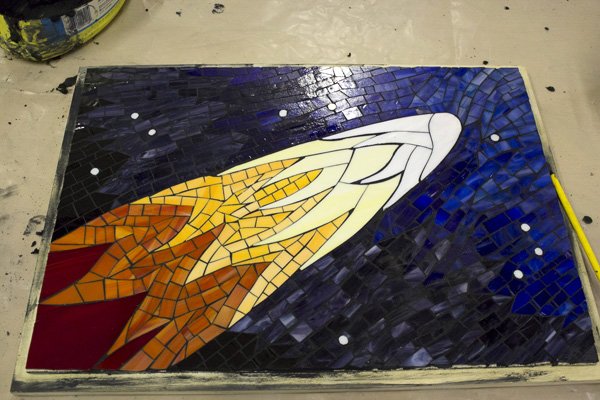
All done!
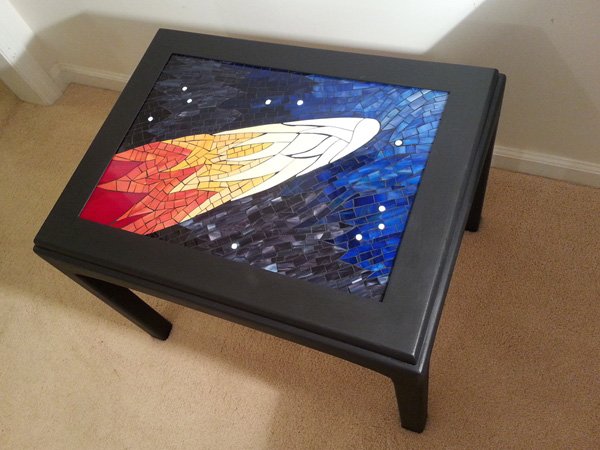
Once it’s cleaned off you’re finished with the grout. Allow a few days to cure fully, but usually it should be pretty solid after a few hours. The time for full curing can depend on the heat and humidity where you did the grouting. Some pieces of dust or sand may slowly fall off the mosaic over the next few days, don’t be alarmed if that happens.
The comet is finished and is ready to be installed in its table.
Stars are illuminated by LEDs.
Selecting a Grout Color
I always choose a grout color which contrast the colors of the mosaic tiles so that the design is highlighted. Otherwise the individual tiles run together and are lost to the eye, and the mosaic looks more like an ordinary picture and less like a mosaic made from pieces. I avoid situations like gray grout with gray tile. A nice red-brown terra cotta grout works better in that instance. The key concept is color contrast instead of matching colors.
Color is best provided by the tile, not the grout. In terms of a visual element, the grout is supposed to act like a thin gray pencil line whose only purpose is to make each tile distinct. I don’t think I’ve ever seen a mosaic that used colored grout that wouldn’t have looked better if all tile had been used instead. For example, let’s say you wanted red tile in pink grout. A better way to get the same color effect would be to mix in a few pink tiles randomly throughout the red tiles, or maybe use a few lines of pink tiles. Often this means you have to cut your tile just a little bit smaller. That being said, it is possible to dye grout.
Dyeing Grout
There are mineral concrete dyes sold at building material stores, and these can be used, although the range of colors is limited to black, brown, gray, terracotta, etc. Vegetable dyes such as food colors will not work. You can use artists acrylic paint to color grout by mixing it in the wet grout. I recommend experimenting with tiny batches of grout and letting it harden before grouting a mosaic you have worked many hours on.
The Best Grout Color
Sometimes it is hard to decide which color grout to use because your mosaic already contains so many colors. The best color grout to use for most mosaics is black. Here’s why: The purpose of grout in visual terms is to make each tile distinct in the same way a pencil line in a watercolor is used to provide definition but not color. Black provides just enough contrast to most colors, unless you have black tile, and then you might want to consider something else.
Avoid pure white unless you are trying to make something that looks like a little kid’s summer camp project. Most building material stores such as Lowes and Home Depot cary about 30+ colors of grout. We carry the most commonly needed colors. Bring a few of each color of your tiles with you, and you can pick the color grout that works best with all the tile.
Grouting Stone Tile and Unglazed Ceramic
You should always seal unpolished stone and unglazed ceramic tiles with a tile and grout sealer BEFORE you grout. This is necessary for all porous materials that can be stained by grout. You should seal using a Stone Enhancer instead of tile and grout sealer if you want to darken and enhance the natural color of the stone. Both of these products are available at local building material stores. For a stone mosaic that is already stained, you might want to try some of the muratic acid that contractors use to clean cement from bricks.
Cracking and Crumbling Grout
You shouldn’t let the grout dry out as it cures. Cover with plastic if necessary. Lightly mist with a spray bottle, but don’t let drops accumulate on the surface of the grout. It also helps if you mix the grout according to instructions. It should be like a thick moist dough when you start with no dry material or lumps, and it should stick to your mixing wand, not drip, slide or crumble off.
Sanded Grout vs. Unsanded Grout
Don’t use unsanded grout. Unsanded grout is only used to fill hairline cracks. (Or it is mixed with sand for normal use.) If you use unsanded grout, then you can expect cracks in your grout and grout that isn’t quite as hard and durable.
Note: some tutorials incorrectly advise against using sanded grout because it might scratch the tile during grouting. Very few high quality mosaic materials will be soft enough to be damaged in this way, and you shouldn’t be using such easily scratched materials in any functional setting (bathrooms, counters, table tops et cetera…). Some ‘craft’ materials may have softer glazes which could be scratched by sand, but if you grout carefully the issue is easily avoided. There is no need to use a lot of force when grouting. If you have doubts about the durability of your materials, make a small test piece first.
If you decide to use unsanded grout, be sure to understand exactly why you are using it instead of the the stronger alternative.
Disposal of Grout Waste
Never pour grout down your drains. Grout is concrete, and that isn’t good for your plumbing. It will clog the pipes. I make a point of pouring as much of my grout sludge in an old cardboard box and allowing it to harden for disposal as solid waste. I always just dilute the dirty grout water and pour it in on my compost heap. The grout is a limestone product, so it actually helps balance the pH when there is excess decaying organic matter. Of course, this only applies to traditional grouts. I am not familiar with the synthetic epoxy grouts that some craft sites are selling. For easy cleanup, I always do my grouting in the backyard instead of indoors.
Grout and Glass Mosaic Tiles: How To Avoid Disasters
Many beginners report spending hours or days gluing down tiles only to report that they all start coming off when the apply grout. Others report grout that crumbles or never being able to get all the concrete off the tiles. Here’s how to avoid ruining your mosaic:
Always test your adhesive on one or two glass mosaic tiles before you spend days creating a masterpiece. You may occasionally find that the glue doesn’t bond well to the glass or the surface underneath. Simply allow the test tile to cure overnight and try prying it off in the morning. (Wear safety glasses as the tile may splinter.)
Seal porous tile such as tumbled stone and unglazed ceramic tile BEFORE you grout. This prevents the grout from staining the porous surfaces. This step isn’t necessary with glass mosaic tile because smooth glass is nonporous.
Allow the glue to cure for at least 24 hours before you grout.
Use sanded grout if the gaps between tiles are greater than 1/8″ Grout is concrete, and it needs reinforcing the same way that concrete in roads is reinforced with gravel and iron bar. This keeps the grout from crumbling.
Make sure that the surfaces of your mosaic tile are relatively level. This usually isn’t a problem with glass mosaic tile because most varieties are relatively flat. However, artistic mosaics on surfaces that aren’t flat (such as a mosaic vase) tend to have corners of tile that stick out. Be gentle with these when you apply the wet grout so that you don’t knock off any tiles. Keep in mind that wet grout may loosen water-based adhesives. Use a water-proof solvent-based adhesive if necessary. Cutting the tile into smaller pieces may also help on rounded surfaces.
Mix the grout according to manufacturer instructions. Mix thoroughly. Don’t add too much water. The consistency should be a firm dough.
Don’t let the grout dry out as it cures. Grout is like any other concrete. It hardens by hydration, not dehydration. After an hour, mist LIGHTLY with a spray bottle if needed. Don’t spray or drip.
Grout is applied by rubbing the grout into the gaps with a spatula, trowel or rubber glove. Press the grout in thoroughly and wipe away the excess. Then make repeated passes with a damp sponge (not dripping wet). Rinse sponge and repeat as needed. This step requires more passes and more care if the surface is uneven or the gaps between the tiles are too large.
Don’t erode the wet grout from the gaps between tiles. This exposes sharp edges and looks bad.
The day after you grout, you may notice a residue or haze on the surface of the glass mosaic tile. Simply buff this haze away with a clean dry cloth. The last step in grouting is appropriately called “hazing.”
Mosaic Vases
Vases, votives and lamps are popular mosaic projects because they don’t require any extra work to figure out how they will be displayed or hung on the wall. However, they do require a LITTLE extra work because they are usually glass and usually rounded.
Here are some tips for grouting mosaic vases made from glass mosaic tile:
If necessary, scuff the vase with sand paper to ensure that the glue bonds securely.
Glue can be runny, and tiles can slide off. Simply lean the vase on the side and glue one side at time.
Cut the tile small enough so that the flat tile can fit to the rounded vase.
Make sure the glue cures for 48 hours or more before grouting.
The Grouting Bag is made from latex-rubber-coated reinforced canvas and is puncture and tear resistant for durable use with concrete products such as grouts and mortars. The bag is large, about 22 inches long, so it can hold 5 to 8 pounds of grout easily, depending on your preference. (We prefer to use less and keep the top of the bag cleaner where you twist it closed.) The purpose of the bag is for applying grout in areas where you have to work a little neater or in places that are harder to reach, such as the tops of walls near the ceiling. Ask any installer, and they will tell you: squeezing a controlled amount from a bag is neater than lifting wet grout on a trowel, especially when working over head, unless you don’t mind clumps of concrete falling in your hair!
Grouting Bag
material: reinforced canvas coated with latex rubber
length: approximately 22 inches
capacity: approximately 8 pounds
closure: twisted by hand, using clips or clamps recommended
nozzle: simple opening in the end of the bag
How to Use the Grouting Bag
A grouting bag works just like an icing bag that is used for icing cakes. The only difference is that it is larger and doesn’t come with different nipple attachments. The end of the bag is twisted to close it up and squeeze it, and we have found that a plastic carpenters clamp is useful for keeping the bag twisted closed when you sit it down. (If it twists open, it can get a little messy when you twist it closed again.)
Use for Detailed Mosaic Art
The normal use of the Grouting Bag is for getting grout neatly into architectural crevices and corners that are too confined for trowel work. We use the Grouting Bag for much more detailed work than that. Specifically, we use the bag for cementing irregularly-shaped artifacts in found-object mosaic using thinset mortar. To use the bag for this purpose, we attach a small diameter nozzle from a Wilton brand cake icing kit, which allows us to apply smaller amounts of mortar in a more controlled way.
To get the nozzle tip of a cake icing kit to stay on the grouting bag, we have to improvise a little bit: We trim some of the tip of the bag off so that the nozzle can fit through the opening. Then we put rubber bands around the plastic collar holding the nozzle to help it stay on. The finished assembly looks home made, but we have found it to be highly effective for dispensing controlled amounts of thinset mortar on tiny objects without contaminating them. Note that rags are still required for cleaning up occasional mistakes, and a set of palette knives is also useful for manipulating and spreading material.
Tip: the icing nozzle has a small diameter and tends to get clogged occasionally, so keep a nail or piece of wire to clean it out. We have also written some instructions for how to use thinset mortar for detailed mosaic artwork.
Loading Without Contaminating
The most important tip we can give in using the bag is to keep the top of the inside clean where you will need to twist it closed. How do you do that and still get the sticky grout or thinset inside? Pull the top of the bag down so that it is inside out, but don’t pull the bag all the way inside out. Then sit the bag tip down in something that can hold it upright as you scoop grout or thinset into it. We sit our bags in plastic quart-sized yogurt tubs and coffee cans and other recycled containers, and then we fill them and then fold up the top of the bag so that it is no longer inside out. Then we twist the top of the bag closed and clamp it and get to work.
Safety
Always wear safety glasses with side shields when mixing and applying grout. Grout is mildly caustic and contains little pieces of sand. Grouting is a physical process with lots of mixing and rubbing and wiping, and these motions cause pieces of sand and grit to fly unexpectedly.
How To Make Mosaics
For more advice on designing your mosaic project or mounting, cutting, and grouting tile, please see our page of Mosaic Frequently Asked Questions or our Mosaic Information Guide, which lists instructional pages described by topic. We also post new articles about making mosaics at our How to Mosaic Blog.
Grout Removal Tool has durable carbide tips for scraping grout and thinset from between mosaic tile. It is great for removing the wrong color grout or old grout that is stained by age.
When to Use This Tool
Fine Art Mosaic
One of the worst experiences you can have is a mosaic artist is to spend days or weeks mounting tile by hand to produce a mosaic that looks great only to ruin it by applying the wrong color grout. THIS HAPPENS OFTEN, at least with artists new to mosaic, and most are surprised and horrified at how quickly they ruined something beautiful that took them an significant amount of time to make. The good news is the mosaic is not ruined. The grout removal tool can efficiently scrape out the grout so that a new color can be applied.
Bathroom Tiling and Kitchen Backsplashes
While it is true that there are people who genuinely dislike the color of their bathroom tile and want to replace it with something else, a significant percentage of people who say this would actually find the current color acceptable if only the old stained grout were replaced with new clean grout. Unless tile is chipped or broken or scratched, some very old tile can look remarkably new if regrouted. The Grout Removal Tool provides a very affordable way of making bathroom tub and shower stalls look new without the work and expense of tearing down old tile.
Crumbly Grout
Many people do not realize the grout and concrete harden by BINDING water not by drying out. If you let grout or concrete dry out while it is curing, then it will be soft and crumbly. This also happens if you did not add enough water to the grout when you mixed it up. The Grout Removal Tool can be used to quickly scrape the old grout out and start over.
How To Make Mosaics
For more advice on designing your mosaic project or mounting, cutting, and grouting tile, please see our page of Mosaic Frequently Asked Questions or our Mosaic Information Guide, which lists instructional pages described by topic. We also post new articles about making mosaics at our How to Mosaic Blog.
Extra Large Grouting Sponge is foam rubber for high water holding capacity and efficient grouting and clean up. We also make use of recycled/reused rags in our studio when grouting, but a sponge is essential for this process because it is more easily and quickly rinsed clean; it doesn’t hold sand as much as woven fibers, and it softer and less likely to erode grout from the gaps between tile.
Grouting Sponge Extra Large
foam rubber
width: ~5.5 inches
length: ~7.5 inches
thickness: ~2 inches
Grouting Tips
Grouting outdoors is best, especially some place you can run a water hose and don’t mind a little sand and residue being rinsed. Excess grout can kill grass or plants, so scoop up what you can and wash away what is left.
Grout and concrete harden by BINDING water not by drying out. If you let grout or concrete dry out while it is curing, then it will be soft and crumbly. This also happens if you did not add enough water to the grout when you mixed it up. Cover your mosaic with plastic if you are grouting in strong heat, sunlight, air conditioning, wind, or any other condition that accelerates drying.
Make sure you rinse all the water out of your sponge so that it is moist but not leaving drips of water when you rub it on the mosaic. You do not want to get drips of water in the grout in the gaps when you are rubbing the residue off the faces of the tile.
Do not pour left over grout or grout sludge down plumbing or drains. Grout is concrete and can harden under water. Even sand can clog drains. Instead, pour your grout and grout water into an old plastic container. After it hardens, you can pour off the water and dispose what is left as solid waste.
We use traditional grouts and NOT the new epoxy-grouts, and all our advice is written for traditional grout. If you use the new epoxy-base products, then make sure you read manufacturer recommendations for safety and disposal.
Safety
Always wear safety glasses with side shields when mixing and applying grout. Grouting is a physical process with lots of mixing and rubbing and wiping, and these motions cause pieces of sand and grit to fly unexpectedly.
Grout is mildly caustic and can irritate skin, sometimes severely if you have sensitive skin. The sand and rubbing required in grouting aggravate the problem. Wear heavy-duty rubber gloves while grouting to protect your skin.
Grout contains powdered silica (sand) and is slightly caustic due to the lime it contains. Avoid breathing the dust. Wear an ordinary dust mask rated N95 when mixing or use a misting water bottle to avoid creating dust.
How To Make Mosaics
For more advice on designing your mosaic project or mounting, cutting, and grouting tile, please see our page of Mosaic Frequently Asked Questions or our Mosaic Information Guide, which lists instructional pages described by topic. We also post new articles about making mosaics at our How to Mosaic Blog.
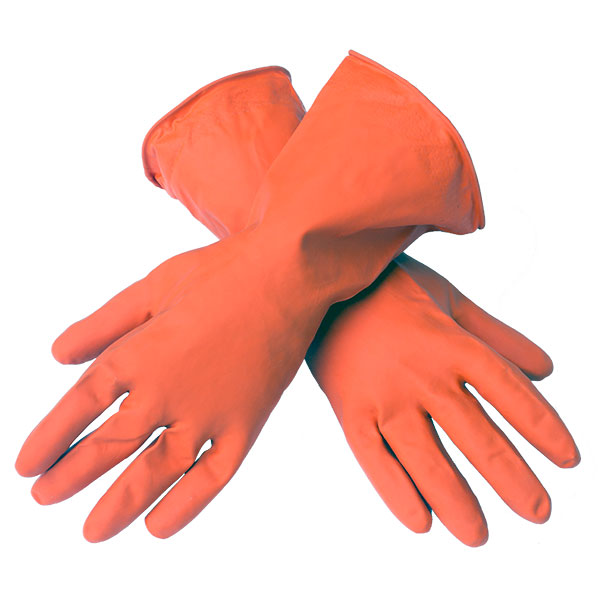
Grouting Gloves are heavy-duty latex, and they are puncture resistant and tear resistant (compared to other rubber gloves such as dish-washing gloves). Note that these are not work gloves that should be worn for cutting tile. For cutting and smoothing tile, we wear leather work gloves or vinyl work gloves.
When To Use This Tool
The latex grouting gloves are worn during grouting to protect the skin from abrasive sand and grout, which is mildly caustic. We often use our gloved hands to press the grout between the tiles, but we are careful to rub parallel to the surface of the mosaic and keep our fingertips from pressing between the tiles where the sharp edges are. We also avoid rubbing against the outer edge of the mosaic, which sometimes has sharp edges. Grouting is easier if your outer edges have been smoothed with a marble file and you use a uniform small grout gap of about 1/16 inch or smaller. Wider grout gaps can allow fingertips to press between the tiles.
Product Specifications
heavy duty latex
1 pair
fits large hands, not made for dexterity or detailed work
Grouting Tips
Grouting outdoors is best, especially some place you can run a water hose and don’t mind a little sand and residue being rinsed. Excess grout can kill grass or plants, so scoop up what you can and wash away what is left.
Grout and concrete harden by BINDING water not by drying out. If you let grout or concrete dry out while it is curing, then it will be soft and crumbly. This also happens if you did not add enough water to the grout when you mixed it up. Cover your mosaic with plastic if you are grouting in strong heat, sunlight, air conditioning, wind, or any other condition that accelerates drying.
Make sure you rinse all the water out of your sponge so that it is moist but not leaving drips of water when you rub it on the mosaic. You do not want to get drips of water in the grout in the gaps when you are rubbing the residue off the faces of the tile.
Do not pour left over grout or grout sludge down plumbing or drains. Grout is concrete and can harden under water. Even sand can clog drains. Instead, pour your grout and grout water into an old plastic container. After it hardens, you can pour off the water and dispose what is left as solid waste.
We use traditional grouts and NOT the new epoxy-grouts, and all our advice is written for traditional grout. If you use the new epoxy-base products, then make sure you read manufacturer recommendations for safety and disposal.
Safety
Always wear safety glasses with side shields when mixing and applying grout. Grouting is a physical process with lots of mixing and rubbing and wiping, and these motions cause pieces of sand and grit to fly unexpectedly.
Grout is mildly caustic and can irritate skin, sometimes severely if you have sensitive skin. The sand and rubbing required in grouting aggravate the problem. Wear rubber gloves while grouting to protect your skin.
Grout contains powdered silica (sand) and is slightly caustic due to the lime it contains. Avoid breathing the dust. Use a dust mask when mixing or use a misting water bottle to avoid creating dust.
How To Make Mosaics
For more advice on designing your mosaic project or mounting, cutting, and grouting tile, please see our page of Mosaic Frequently Asked Questions or our Mosaic Information Guide, which lists instructional pages described by topic. We also post new articles about making mosaics at our How to Mosaic Blog.
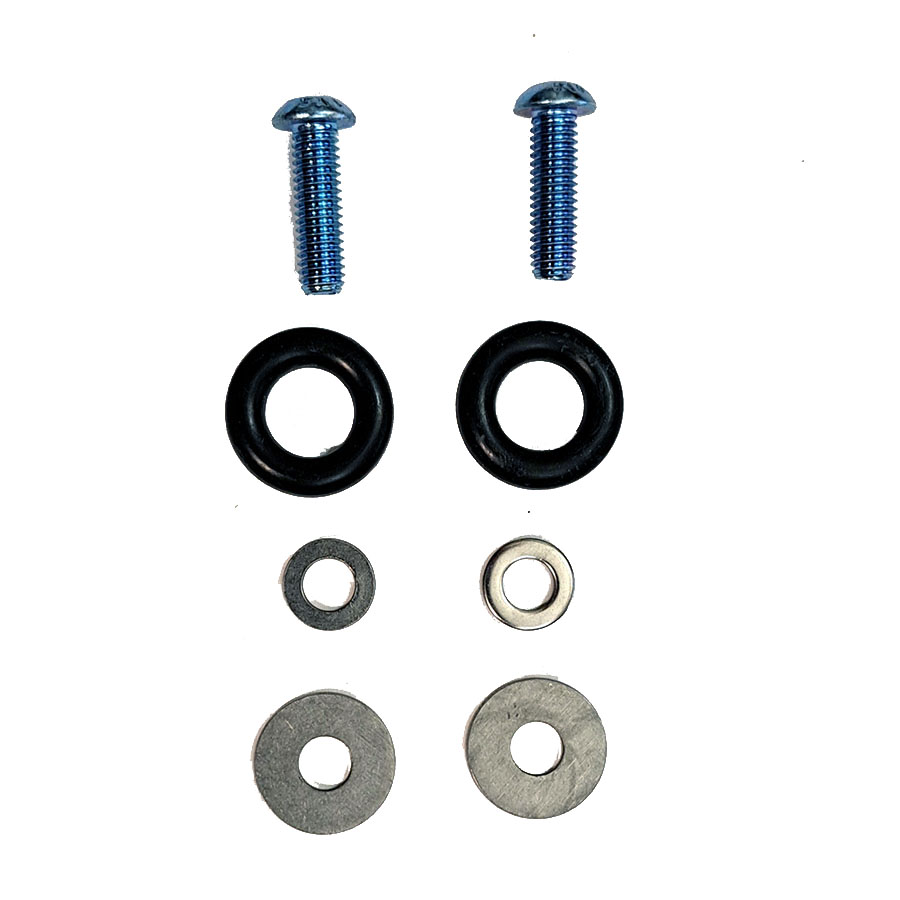
Catch-Ring Upgrade Kit for ProControl Mosaic Glass Cutter Model 32014 does NOT fit our regular Mosaic Glass Cutter. The kit allows the user to install rubber catch rings under the blades of our ProControl Mosaic Glass Cutter. The catch rings hold the cutting during and after the cut. This upgrade is not required but is preferred by many users. The traditional method of catching cuttings was to hold the cutting tool in a basin or with the user’s free hand caged around the cut.
Product Specifications for Catch-Ring Upgrade Kit for PROCONTROL Cutter
The Catch-Ring Upgrade Kit contains 2 pieces of each part, sufficient for installing catch rings on 1 PROCONTROL Cutter.
2x Oil-Resistant Buna-N O-Ring, 5 mm Wide, 11 mm ID
2x 18-8 Stainless Steel Oversized Washer for M6 Screw, 18 mm OD
2x 18-8 Stainless Steel Washer for M6 Screw Size, 6.4 mm ID, 12 mm OD
2x Alloy Steel Button Head Hex Drive Screws, Blue-Dyed Zinc-Plated, M6 x 1 mm Thread, 20 mm Long
Note that the kit does NOT include replacement blades.
Make sure that you don’t cut glass around people who are not wearing safety glasses. Flying chips could potentially hit their eyes as easily as yours.
Never use a mosaic glass cutter to cut materials other than glass, especially hard porcelain. The wheel-shaped blades can shatter. Cutting materials other than glass also ruins the precision of the cutters!
Be aware that cutting glass tile can produce sharp tiny slivers. Never sweep off a work surface with your bare hand. Use a vacuum or counter brush.
How To Make Mosaics
For more advice on designing your mosaic project or mounting, cutting, and grouting tile, please see our page of Mosaic Frequently Asked Questions or our Mosaic Information Guide, which lists instructional pages described by topic. We also post new articles about making mosaics at our How to Mosaic Blog.
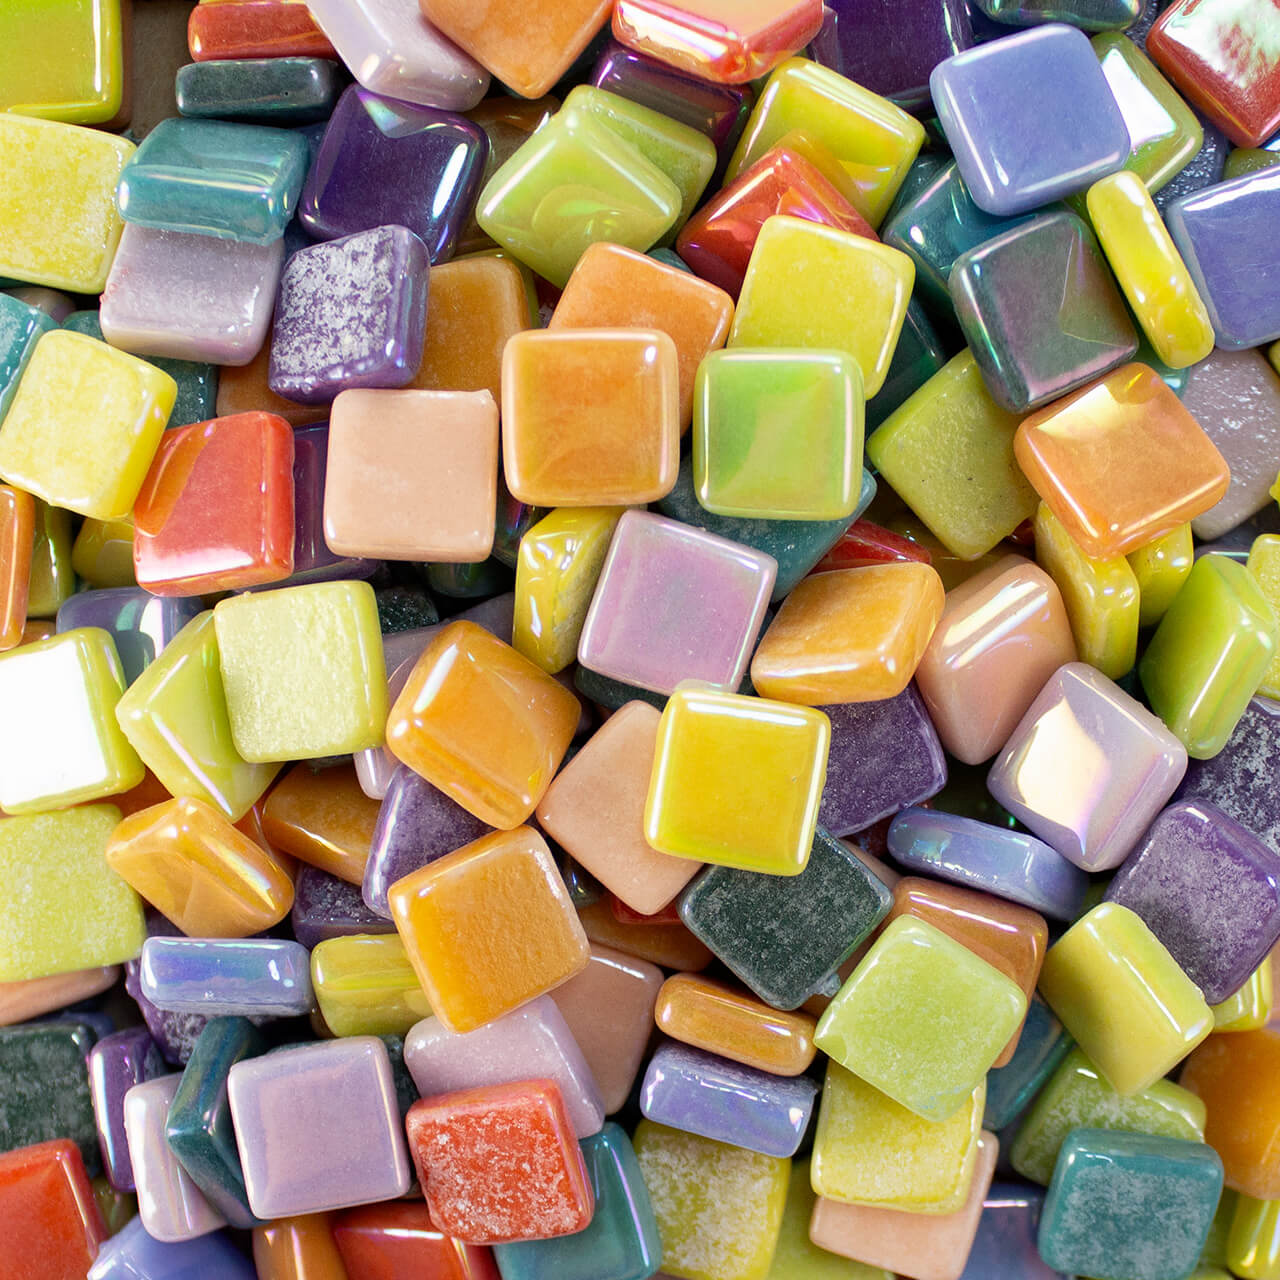
SOUR CANDY Iridescent Tile Assortment is a limited mix of bright and tangy colors of our Morjo™ 12mm Iridescent Recycled Glass Mosaic Tile. This 1-lb assortment will include about 320+ loose glass mosaic tiles in bright colors for vibrant mosaic details, outdoor decor, backsplash designs, and ornaments.
12mm Morjo™ Recycled Glass Mosaic Tile
These wonderful tiles cut cleanly into tiny pieces with minimal waste and have an iridescent finish with solid opaque color throughout. Durable and UV-resistant, they make fantastic material for commercial building exteriors and other architectural applications. This recycled tile product is manufactured by fusing powdered recycled glass in a process known as “warm glass,” “enamel glass,” or “pate de verre.”
thickness: 1/8 nominal (4mm), but runs slightly thicker than most other brands nominally 4mm. Can be used in the same mosaics.
sales unit: 1 pound, which is approximately 320+ LOOSE pieces.
material: glass
variety: recycled glass
pigments: colorfast, UV resistant
finish: iridized
durability: frost-proof, impervious to liquid
usage: suitable for indoor and outdoor use
Coverage
One pound (~320 tiles) covers 91 square inches or 0.6 square feet assuming a standard grout gap of 1/16 inch. You need about 508 tiles (1.6 pounds) to cover one square foot assuming a standard grout gap of 1/16 inch. You need about 645 tiles (2 pounds) for a square foot assuming no grout gap. Use our tile estimator to calculate how much you need for your grouted project. Use a mounting grid to plan and design.
Compatibility
With a NOMINAL industry-standard thickness of 1/8 inch (4mm), 12mm Morjo™ glass tile combines well with most mosaic tile.
Cutting Morjo 12mm Glass Mosaic Tile
Morjo™ Recycled Glass Mosaic Tile cuts easily with clean edges using a pair of Mosaic Glass Cutters.
Use in Mosaic Art
The size and quality of 12mm Morjo™ glass tile renders small detailed images and large scale works with equal versatility.
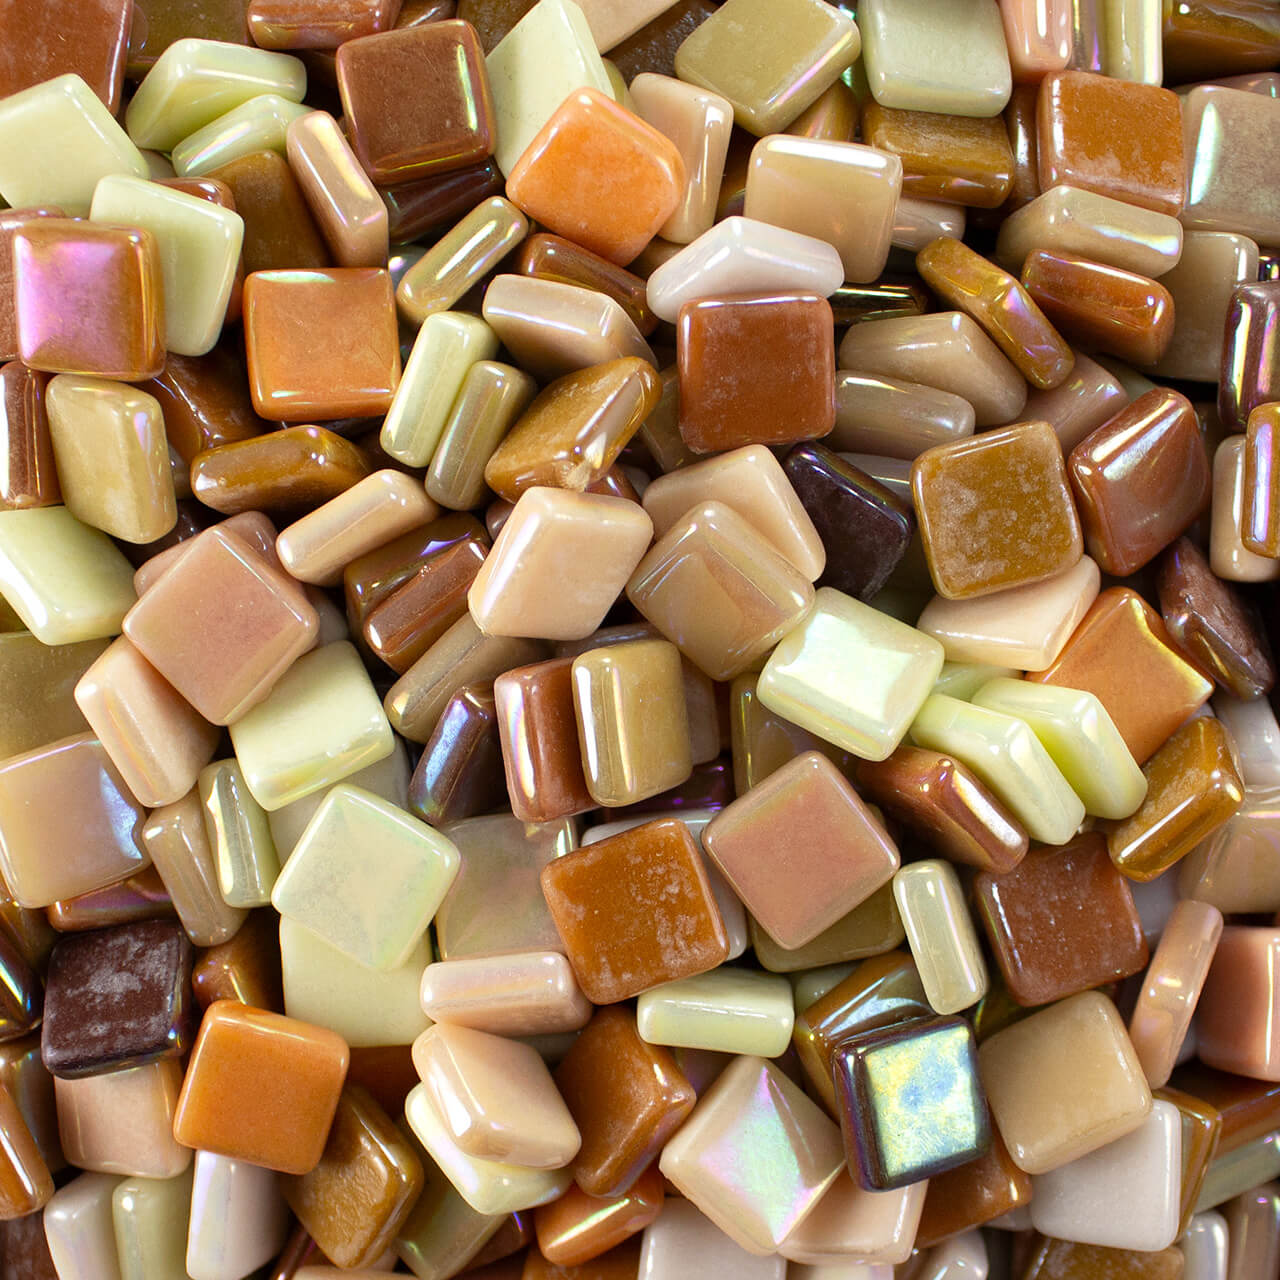
CINNAMON TOAST Iridescent Mosaic Tile Assortment is a limited mix of brown and cream Morjo™ 12mm Iridescent Recycled Glass Mosaic Tile. This 1-lb assortment will include about 320+ loose tiles in brown and beige syrupy french toast colors for mosaic details, outdoor decor, backsplash designs, and ornaments.
thickness: 1/8 nominal (4mm), but runs slightly thicker than most other brands nominally 4mm. Can be used in the same mosaics.
sales unit: 1 pound, which is approximately 320+ LOOSE pieces.
material: glass
variety: recycled glass
pigments: colorfast, UV resistant
finish: iridized
durability: frost-proof, impervious to liquid
usage: suitable for indoor and outdoor use
Coverage
One pound (~320 tiles) covers 91 square inches or 0.6 square feet assuming a standard grout gap of 1/16 inch. You need about 508 tiles (1.6 pounds) to cover one square foot assuming a standard grout gap of 1/16 inch. You need about 645 tiles (2 pounds) for a square foot assuming no grout gap. Use our tile estimator to calculate how much you need for your grouted project. Use a mounting grid to plan and design.
Compatibility
With a NOMINAL industry-standard thickness of 1/8 inch (4mm), 12mm Morjo™ glass tile combines well with most mosaic tile.
Cutting Morjo 12mm Glass Mosaic Tile
Morjo™ Recycled Glass Mosaic Tile cuts easily with clean edges using a pair of Mosaic Glass Cutters.
Use in Mosaic Art
The size and quality of 12mm Morjo™ glass tile renders small detailed images and large scale works with equal versatility.