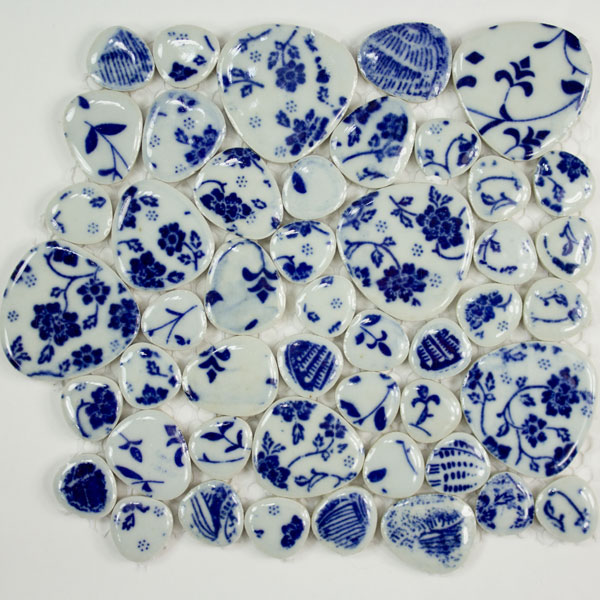
Blue and White Floral China Pebbles Porcelain Tiles are glazed ovals sold on sheets of fiberglass mesh, which can be pulled off or cut apart with scissors. These are made in a porcelain factory to look like tiles broken from china plates and rounded by tumbling. They have rounded edges and corners, as if they were rounded by tumbling on a beach, although the finish is shiny gloss not tumbled. The backs of the tiles are unglazed and have grooves to help adhesives and mortars bond more securely. There are three sizes of tiles that come mixed randomly in the sheet: 5/8-inch, 1-inch, and 1.5-inch. NOT ALL SHEETS CONTAIN THE 1.5-INCH SIZE. Most ovals are the 5/8 and 1-inch sizes.
Blue and White Floral China Pebbles Porcelain Tiles
tile size: 5/8-inch, 1-inch, and 1.5-inch mixed RANDOMLY
tile count: varies due to random size distribution
sheet size: roughly 1/4 square foot
thickness: 3/16 inch nominal
sales unit: mesh sheet roughly 1/4 sq ft, not perfectly square due to the shape of the tiles.
material: porcelain
variety: glazed
pigments: colorfast, UV resistant
durability: frost-proof, impervious to liquid
usage: suitable for indoor and outdoor use
Coverage
Roughly 1/4 square foot.
WARNING
Both His Holiness the Pope and His Holiness the Dalai Lama have issued edicts stating that these sheets are not perfectly square and vary sheet to sheet in shape and in piece count and that people who complain about this because they did not read the product description or look at the bleeding pictures should be ashamed of themselves.
Compatibility
These are slightly thicker than the glass tile we sell, but that isn’t a problem if you are wanting your mosaic to have texture with tiles and regions that are a little higher than others. (Raised elements might be problematic on a table top or floor, but for other mosaics, texture and dimension are an easy way to add visual interest to your work.)
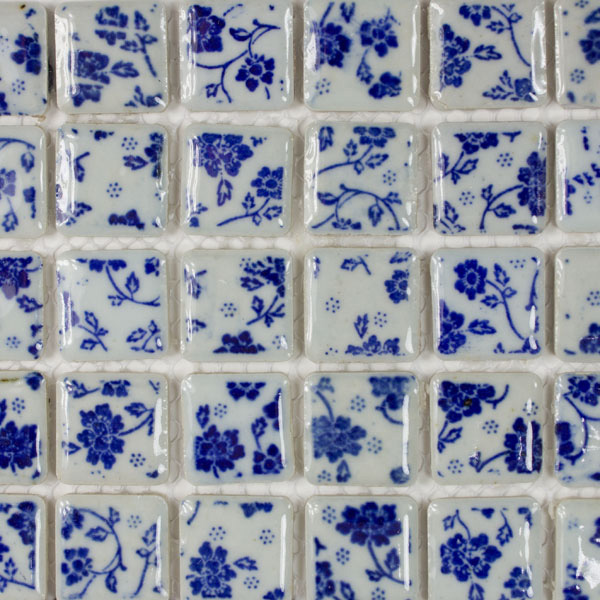
Blue and White Floral China Tiles 1-Inch 30 Pieces are glazed porcelain sold on sheets of fiberglass mesh, which can be pulled off or cut apart with scissors. These are made in a porcelain factory to look like tiles cut from china plates. The faces are not perfectly flat but bulged out with rounded edges and corners, and this makes the tiles look as if they were rounded by tumbling on a beach, although the finish is shiny gloss not tumbled. The backs of the tiles are unglazed and have grooves to help adhesives and mortars bond more securely.
Blue and White Floral China Tiles 1-Inch 30 Pieces
tile size: 1 inch (25mm)
sheet size: 6.375 inch x 5.375 inch
thickness: 3/16 inch nominal
sales unit: one mesh sheet of 30 tiles
material: porcelain
variety: glazed
pigments: colorfast, UV resistant
durability: frost-proof, impervious to liquid
usage: suitable for indoor and outdoor use
Coverage
One sheet of 30 pieces will cover 0.23 square feet assuming a standard grout gap of approximately 1/8 inch. To cover 1 square foot, you would need 4 sheets plus 1 tile, which would give you 121 tiles arranged 11 pieces x 11 pieces. We sell these for use as accents instead of area coverage.
Compatibility
These are slightly thicker than the glass tile we sell, but that isn’t a problem if you are wanting your mosaic to have texture with tiles and regions that are a little higher than others. (Raised elements might be problematic on a table top or floor, but for other mosaics, texture and dimension are an easy way to add visual interest to your work.)
These 1-inch tiles can be used to make borders around mosaic pictures or used randomly with other materials in mixed-media mosaics or in pique assiette work with pieces cut from plates and dinnerware. Used in sheets for area coverage, these could make a great kitchen backsplash.
Mosaic wall art often takes the form of rectangular “plaques” which, visually, serve the same function as rectangular paintings on canvas. Paintings often look best when they have been framed properly; this can also be true for mosaics.
Paintings are usually framed with some kind of stained wood. This can be done for mosaic art as well, but this tutorial will show how to use another attractive option: angle aluminum. Aluminum might sound daunting at first, but with some common hand-tools a clean and sharp frame can be made for your mosaic. Aluminum is also nice because it doesn’t rust and the metallic shine nicely compliments glass.
Part I: Framing a mosaic that has not been grouted yet
Step 1: Preparation
Installing an aluminum frame is easiest when the mosaic has not yet been grouted. However, it is possible to put a frame onto an existing already-grouted mosaic using similar techniques. This tutorial will first demonstrate how to frame an un-grouted mosaic.
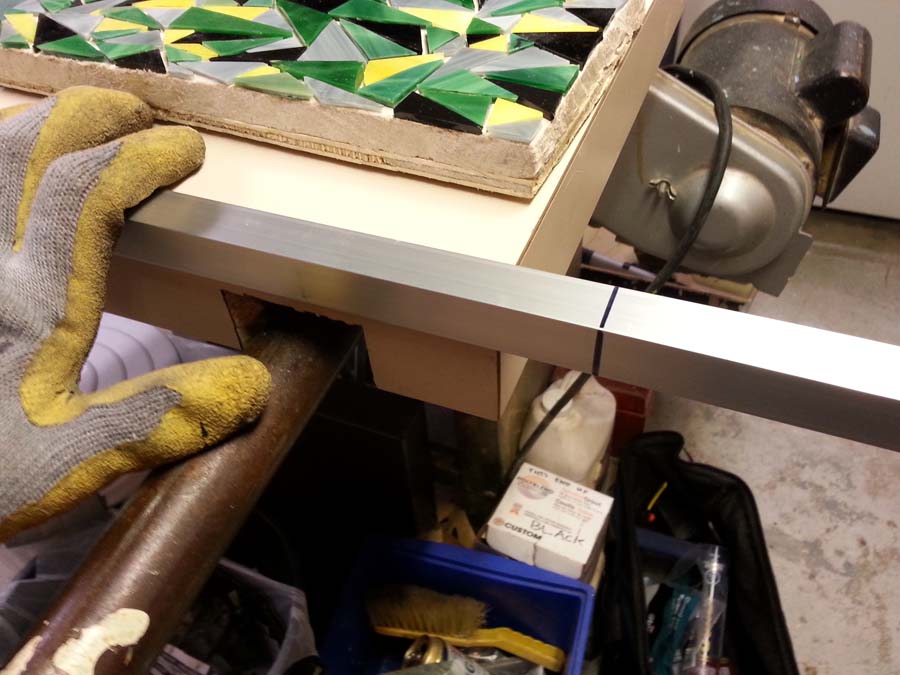
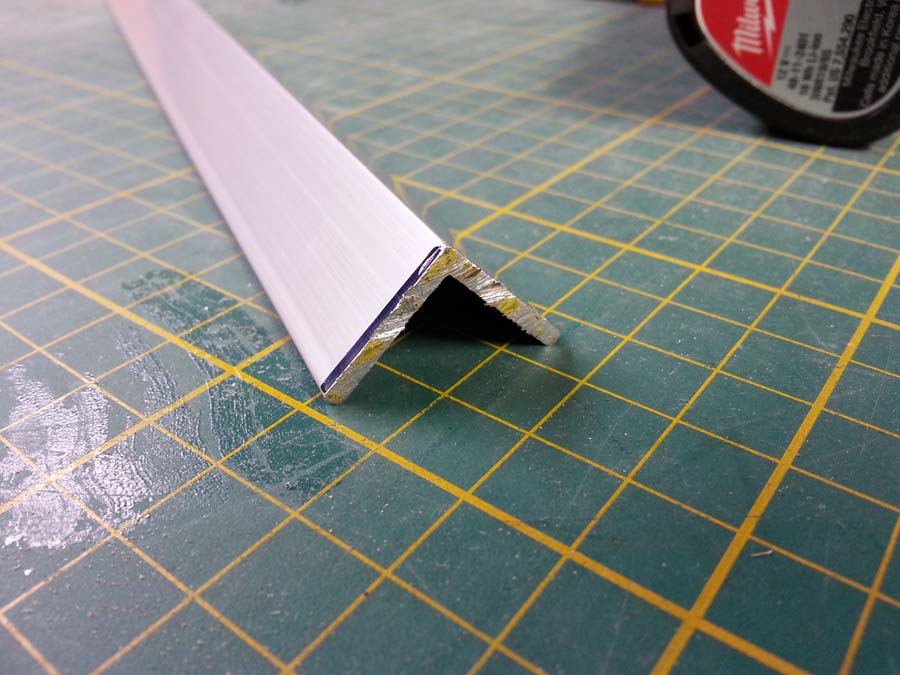
Angle aluminum is readily available in three sizes: 1/2 inch, 3/4 inch, and 1 inch. In my experience the 1/2 inch variety would be unsuitable for most of my artwork because it would be hard to get a screw into the side of it, and it wouldn’t provide a nice lip beyond the surface of the mosaic tile. 3/4 inch angle aluminum is big enough for most projects. Because of its size and weight, 1 inch angle aluminum is only suitable for mosaics whose base is at least 1/2 an inch thick, and should not be used for smaller projects.
The first mosaic is an abstract pattern made of stained glass triangles glued with Weldbond onto a composite backer made of half-inch thick concrete backer board (CBB) and quarter-inch thick plywood. The total thickness of the backer is therefore 3/4 of an inch which is suitable for a 3/4 inch angle aluminum frame. The frame will need to sit a little higher than the glass, so the frame will rest solely on the CBB. The second mosaic is larger and will use a slightly different construction with 1 inch angle aluminum. We have a discussion about how to use concrete backer board as a mosaic surface on our page about ideal mosaic surfaces. Angle aluminum can be purchased in 8 foot lengths at your local big box hardware store. Don’t buy the cheap stuff, get one of the thicker materials seen in this tutorial. The dimensions can be seen more easily in this picture. Notice that each of the “arms” of the “L” are 1/16 inch thick.
The glue needs to be dried before you begin. If you used Weldbond you can perform most of the framing operations as early as three hours after gluing the last tile, but you should still wait 24 hours before grouting. This allows the glue to cure and develop water resistance so that it won’t be weakened by the wet grout.
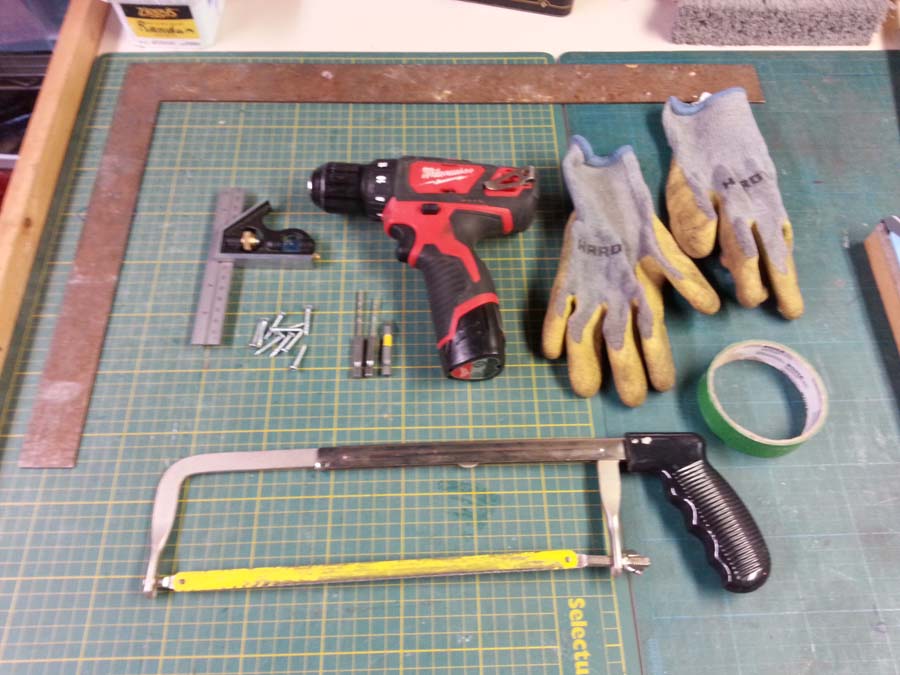
Most of the tools used in this tutorial should already be available to you. You’ll want gloves, a hacksaw, a drill, a square, a ruler or measuring tape, screws, a metal file, and a marker. Safety glasses should also be worn while drilling. If you have a chopsaw in your garage or work room then you can use that instead of the hacksaw as long as you have a blade suitable for cutting metal. Aluminum is soft as far as metals go, so doing it by hand isn’t that difficult. You should wear gloves to protect your hands from the saw and from the metal file. A small slip with a file can actually take off quite a bit of skin so be careful.
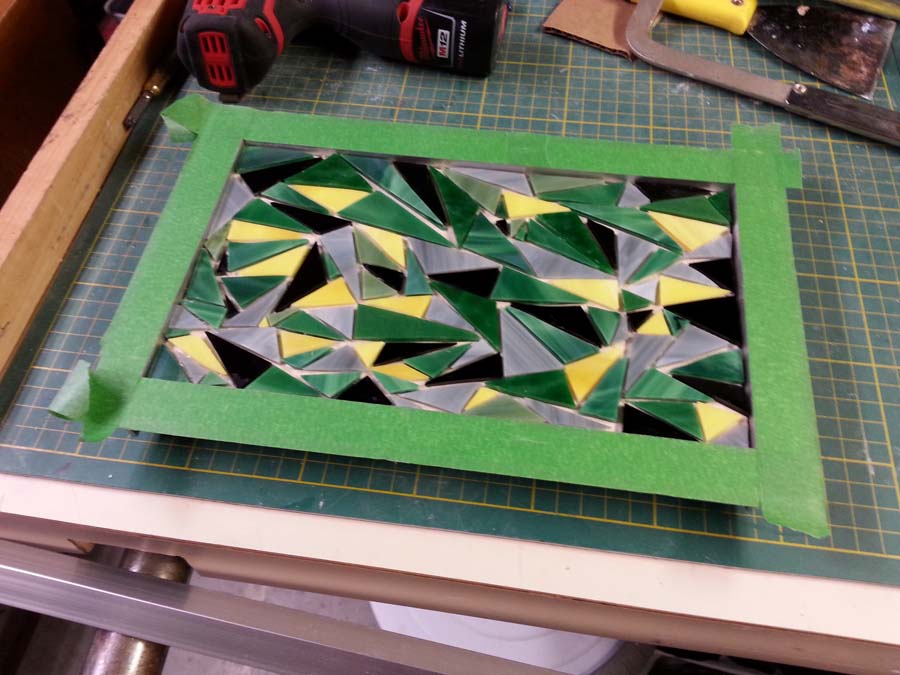
Two mosaics ready to be framed. Most of the tools needed.
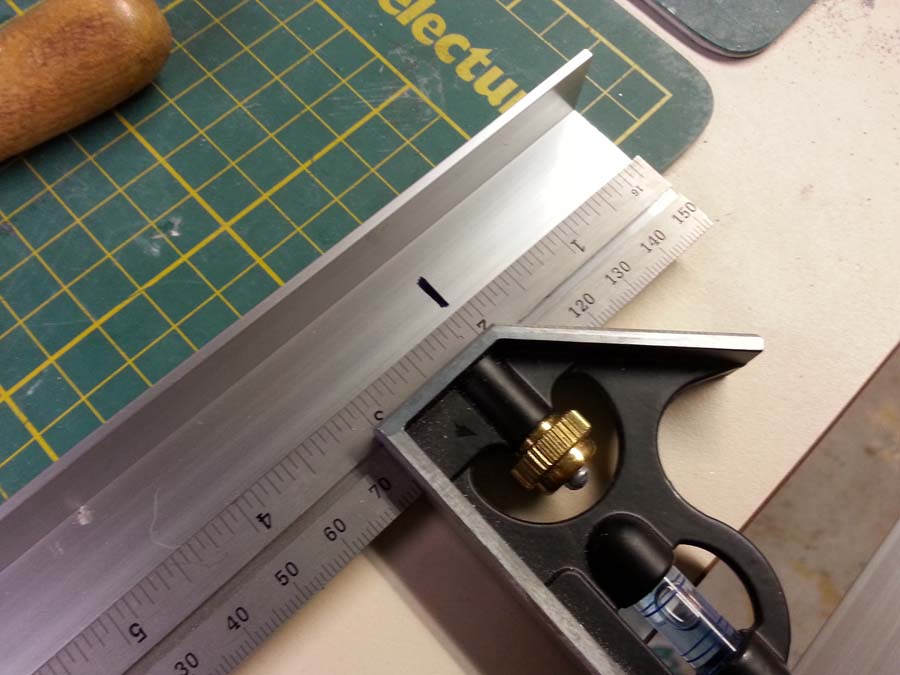
Step 2: Measure the first piece
For this mosaic we will cut sections of angle aluminum at right angles and have two “inside” pieces butt up against two “outside” pieces. With a chop saw a mitred frame can be produced, but mosaic artists with only a hacksaw should stick to right-angle frames instead.
We will make one of the inside pieces first. When they’re completed it will be easy to make the outside pieces. Making the first inside piece is the hardest part of the project, so take your time and measure twice. Lay the aluminum flush with one edge of the mosaic, and then use a marker to draw the cutting line. When you cut bias the saw towards the outside of the mark because you’ll have to file it down.
Use the mosaic to get the length.
Lay the angle on the table edge for cutting.
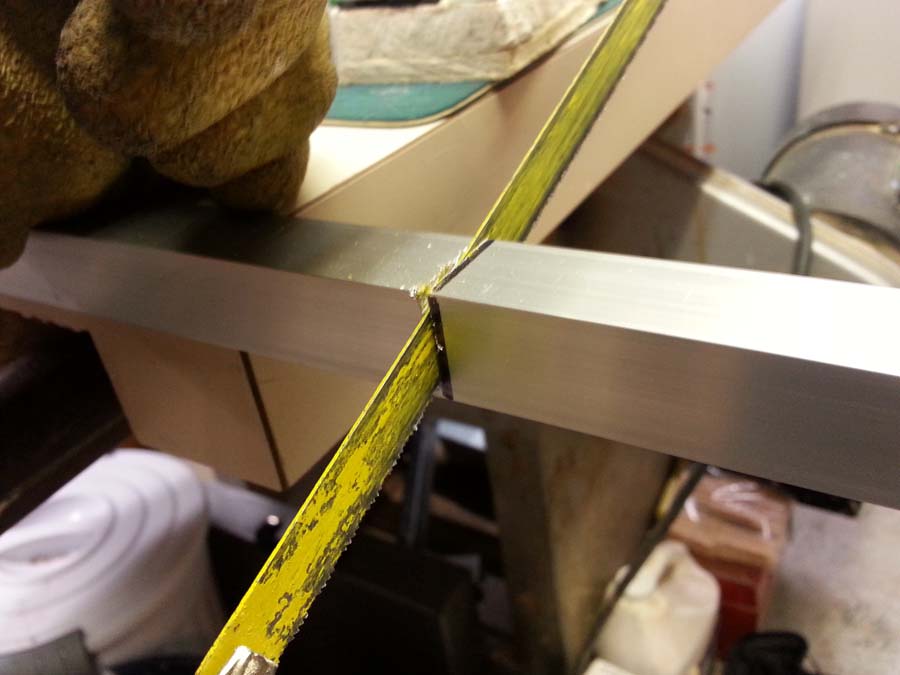
Step 3: Make the first cut
When cutting with the hacksaw be sure to make many long but shallow strokes. Aluminum is tougher than wood, so you need to take it slow. It also helps if you clamp the aluminum to the table. Remember to leave some extra lenghth because you’re going to have to file the end later.
Cutting with a hacksaw. Bias outwards so you can file it down.
Cutting just outside the line. Use many long, shallow strokes.
Step 4: Clean up the edge
After cutting the edge will be very sharp and dangerous. It must be filed down. Sandpaper is not ideal, it will get shredded by the aluminum and you risk scratching the surface that you want displayed. The marker can be wiped off now, but if it has set too long it might be dry. If that happens and water can’t get it off just hold the end of the bar in bleach for 15 seconds then wipe it on a rag.
This edge needs to be filed now.
Remove dried marker by dipping in bleach.
Step 5: Measure in for screws
With our first piece cut we can now attach it to the frame, but the screws need to be positioned properly. Screw positioning depends on the dimensions of the angle aluminum and the thickness of the mosaic.
For this mosaic the screws will be put two inches in from each end, and then lined up so they go right into the middle of the CBB. It is better to have the screws go into wood than CBB, but for a small mosaic like this the CBB will suffice.
Measure two inches from each end for screw holes.
For this mosaic we will align the frame with the backer plywood.
Step 6: Determine screw depth
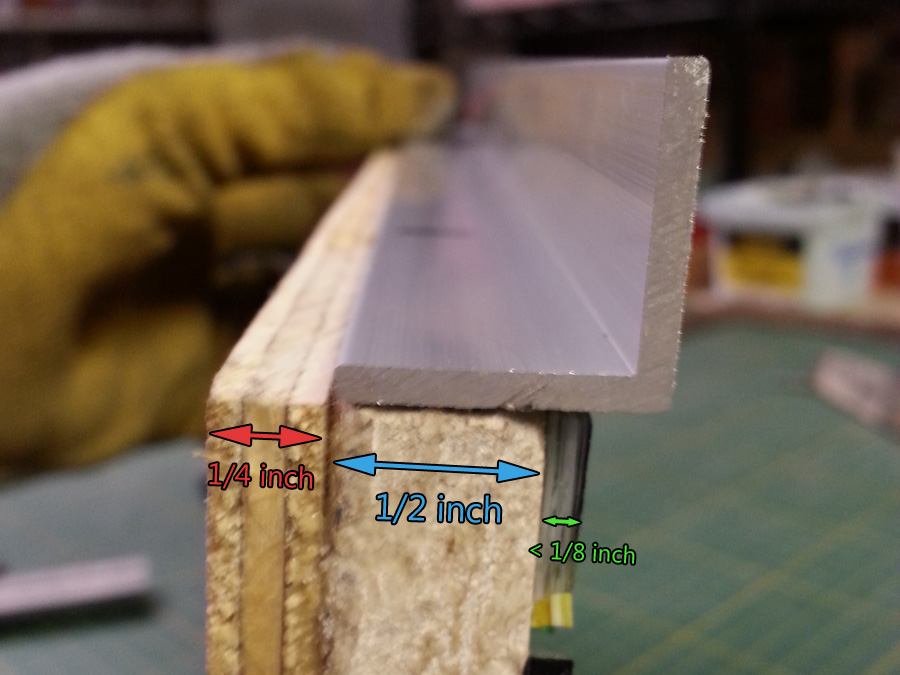
We want the screws in the exact middle of the CBB so that they don’t damage it. With the angle positioned even with the CBB/plywood transition that means the screws are going to go 1/4 of an inch away from the lip of the angle aluminum. This gives us a nice gap above the surface of the glass.
This is how the thickness of the mosaic breaks down.
The screw should be in the middle of the CBB, or 1/4 inch into the frame.
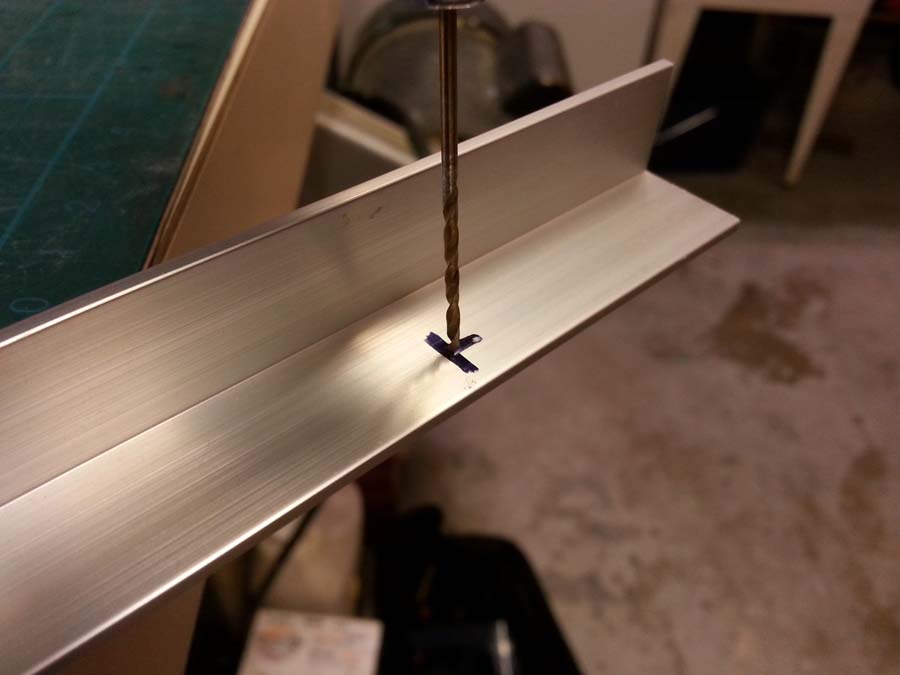
Step 7: Drill pilot holes
Mark the screw holes and clamp the bar of angle aluminum to the work surface. Drill pilot holes with a 1/32 drill bit before drilling out the actual hole size. The actual size is going to be determined by the type of screws you use.
Clamps make drilling easier.
Drill a 1/32 inch pilot hole.
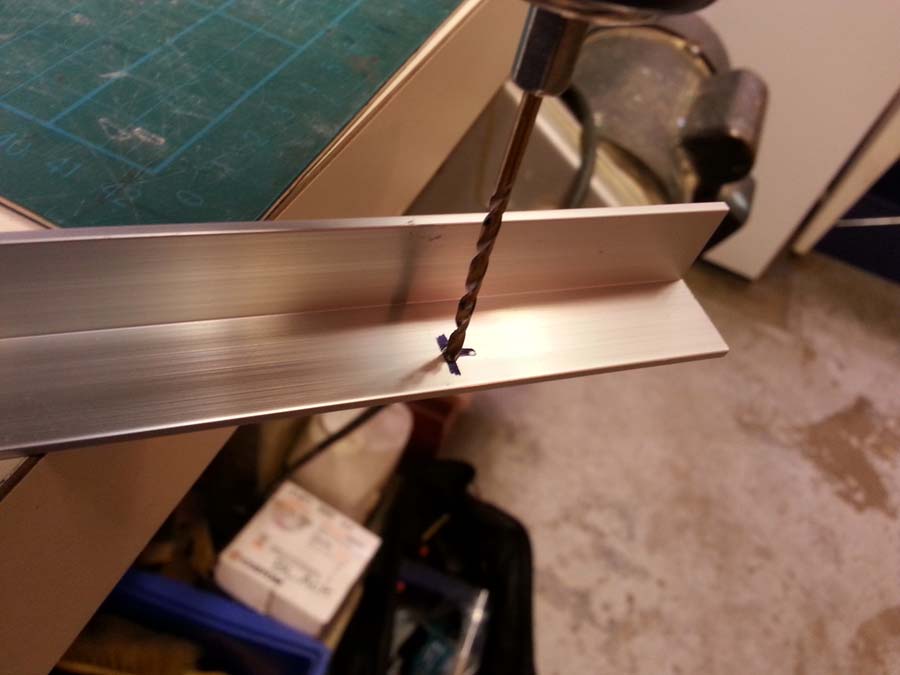
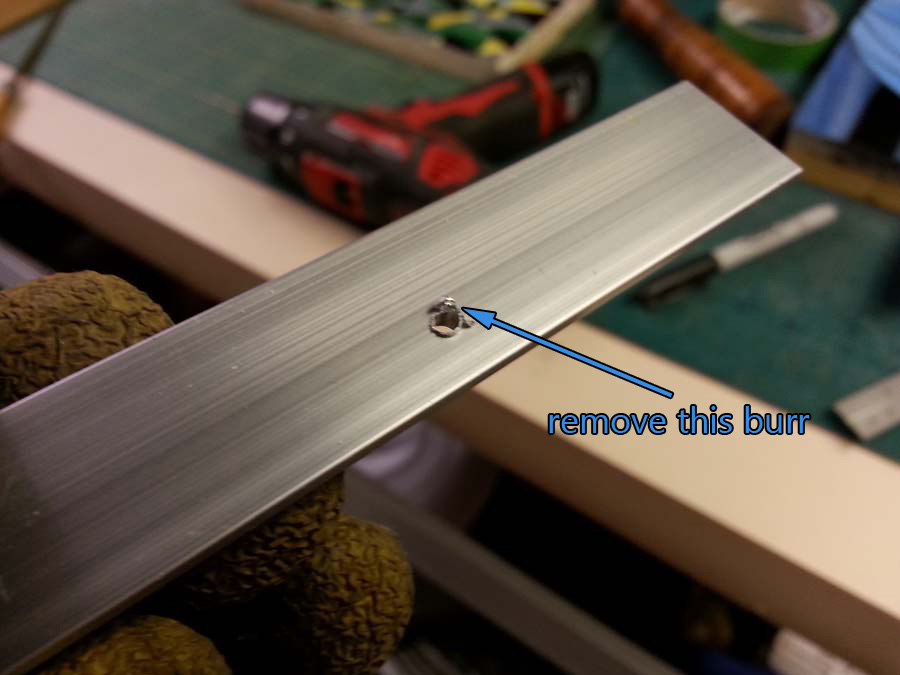
Step 8: Drill the holes larger
Once the pilot holes have been drilled choose the appropriate drill bit and then drill the holes larger. Then check for burrs around the drill hole on both sides. They should be cleaned up before installing the frame piece.
Drill again with the bit appropriate for your screws.
Drilling can leave a burr. File it off before installing the piece.
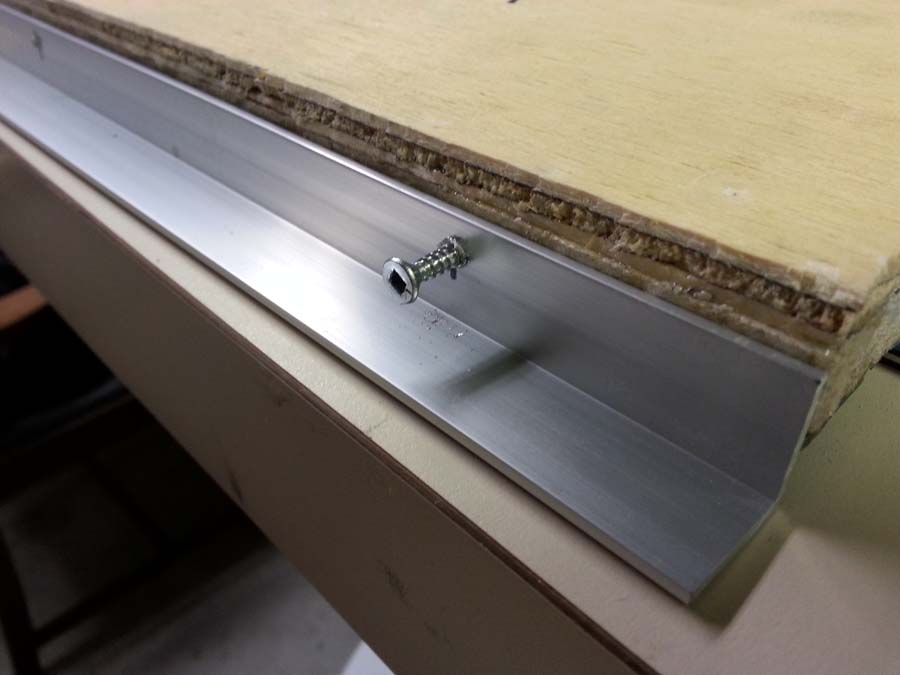
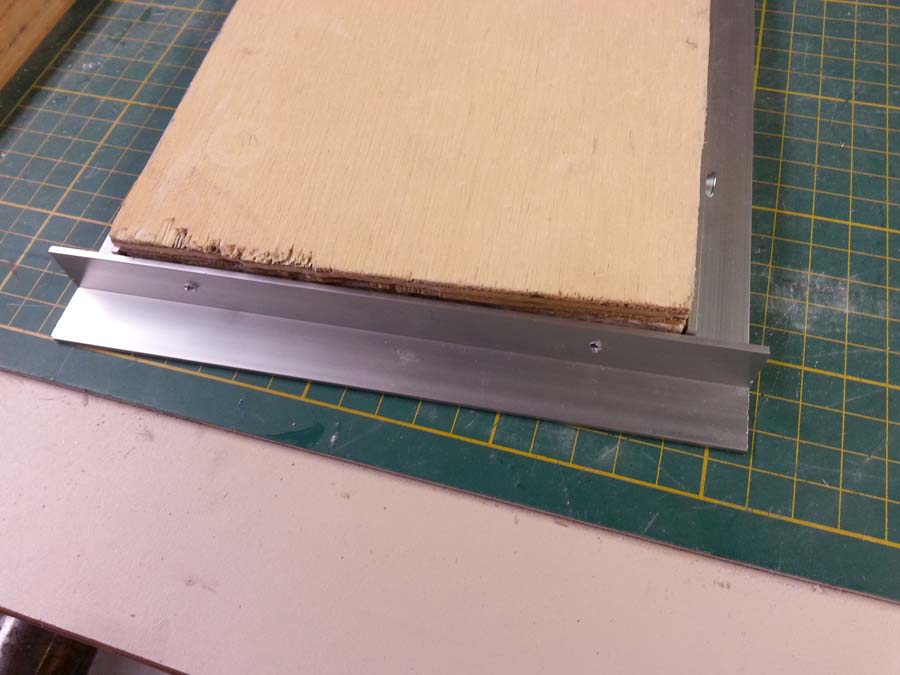
Step 9: Attach the first piece
Line up the angle piece with the mosaic where you want it mounted. Drill through the holes into the CBB, but whatever the length of the screw is subtract about 1/4 inch. This doesn’t have to be exact. Screw the frame piece to the side of the mosaic.
Screws might leave another burr, you can back them out and file if you want.
The first frame piece is installed. Don’t worry if it doesn’t sit 100% flush with the mosaic.
Step 10: Make the opposite piece
Repeat steps 2-9 to produce the next piece. Screw it on opposite the first piece, in the same manner as shown above. You can check for accurate fitment by taking the mosaic and resting it sideways on the table to see if your frame pieces line up properly, or you can use a square.
Everything needs to line up flush or else the next two pieces won’t fit properly. You can play with the angle at which the screws are drilled in and with tightening or loosening them to adjust the frame. This frame has two screws per side, but for larger pieces you might want to go with three screws. If you do that it can help to get the middle screw figured out before attaching the screws near the edge.
Make and install the second piece.
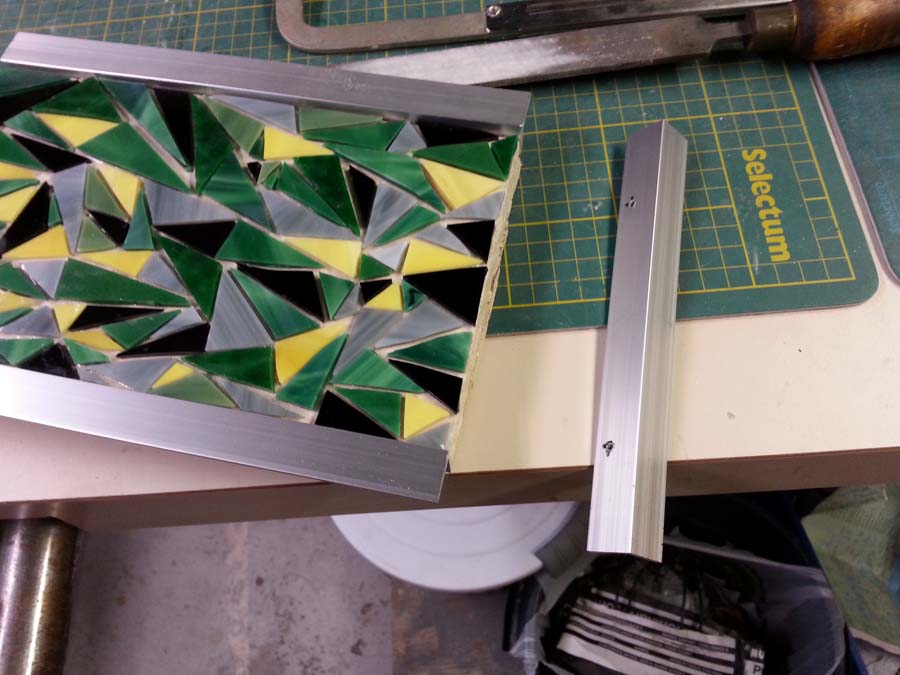
Step 11: Make one of the sides
Using steps 2-9 make one of the side pieces, but this time you need to allot enough extra length to accommodate the width of the two pieces you just installed. Now that the other two pieces are already in place you can flip the mosaic upside-down when you go to pre-drill the screw holes in the sides of the mosaic for the frame piece.
Make the side pieces the same as above, but include the width of the frames.
It’s easy to install sides when the piece is upside down.
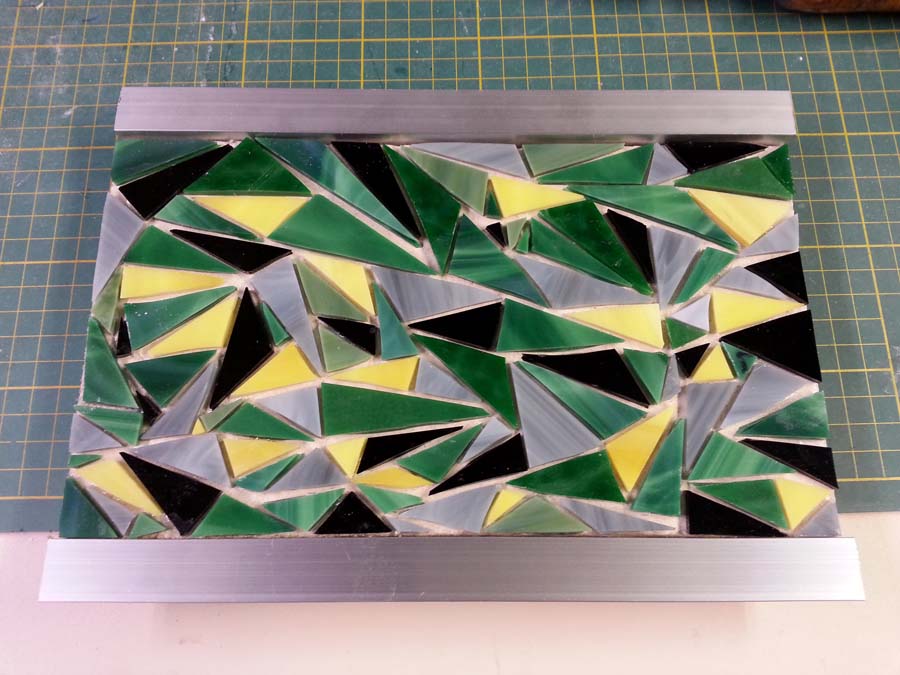
Step 12: Make the other side
With three pieces down, simply copy the piece you just made for the other side and install it. The frame is now complete.
Third piece installed. Notice how the pieces are flush.
Final piece installed. Make sure everything is flush before grouting.
Step 13: Fill in gaps if needed
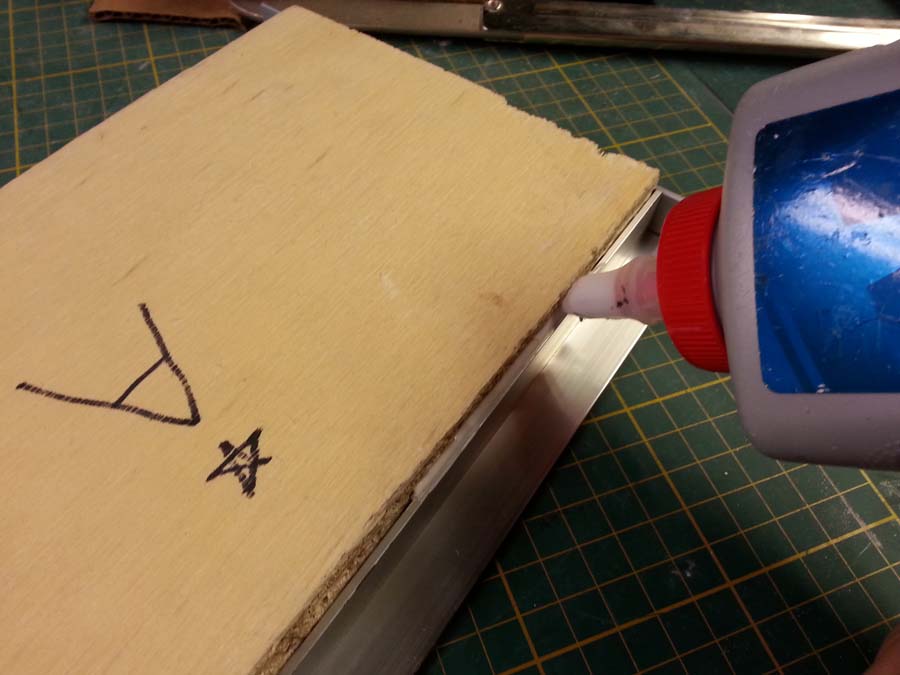
If the mosaic backing was cut by hand (as this one was) there might be some small gaps between the frame and the mosaic. These gaps can be filled with Weldbond before grouting. If you do this wait 24 hours before grouting so the glue can dry. I glued the seam and then pressed the glue in with my index finger, wiping the excess onto a paper towel.
Small gaps may be present between the frame and mosaic backer.
Weldbond can be used to fill in gaps.
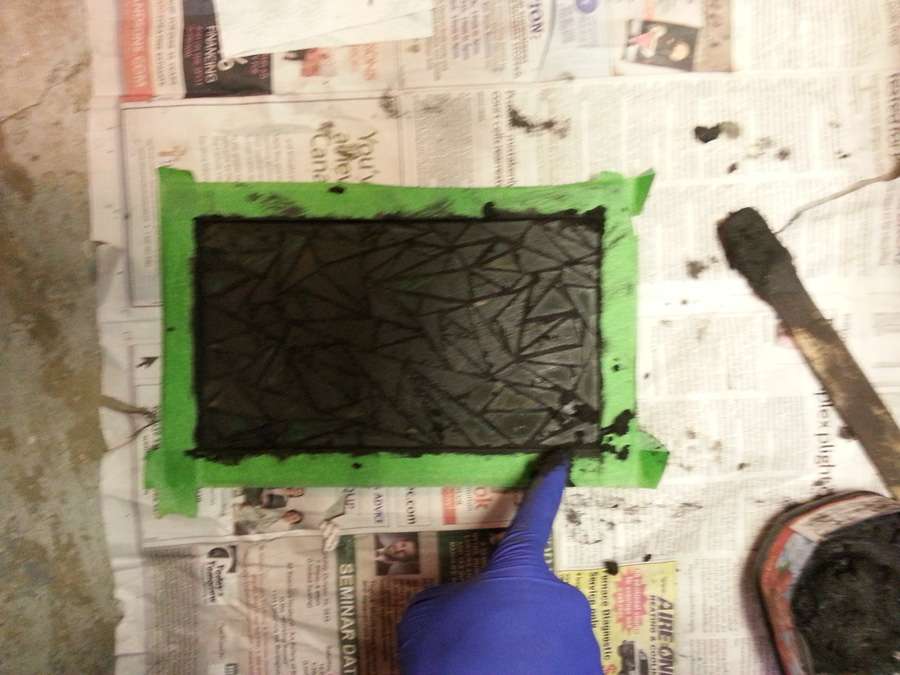
Step 14: Grout your mosaic
The final step for the frame is to grout the mosaic. If the frame is installed before grouting it saves lots of trouble later.
The grout I use in this tutorial dried rather quickly because it was done in a warm environment, but exposure to wet grout can stain some aluminum trim pieces because of a mild chemical reaction. It’s best to mask the surface of the frame to prevent contact with wet grout.
Tape the frame to protect it from grout scratches and chemical damage.
Grout in the normal fashion, but clean out the grout in the corners.
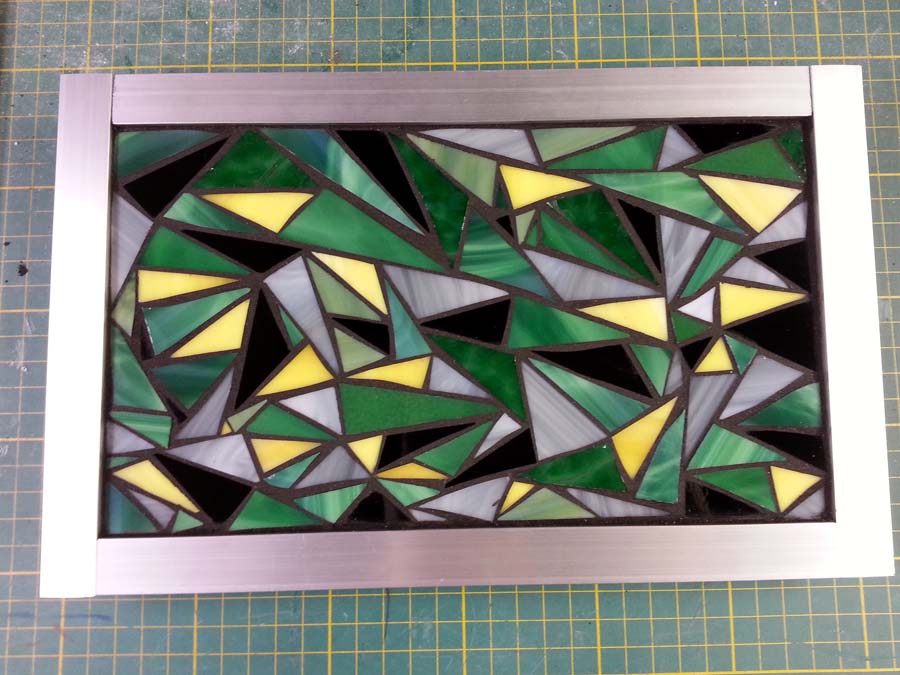
You’re Done!
At this point the frame is complete and the mosaic is grouted. All that remains is to put a hanging wire or hook on the back and sign it.
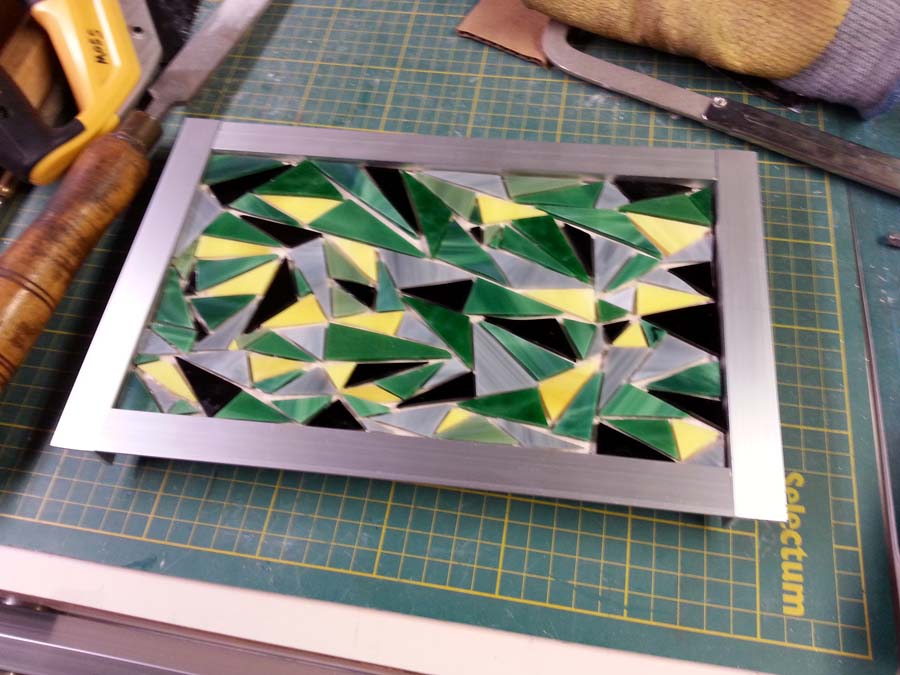
Triangles V mosaic art by Natalija Moss.
Part II: Framing a mosaic that already has grout
Framing a mosaic which has already been grouted with an angle aluminum frame is not ideal!! You should try to decide whether or not a mosaic will get a frame before you grout it, or you should look at using some kind of trim wood with a lip to make a mitred frame which covers the edges of the mosaic.
That being said, you may find yourself in the position I found myself in when I decided to make this tutorial. I had a mosaic I was very proud of, but after grouting it I realized that the way I had planned to deal with the edges just wasn’t going to look as nice as I wanted it to. I could tell that this piece needed a nice clean frame and I had to do it even though the grout was already in place.
Part II shows how to install a frame made out of 1 inch angle aluminum onto a stained glass mosaic whose backing is a little over 1 inch thick. You will follow the same steps as Part I, but make accommodations for the larger size of the mosaic, the new size of aluminum, and the deeper thickness of the mosaic backing.
Building the Frame
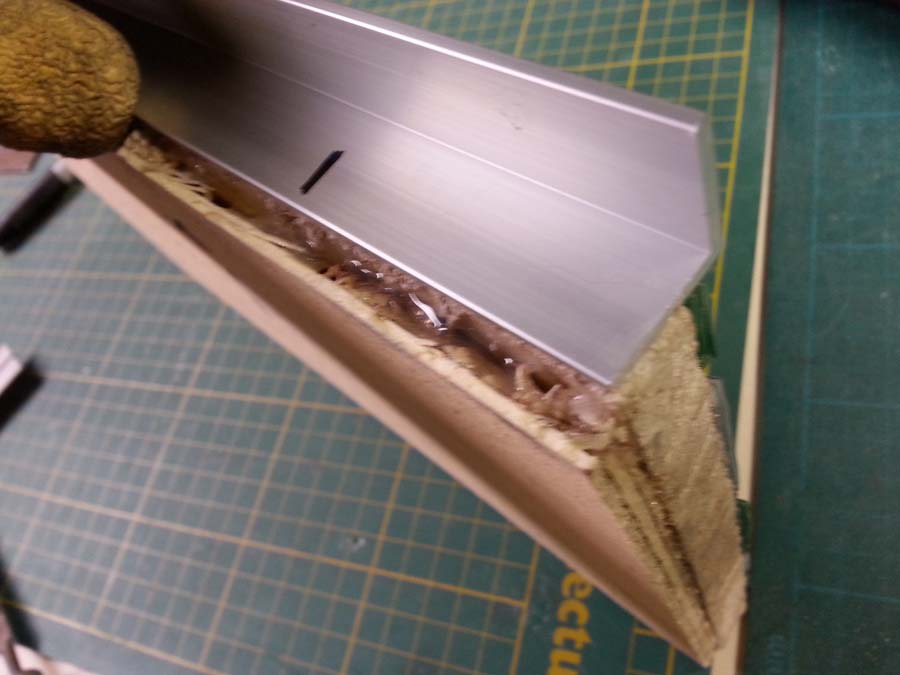
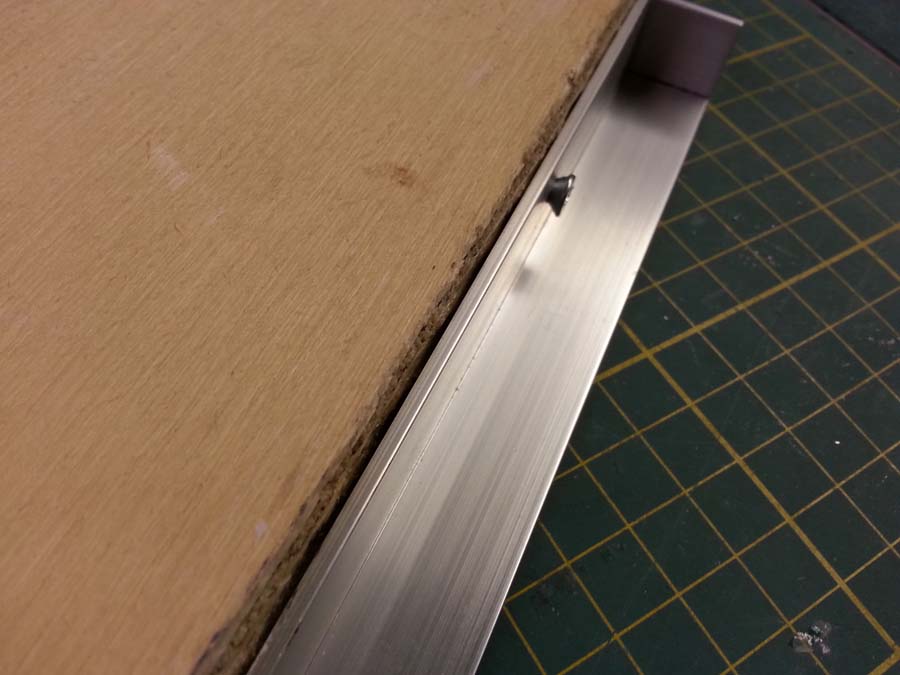
This mosaic is mounted on 1/2 inch concrete backer board as was the previous mosaic, but this time the wood backing is much thicker. Between the wood and the larger aluminum we are able to screw directly into the side of the wood.
You can see in the diagram that the aluminum overlaps the wood by about 5/16 of an inch, yet still has a nice lip above the glass. We’re putting the screws about mid-way through this overlap directly into the wood, or about 5/32 of an inch from the edge of the aluminum. The piece is also larger so you may notice that there are three screws each on the top and bottom. I installed the middle screws first.
The screws will be set approximately 5/32 of an inch away from the edge of the aluminum.
Build the frame as detailed in Part 1. More screws might be required.
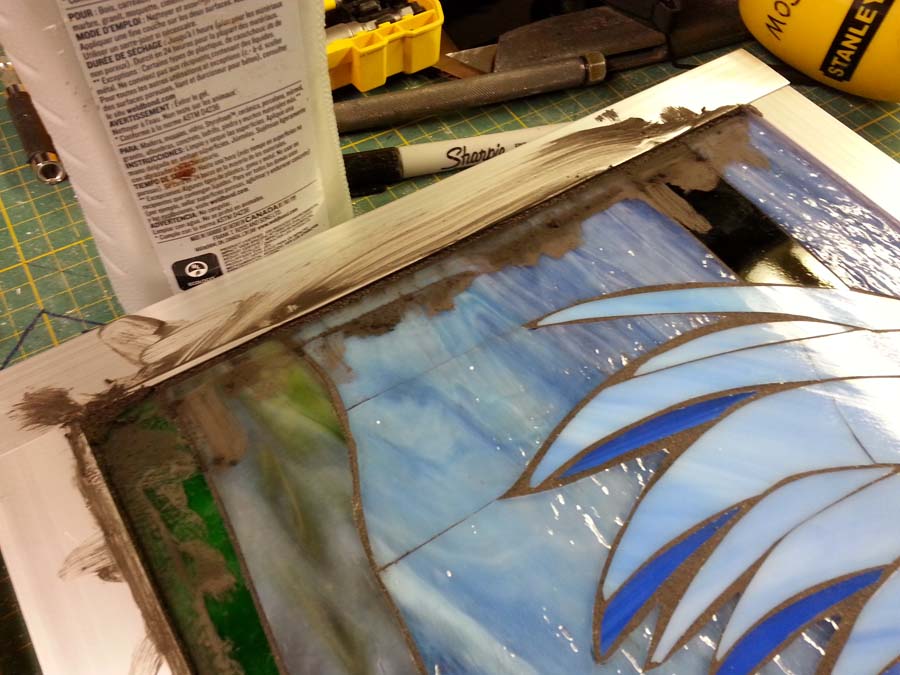
Grout the seams
Once the frame is constructed you might find that there are gaps along the edges. These gaps can be filled with grout. Mix a small amount of it and try to work only around the areas that need it. You might find that one side is already flush with the frame and doesn’t need any grout. Be sure to clean out the grout properly so that it lays flush with the grout on the mosaic so it looks nice.
Grout the seams using the same exact grout as the mosaic already had.
Wipe the grout clean. Try to keep it level with grout that was already there.
All Finished!
Once again your mosaic is essentially complete and all you need to do is put some mounting hardware on the back. Enjoy your new mosaic.
Triangles V and Rei II mosaic art by Natalija Moss
Our printable gift certificates are delivered to you as a digital copy to your email by default, so you don’t have to wait.
On the gift certificate is a PIN number which the recipient can use as store credit.
Why A Gift Certificate Is Best
Artists like to choose their own colors and materials, so a gift certificate is a good way to get them exactly what they want, while trying to pick for them is problematic. When in doubt, get the gift certificate. It’s easier, and they won’t be disappointed. Your artist will also have access to all the mosaic tips and instructions at our website, which is the largest, most complete online source of how-to-mosaic information.
Mosaic Tips and Instructions
All of our online mosaic content was written by a professional artist who also holds an engineering degree and has worked in a materials testing laboratory.
Beware Of Questionable Information
There is quite a bit of instructional material online, and a lot of it is questionable, particularly when it comes to crafts. All too much of it was written merely to drive sales without regard to durability or longevity. For example, you can see websites recommending the use of water-soluable glues to attach tile to terracotta flower pots, which is problematic for several reasons and not likely to last. For comparison, here is something our mosaic artist wrote about potential problems with mosaic flower pots and how to fix them.
How To Mosaic Blog
Our How To Mosaic Blog is where we post new content written after 2013. Check it regularly for new articles concerning all aspects of making a mosaic: choosing a grout color, how to transfer a pattern, how to make a mosaic lawn sculpture, etc.
Mosaic FAQs
Our page of Frequently Asked Questions addresses many basic issues and is organized by topic. A novice could get oriented and avoid many classic mistakes merely by skimming through this page.
Mosaic Instructions
We have many different mosaic instruction pages, and most of these are described in our Mosaic Information Page.
Nitrile Gloves Disposable 9.5-Inch Medium 1 Pair are powder-free, latex-free 4 mil thick examination gloves for detailed work with thinset mortar and Weldbond adhesive. These are more durable than the latex gloves we used to sell and allow the wearer more dexterity than our heavy-duty grouting gloves.
Nitrile Gloves Disposable 1 Pair
material: nitrile
1 pair
size: medium 9.5 inch
weight/gauge: 4 mil
color: blue
powder-free
latex-free
When To Use These Gloves
These gloves can keep your hands and fingertips clean when working with thinset mortar for an extended period, but they are thin and fragile and will not protect the hands from cuts. For that reason, you would NOT use these gloves for grouting, which involves a lot of rubbing and wiping over the surface of the mosaic and exposes the hands to sharp edges. For grouting, we recommend the Heavy-Duty Grouting Gloves, but even those can be sliced by a jagged piece of mosaic tile. Tip: It is better to keep grout gaps fairly narrow to make grouting easier and prevent fingertips from getting in between tile where they can be cut.
We use these gloves at our studio for making found-object mosaics from artifacts and thinset mortar, which involves a lot of careful positioning of small objects in concrete. The gloves are thin enough to not interfere with dexterity, yet they still keep the mildly caustic mortar from contacting the skin and drying it out. Some people also wear these gloves for working with Weldbond adhesive, but that is merely based on preference and not safety. We have never observed any problems with Weldbond on the skin, even when in contact for long hours day after day. Weldbond is a water-based adhesive and was selected by NASA for use in space because it is non-toxic.
Tip: Talcum powder can be used to help get the gloves on and off. We keep a dispenser of baby powder in our studio for applying to our hands before inserting them into gloves. Without the powder, the sweat from the hand makes getting the glove off a lot more difficult.
How To Make Mosaics
For more advice on designing your mosaic project or mounting, cutting, and grouting tile, please see our page of Mosaic Frequently Asked Questions or our Mosaic Information Guide, which lists instructional pages described by topic. We also post new articles about making mosaics at our How to Mosaic Blog.
N95 Comfort Dust Mask has braided headbands, an exhalation valve, and an adjustable nose clip to make wearing it more comfortable. This is a a 3M brand 8511 particulate dust mask that meets NIOSH and OSHA standards and is rated at N95.
The N95 rating means they capture 95% of all particles 0.3 microns in diameter or larger. We wear these when mixing grout and thinset mortar.
Product Specifications
3M brand 8511
quantity: 1 each
N95 particulate rated
NIOSH and OSHA approved
adjustable nose clip
braided headbands for comfort
exhalation valve
When and How To Use The N95 Comfort Dusk Mask
Keep in mind that dust masks are only part of a strategy to prevent breathing dust. You should also mimimize the amount of dust you generate by pouring and mixing carefully and using spray bottles to mist the grout as you mix it.
The masks are not individually wrapped, so keep the box closed during storage to prevent incidental contamination.
Vacuum off used masks before storing them in individual Ziplock sandwich bags labeled with the student’s name.
How To Make Mosaics
For more advice on designing your mosaic project or mounting, cutting, and grouting tile, please see our page of Mosaic Frequently Asked Questions or our Mosaic Information Guide, which lists instructional pages described by topic. We also post new articles about making mosaics at our How to Mosaic Blog.
First check out our Mosaic Classes List to look for classes near you. The listings on that page are organized by location. Although many classes are offered in the evening, others are offered on weekends to accommodate students driving in from other towns. Keep in mind that you will probably only need a class or two to get you started, and once you get going, you can always find answers to specific questions online.
Children’s Mosaic Art Project. Keep in mind that mosaic is a popular children’s summer camp project because the basics are simple: draw an outline pattern on your backer, glue on the tile, and then grout it.
Check With Your Local Institutions
If our Mosaic Classes page does not include a mosaic instructor in your area, there are other ways to find one. As you’ve probably already learned, an Internet search for “mosaic classes” isn’t the best way to find a local instructor because chances are whoever you find online will be at least several hundred miles away. But what about your local schools and churches and organizations? We recommend checking with the following local institutions, many of which have activity schedules posted online or offer continuing education programs:
art schools
community colleges
universities
YMCA
churches and synagogues
city and county recreation departments
community centers
museums
art centers
local mosaic artists
Alternatives To Mosaic Classes
If no class is available near you, do not give up hope. Remember that a class is not the only way to learn how to mosaic, and it might not be the best way after all. Most of the time in an art class is spent learning by doing, and you can do that on your on. The instructor’s main purpose is to introduce basics, answer questions, and keep you from making obvious mistakes. You can get all that by reading our mosaic instructions and our mosaic FAQs page and our How To Mosaic blog.
Email Us Your Project Questions
You can also email us with your technical questions or for artistic advice. We are all working artists, and we have consulted on tens of thousands of projects worldwide, ranging from first time beginner projects to large public art projects and murals. We have answered your question before, and we probably have a web page that has exactly the information you need.
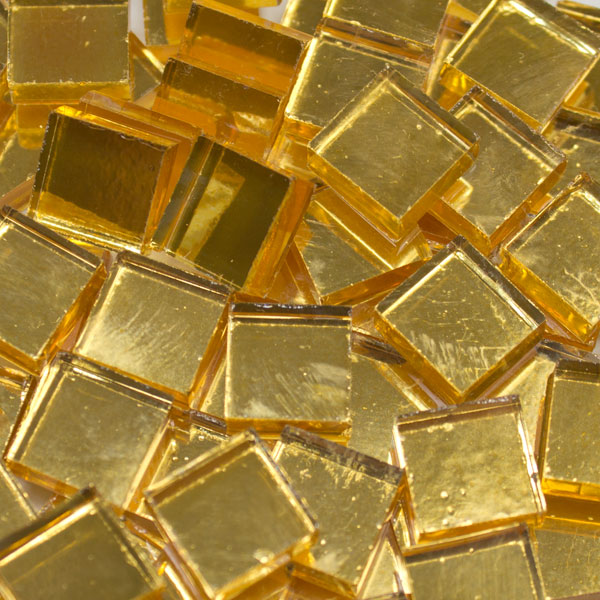
Imitation Gold Mosaic Glass Smooth 10mm (3/8 Inch) is SILVER (Ag) alloy leaf fused under hand-cut glass and sold in sheets of 196 tiles mounted on removable clear film. These are what some competitors are selling as real gold mosaic (shame, shame), but they are great for what they are: a beautiful and economical alternative to real gold mosaic.
These are hand-cut tiles, but they are fairly square and uniform for the most part, although some are slightly irregular in shape. Note that the backs are coated with a yellow epoxy to inhibit oxidation from tarnishing the silver foil.
sales unit: 196 tiles imprecisely mounted on removable clear film with protective tray
material: glass fused over SILVER alloy leaf with gold tone
variety: molded tile
colorfast, UV resistant
durability: frost-proof, impervious to liquid
usage: suitable for indoor and outdoor use
CAVEAT: The glass tiles are on Mosaic Mounting Tape, but the alignment is more loose than desired. We recommend using these as individual tiles and not as sheets of tile.
Coverage
One sheet of 196 tiles covers 1/4 square foot. Use our tile estimator to calculate how much you need for your project. Add about 5% extra to account for cutting scrap.
Compatibility
These can be mixed and used with most brands of 3/8 inch mosaic tile because their thickness is 1/8 inch nominal (4mm), which is a common industry standard. BUT, keep in mind that these are hand cut and do not have beveled edges like molded tile, and this means they will not fit into mounting grids as deeply as the molded tile.
Cutting Imitation Gold Mosaic Glass
Imitation Gold Mosaic Glass can be cut into halves, quarters, triangles and irregular shapes using our Mosaic Glass Cutter.
Use in Mosaic Art
These are an attractive and affordable alternative to real gold.
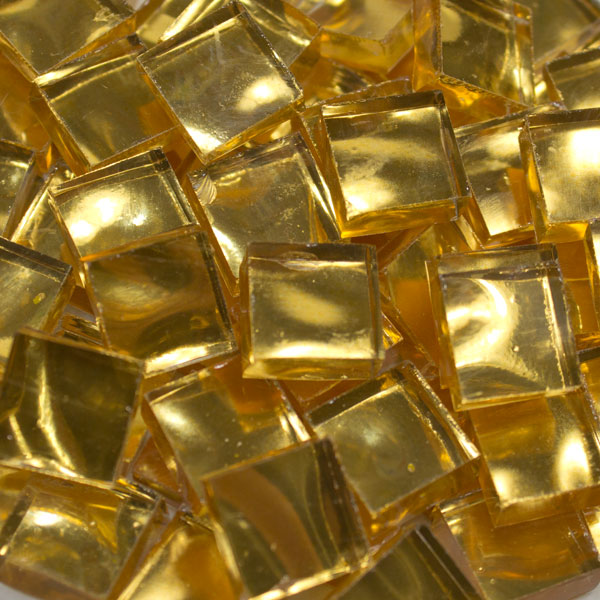
Imitation Gold Mosaic Glass Wavy 10mm (3/8 Inch) is SILVER (Ag) alloy leaf fused under hand-cut glass and sold in sheets of 196 tiles mounted on removable clear film. These are what some competitors are selling as real gold mosaic (shame, shame), but they are great for what they are: a beautiful and economical alternative to real gold mosaic.
These are hand-cut tiles, but they are fairly square and uniform for the most part, although some are slightly irregular in shape. Note that the backs are coated with a yellow epoxy to inhibit oxidation from tarnishing the silver foil.
sales unit: 196 tiles imprecisely mounted on removable clear film with protective tray
material: glass fused over SILVER alloy leaf in gold tone
variety: molded tile
colorfast, UV resistant
durability: frost-proof, impervious to liquid
usage: suitable for indoor and outdoor use
CAVEAT: The glass tiles are on Mosaic Mounting Tape, but the alignment is more loose than desired. We recommend using these as individual tiles and not as sheets of tile.
Coverage
One sheet of 196 tiles covers 1/4 square foot. Use our tile estimator to calculate how much you need for your project. Add about 5% extra to account for cutting scrap.
Compatibility
These can be mixed and used with most brands of 3/8 inch mosaic tile because their thickness is 1/8 inch nominal (4mm), which is a common industry standard. BUT, keep in mind that these are hand cut and do not have beveled edges like molded tile, and this means they will not fit into mounting grids as deeply as the molded tile.
Cutting Imitation Gold Mosaic Glass
Imitation Gold Mosaic Glass can be cut into halves, quarters, triangles and irregular shapes using our Mosaic Glass Cutter.
Use in Mosaic Art
These are an attractive and affordable alternative to real gold.
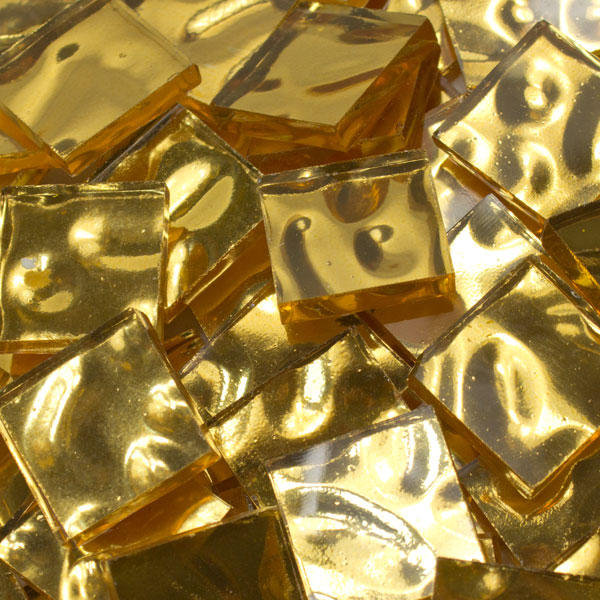
Imitation Gold Mosaic Glass Wavy 20mm (3/4 Inch) is SILVER (Ag) alloy leaf fused under hand-cut glass and sold in sheets of 49 tiles mounted on removable clear film. These are what some competitors are selling as real gold mosaic (shame, shame), but they are great for what they are: a beautiful and economical alternative to real gold mosaic.
These are hand-cut tiles, but they are fairly square and uniform for the most part. Note that the backs are coated with a yellow epoxy to inhibit oxidation from tarnishing the silver foil.
sales unit: 49 tiles imprecisely mounted on removable clear film with protective tray
material: glass fused over SILVER alloy leaf in gold tone
variety: molded tile
colorfast, UV resistant
durability: frost-proof, impervious to liquid
usage: suitable for indoor and outdoor use
CAVEAT: The glass tiles are on Mosaic Mounting Tape, but the alignment is more loose than desired. We recommend using these as individual tiles and not as sheets of tile.
Coverage
One sheet of 49 tiles covers 1/4 square foot. Use our tile estimator to calculate how much you need for your project. Add about 5% extra to account for cutting scrap.
Compatibility
These can be mixed and used with most brands of 3/4 inch mosaic tile because their thickness is 1/8 inch nominal (4mm), which is a common industry standard. BUT, keep in mind that these are hand cut and do not have beveled edges like molded tile, and this means they will not fit into mounting grids as deeply as the molded tile.
Cutting Imitation Gold Mosaic Glass
Imitation Gold Mosaic Glass can be cut into halves, quarters, triangles and irregular shapes using our Mosaic Glass Cutter.
Use in Mosaic Art
These are an attractive and affordable alternative to real gold.


