Most mosaic wall art can be mounted on a wall with a simple hangar and wire. However, larger mosaics will need more robust mounting hardware. The “french cleat” is a type of wall moulding that can be used to securely affix heavy mirrors, cabinets or artwork to a wall. In addition to its strength, the french cleat also allows mosaic art to be mounted flush against the wall and makes leveling it easy.
If you built a frame on the back of your mosaic as described in this tutorial, then french cleat moulding is a good hanging option.
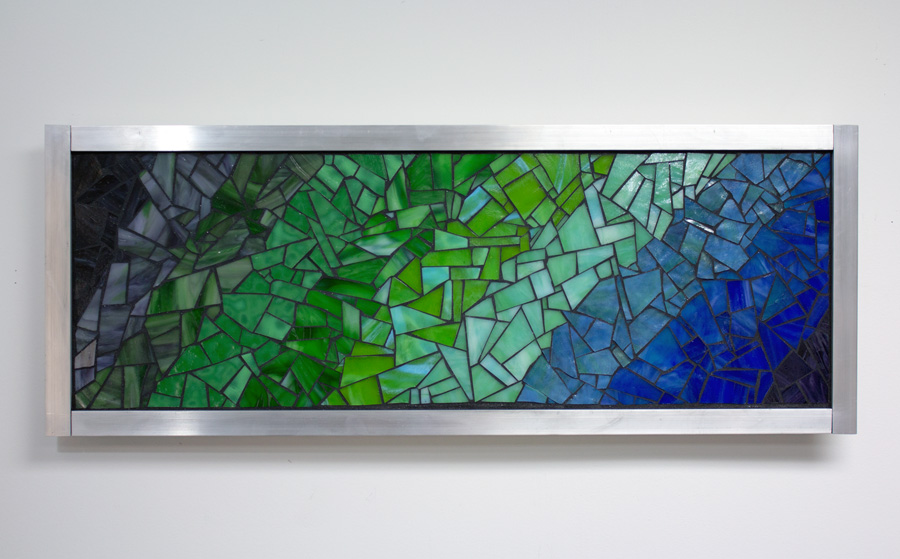
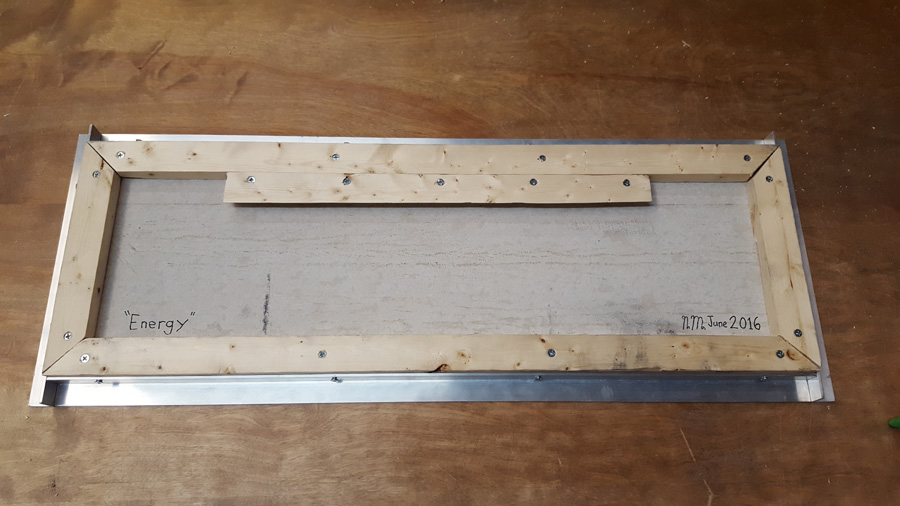
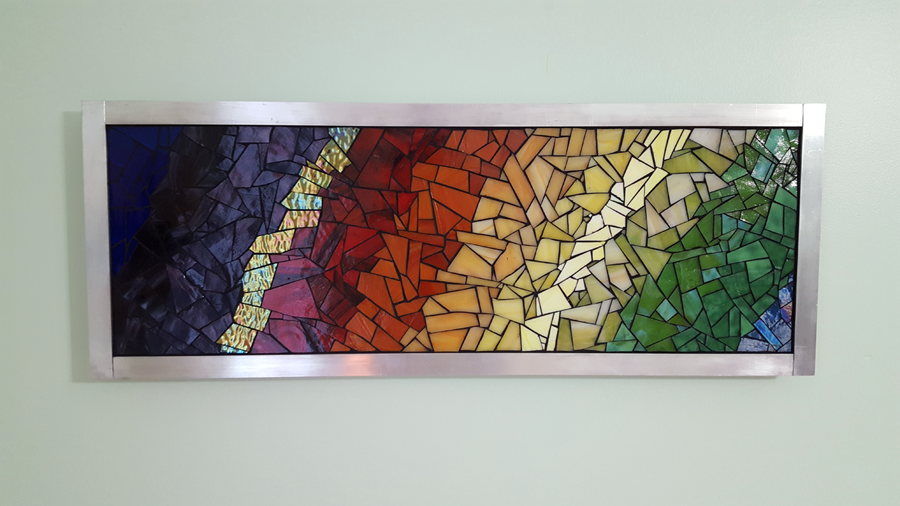
Mosaic art built with a wooden frame structure on the back can be securely mounted flush against a wall using the “french cleat” system.
Preparations and Safety
To make french cleat wall mounts you need a table saw, screwdriver, screws, and a drill. A level and ruler are needed to position the mosaic art properly on the wall. You also want a stud finder.
Proper personal protection equipment (PPE) should be worn when using power tools. Table saws are extremely dangerous, wear a dust mask, safety glasses, and hearing protection when using the table saw. Always have someone help you when using a table saw. Safety glasses and gloves should be worn when using the drill.
If you don’t have much experience with a table saw, don’t try to learn on this project. Instead, you probably know somebody who is a carpenter or who does woodworking in their spare time. Ask them for help, if you tell them it’s for a mosaic art project they will probably think that’s really cool and offer to make the pieces for you, saving you time and preventing any risks. This tutorial is intended for artists who are already familiar with table saws, and who are looking for a solid way to wall-mount a mosaic.
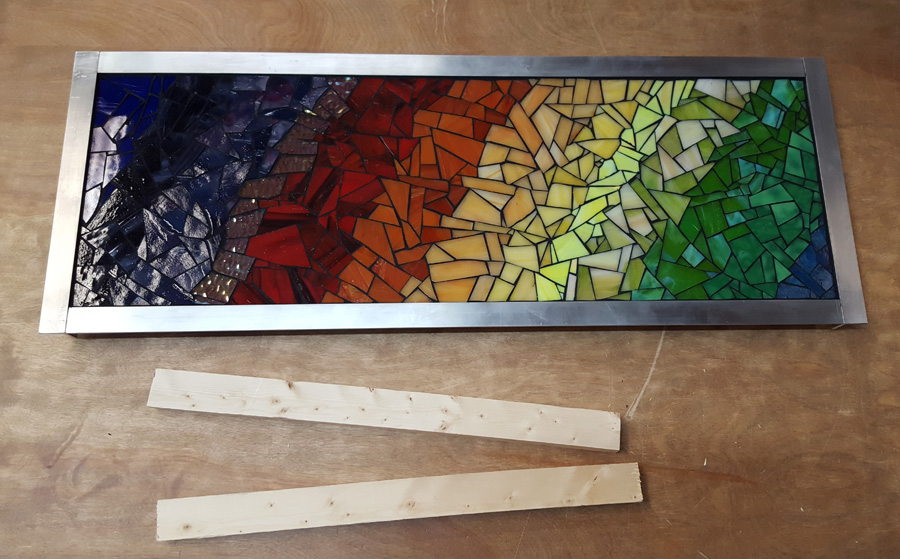
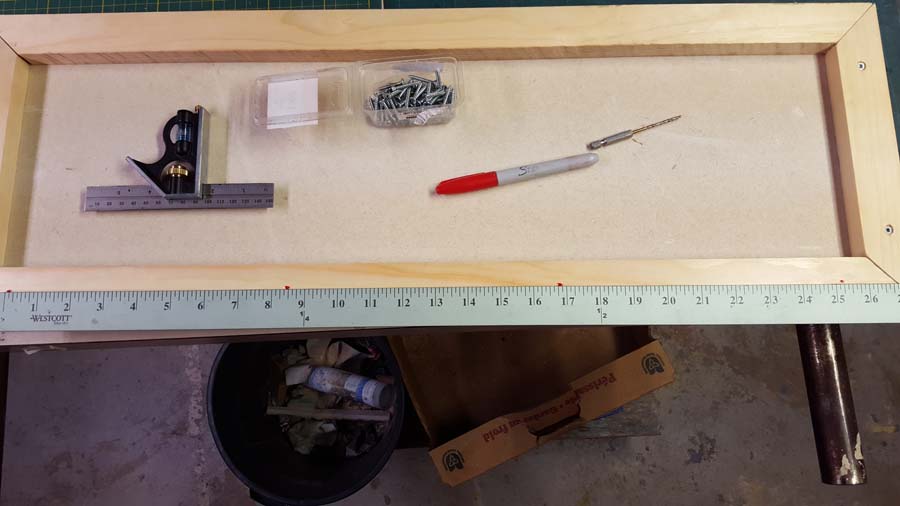
This mosaic is going to get a french cleat attachment on the back. One piece of wood will be affixed to the back of the mosaic and the other will be fastened to the wall.
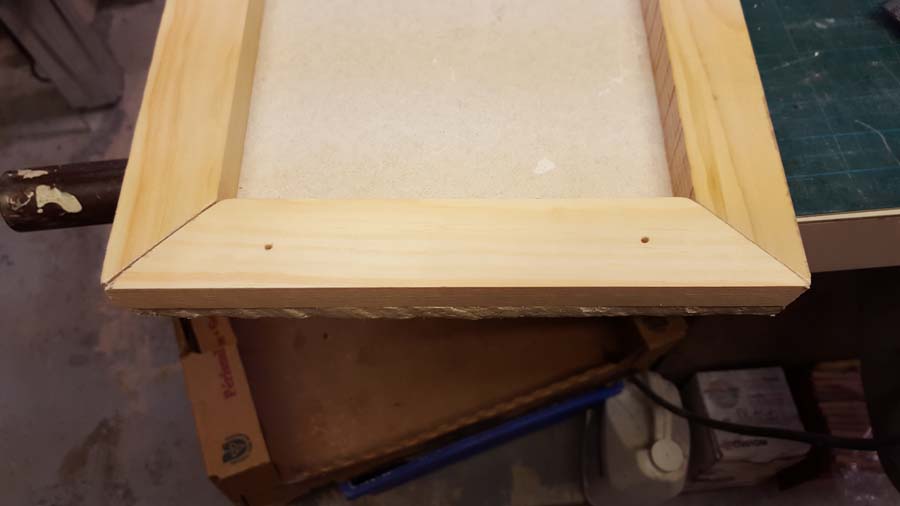
The two pieces of wood shown above are scraps from when the wood backing was built onto the above mosaic. Cut a corner off of each piece of wood using a 45° angle with the table saw.
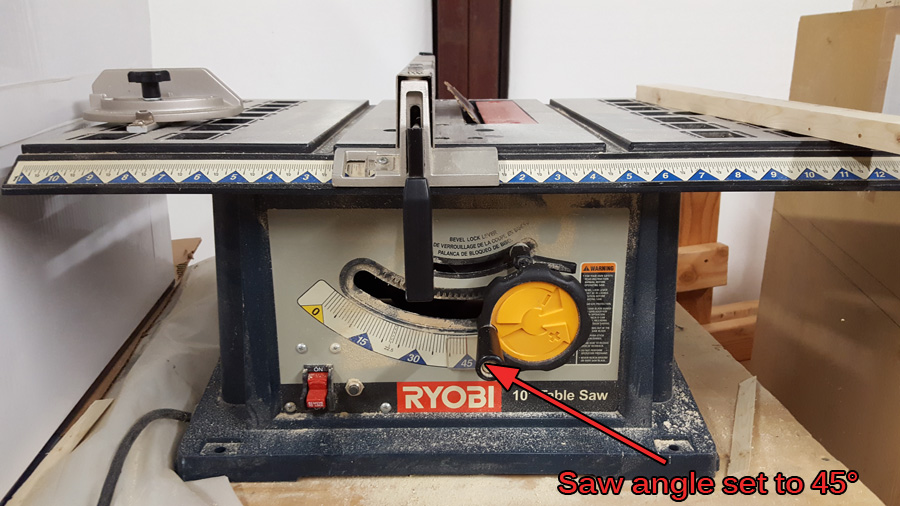
You can use a table saw to cut a piece of wood to be used for the french cleat.Mount one of the pieces to the frame, the other will go on the wall.
Install the French Cleat Moulding
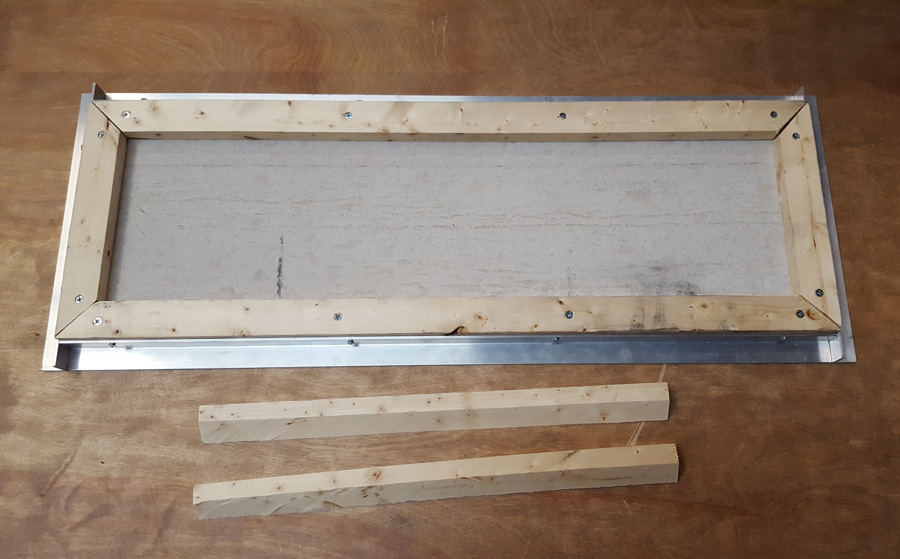
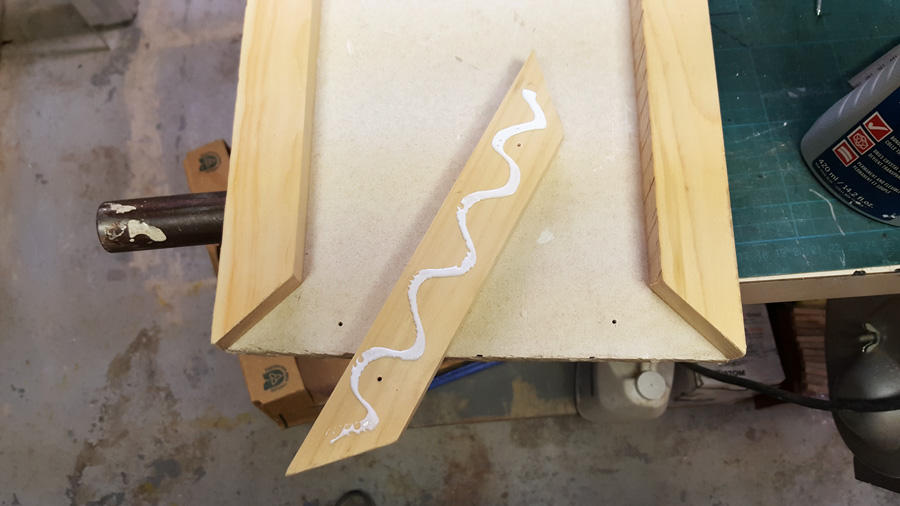
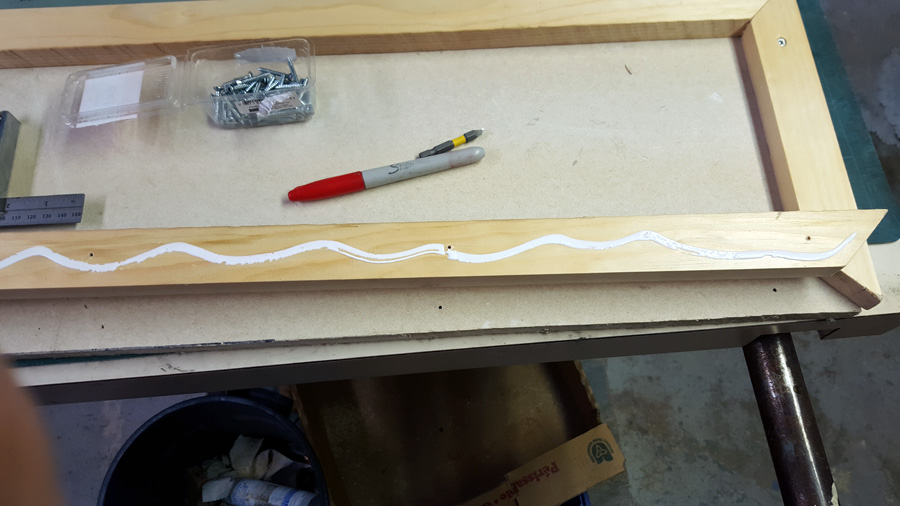
The proper way to affix the moulding is one piece on the wall with the angled side facing up and one piece on the mosaic with the angled side facing down.
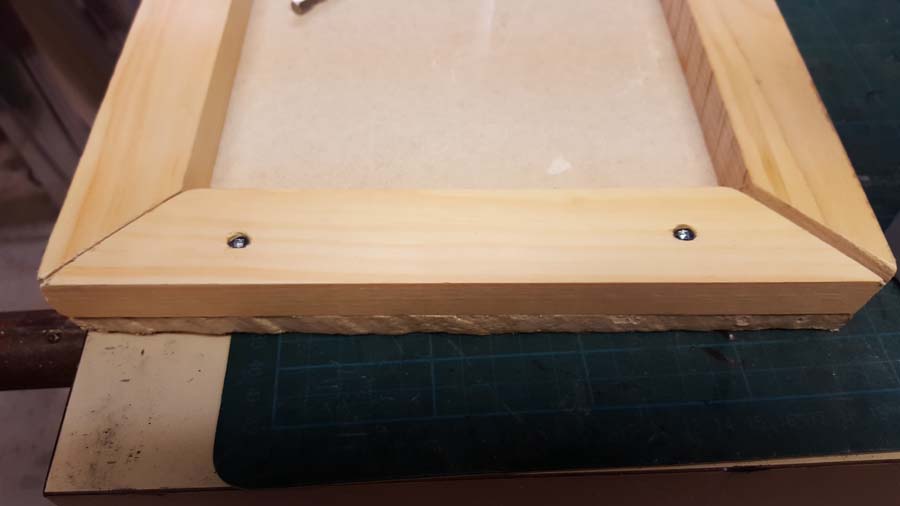
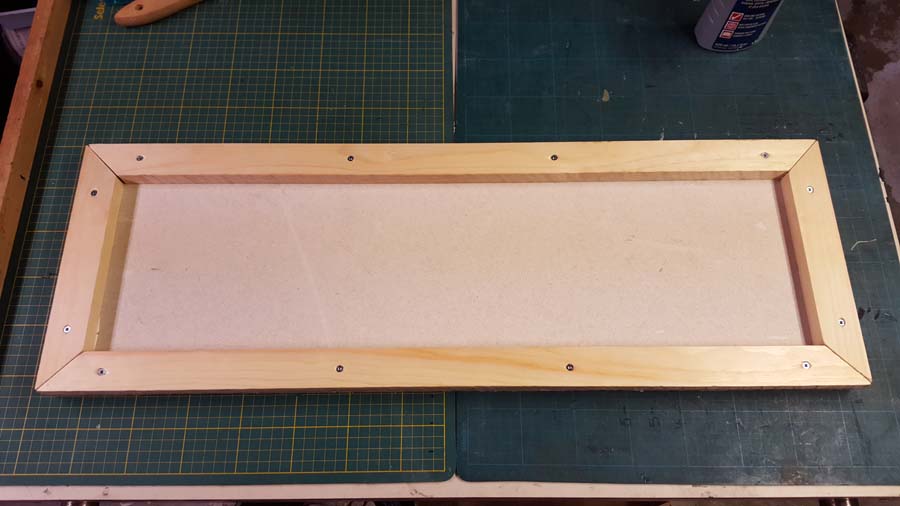
The first piece of moulding has been affixed to the back of the mosaic.
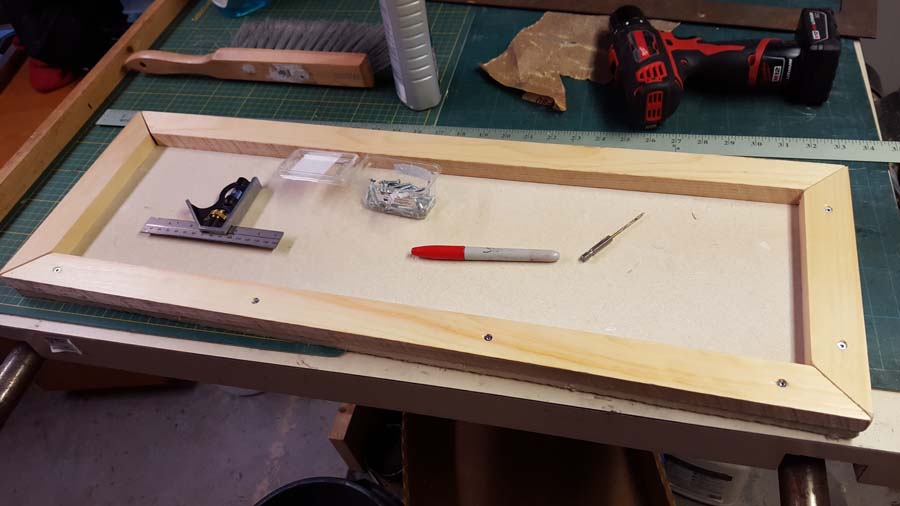
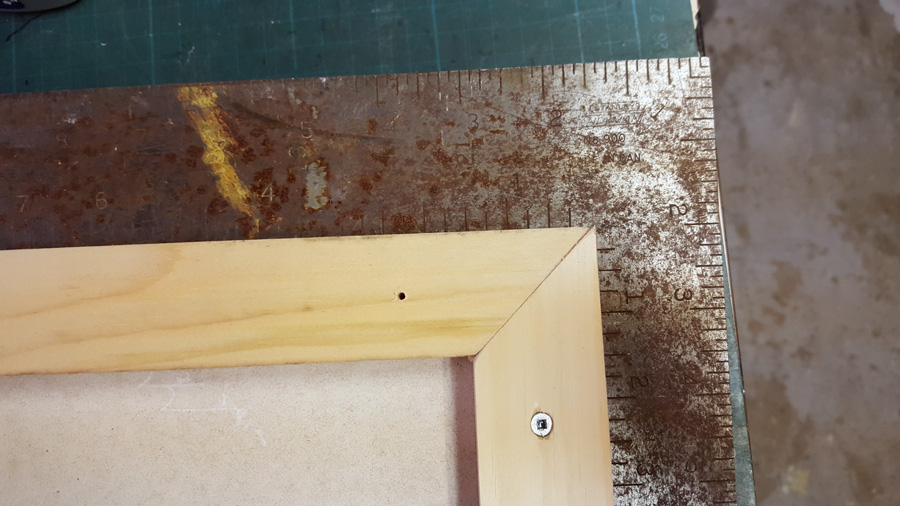
You can see above the moulding for the mosaic is installed inside the wooden frame. It is placed evenly between the left and right, and flush against the upper frame piece. Another option is to use a wider upper frame piece and cut the corner off of that before making the mitre cuts. That way you only have to do it once.
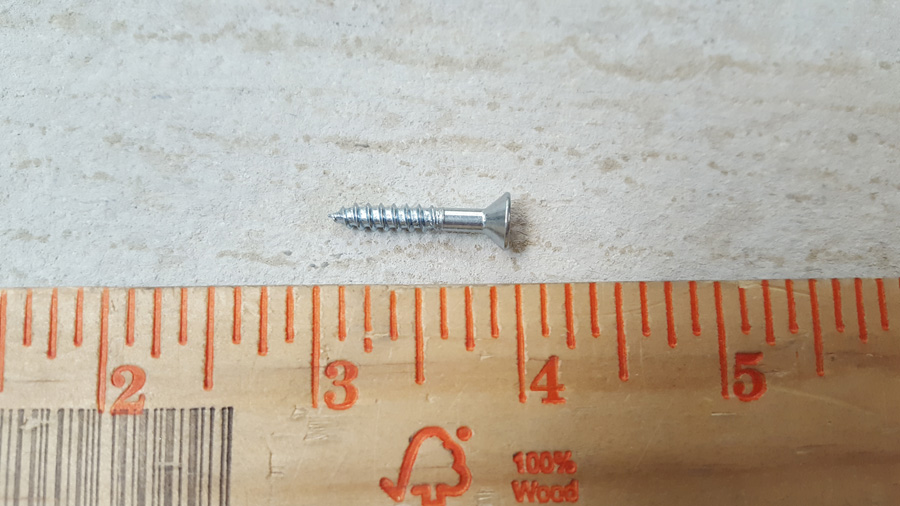
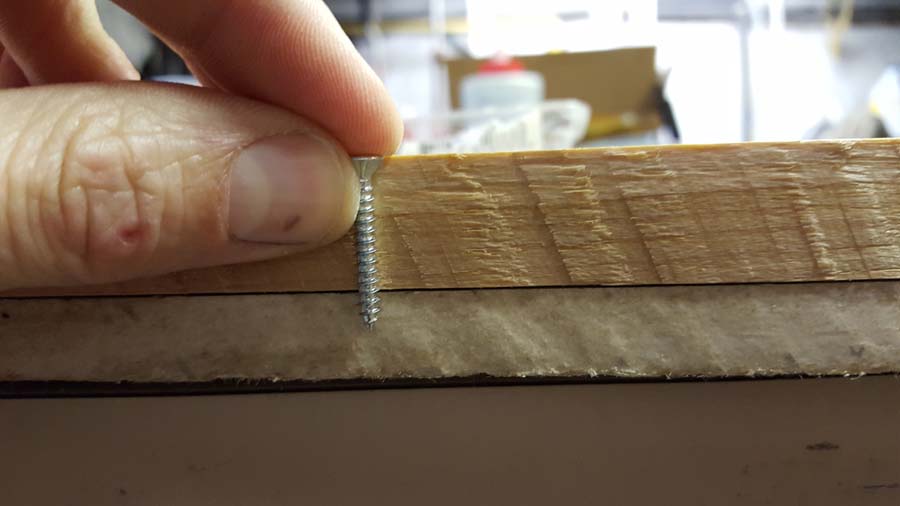
These screws are long enough to go through the wood, but not so long that they would go all the way through the CBB and hit the glass.
Use the same screws for the frame’s french cleat moulding as were used for the frame itself. Don’t use deeper screws because you could puncture the mosaic’s surface.
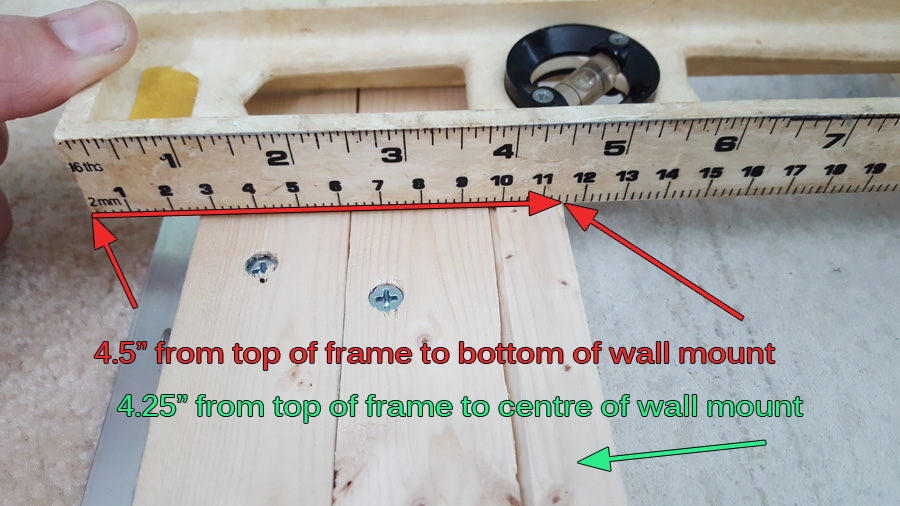
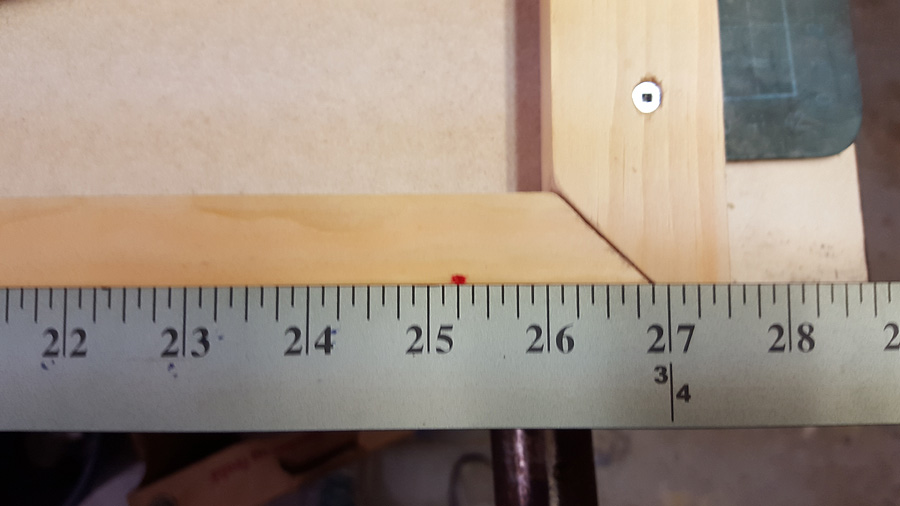
The wall side piece of the moulding needs to be set a few inches below the ideal top position of the mosaic.
Once you have the mosaic’s piece installed figure out where on the wall you want the mosaic. Then you’ll need to figure out the vertical offset for the wall piece. In the above example, you can see that the top of the frame is 4.25″ away from the middle of the moulding when it is slid into the mosaic. That means that the screws need to go 4.25″ below the desired height of the top of the mosaic on the wall.
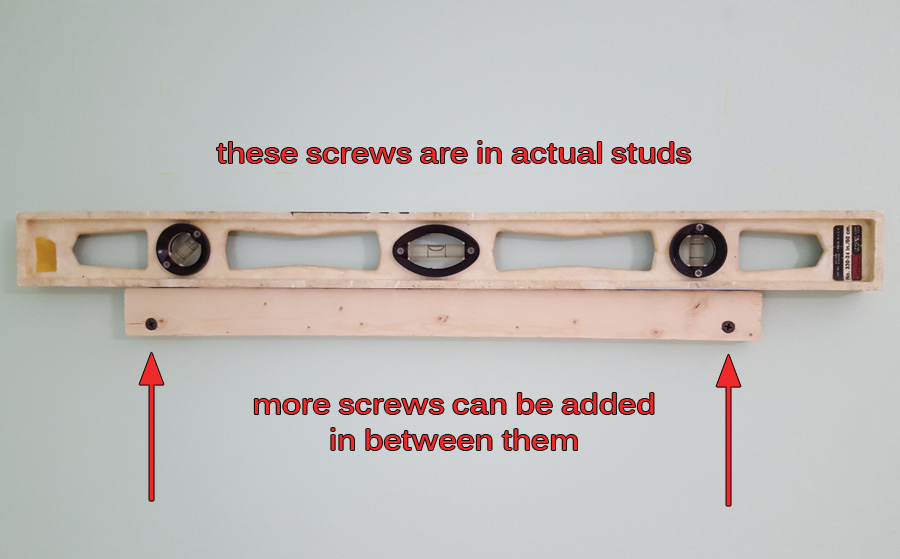
The second piece of moulding should be secured to the studs behind the drywall.
Use a stud finder to locate one or two studs. Lighter mosaics can be affixed to the drywall, but for heavy projects like this it’s good to use the studs themselves and long screws into them. There aren’t any pictures, but after putting this into the wall I added a couple extra screws to the middle of the wood that just went into the drywall. Also, notice the level; make sure things are lined up nicely before permanently attaching the wood to the wall. Once you’ve gotten this far you’re ready to hang the mosaic.
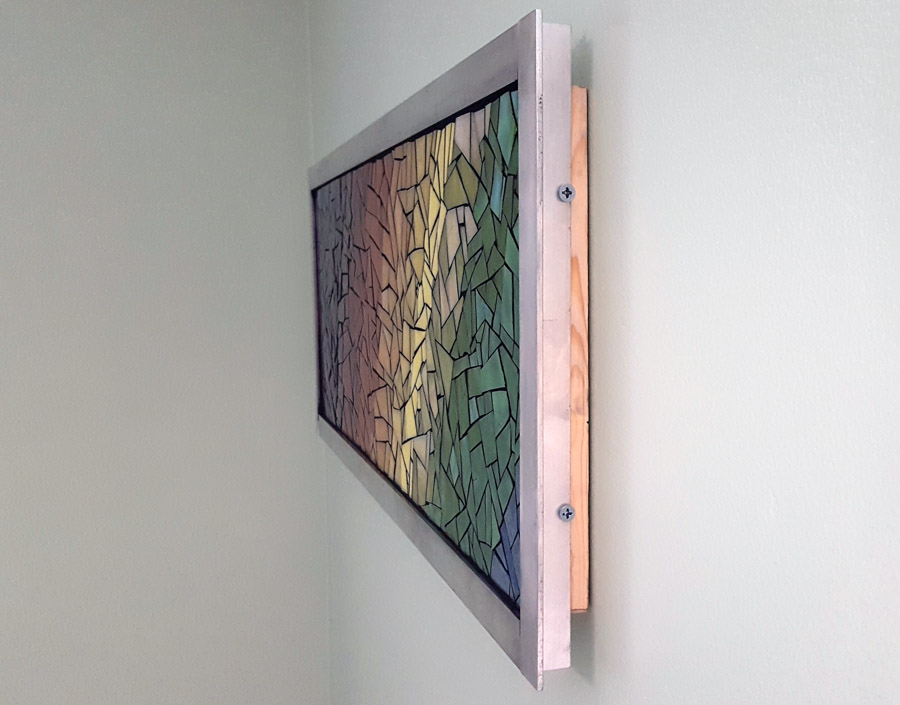
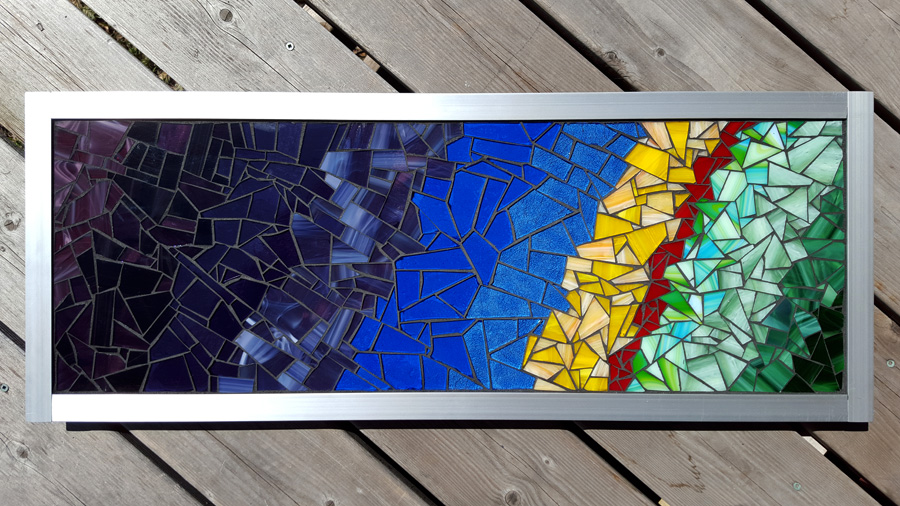
“Energy” mosaic plaque by Natalija Moss mounted against the wall with the french cleat system.“Energy” mosaic art mounted both secure and flush against the wall. If you use a metal frame like this, choose aluminum over steel because it is lighter and easier to work with. Also, be sure to file the corners down to prevent injury if someone walks into it, or secure it high on the wall where it can’t be disturbed.
This mosaic is now secure in place, flush against the wall, and level. For extra tall mosaics hung in this fashion you can add an extra bracket at the bottom with a couple screws hidden behind the frame (if it has one) to prevent the mosaic from falling off the french cleat if it gets bumped by someone.
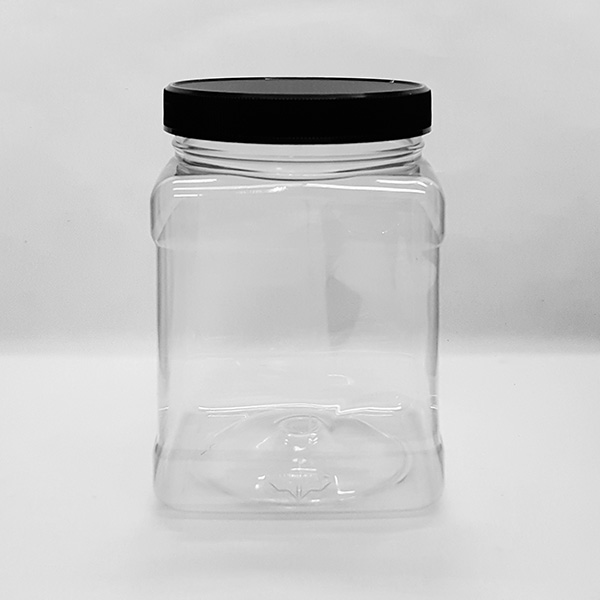
Plastic Storage Jar Square-Grip Clear PET 32oz is perfect for storing and displaying glass mosaic tile. The square shape makes these jars stack efficiently in a small bookshelf. The clear plastic makes the contents visible, which is essential for storing studio materials that are chosen on sight. Holds about 2 to 3 pounds of tile.
Product Specifications
Square-grip plastic storage jar
black ribbed lid with liner
quantity: 1 each
Width: 3.7 in
Height: ~5.5 in with lid
How to Use Plastic Storage Jar Square-Grip Clear PET 32oz
Mosaic tile should be displayed side by side in the studio so that the artist can select just the right color. These clear plastic jars make this possible. We arrange our shelves in “rainbow order” (red-orange-yellow-green-blue-purple-pink) plus browns and black-white-grays. This allows use to find colors quickly, and so we always return the colors to this order, but during a studio session, we are constantly pulling out jars and placing them in different combinations. This is how we quickly evaluate different color schemes for a mosaic before we even start taking tile out of the jar.
How To Make Mosaics
For more advice on designing your mosaic project or mounting, cutting, and grouting tile, please see our page of Mosaic Frequently Asked Questions or our Mosaic Information Guide, which lists instructional pages described by topic. We also post new articles about making mosaics at our How to Mosaic Blog.
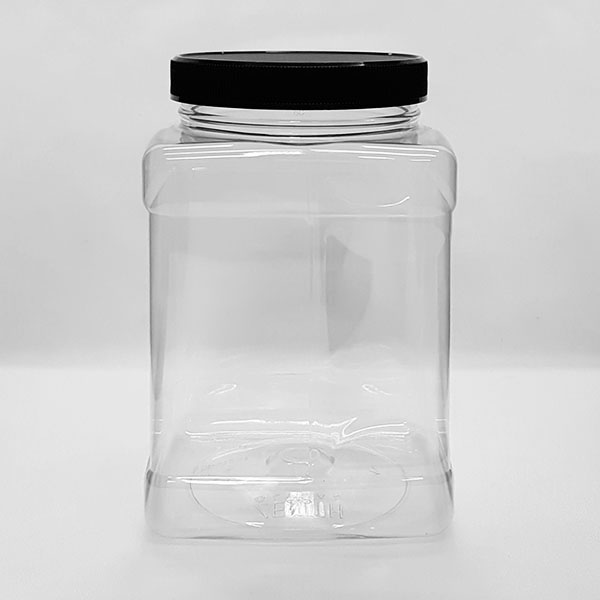
Plastic Storage Jar Square-Grip Clear PET 48oz is perfect for storing and displaying glass mosaic tile. The square shape makes these jars stack efficiently in a small bookshelf. The clear plastic makes the contents visible, which is essential for storing studio materials that are chosen on sight.
Product Specifications
Square-grip plastic storage jar
black ribbed lid with liner
quantity: 1 each
Width: 4.25 in
Height: ~6.5 in with lid
How to Use Plastic Storage Jar Square-Grip Clear PET 48oz
Mosaic tile should be displayed side by side in the studio so that the artist can select just the right color. These clear plastic jars make this possible. We arrange our shelves in “rainbow order” (red-orange-yellow-green-blue-purple-pink) plus browns and black-white-grays. This allows use to find colors quickly, and so we always return the colors to this order, but during a studio session, we are constantly pulling out jars and placing them in different combinations. This is how we quickly evaluate different color schemes for a mosaic before we even start taking tile out of the jar.
How To Make Mosaics
For more advice on designing your mosaic project or mounting, cutting, and grouting tile, please see our page of Mosaic Frequently Asked Questions or our Mosaic Information Guide, which lists instructional pages described by topic. We also post new articles about making mosaics at our How to Mosaic Blog.
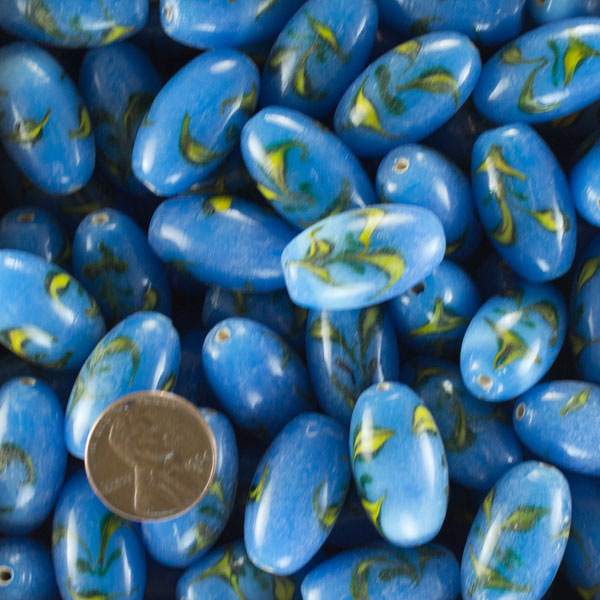
Ovoid Blue Nautical Glass Beads are chunky and roughly 7/8 inch long and sold in 2 ounce lots of approximately 9 pieces. These beads are competitively priced by weight for use in mosaic art, but the diameters of these beads about 1/2 inch, which means they best pressed into thinset mortar or concrete instead of being glued to a flat surface.
Product Coverage
This is a problematic question because beads was intended to be used as an accent instead of as area coverage, and the piece size can vary. One 2-ounce lot covers roughly 3 square inches.
Compatibility
Ovoid Blue Nautical Glass Beads are 1/2 inch in diameter, which is thicker than mosaic of the glass mosaic tile we sell. For this reason, these beads are best used by pressing into a bed of thinset mortar or a stepping stone mold filled with concrete.
Cutting Ovoid Blue Yellow Floral Glass Beads
These beads are too large to be cut using a Mosaic Glass Cutter because they won’t fit into the jaws. These beads are best used uncut. Lampwork beads often break unpredictably when cut with compression tools.
Ovoid Blue Nautical Glass Beads 2oz
Price is per 2 ounces. (Approximately 9 pieces.)
Diameter: ROUGHLY 1/2 inch.
Length: ROUGHLY 7/8 inch.
Coverage: should cover roughly 3 square inches.
Material: glass of varying degrees of translucence.
frost proof if holes filled or plugged with grout.
impervious to liquids.
Suitable for indoor and outdoor installation.
Not suitable for floors.
How To Make Mosaic Art
For more advice on designing your mosaic project or mounting, cutting, and grouting tile, please see our page of Mosaic Frequently Asked Questions or our Mosaic Information Guide, which lists instructional pages described by topic. We also post new articles about making mosaics at our How to Mosaic Blog.
Ovoid Blue Yellow Floral Glass Beads are chunky and roughly 1 inch long and sold in 2 ounce lots of approximately 9 pieces. These beads are competitively priced by weight for use in mosaic art, but the diameters of these beads about 1/2 inch, which means they best pressed into thinset mortar or concrete instead of being glued to a flat surface.
Product Coverage
This is a problematic question because beads was intended to be used as an accent instead of as area coverage, and the piece size can vary. One 2-ounce lot covers roughly 3 square inches.
Compatibility
Ovoid Blue Yellow Floral Glass Beads are 1/2 inch in diameter, which is thicker than mosaic of the glass mosaic tile we sell. For this reason, these beads are best used by pressing into a bed of thinset mortar or a stepping stone mold filled with concrete.
Cutting Ovoid Blue Yellow Floral Glass Beads
These beads are too large to be cut using a Mosaic Glass Cutter because they won’t fit into the jaws. These beads are best used uncut. Lampwork beads often break unpredictably when cut with compression tools.
Ovoid Blue Yellow Floral Glass Beads 2oz
Price is per 2 ounces. (Approximately 9 pieces.)
Diameter: ROUGHLY 1/2 inch.
Length: ROUGHLY 1 inch.
Coverage: should cover roughly 3 square inches.
Material: glass of varying degrees of translucence.
frost proof if holes filled or plugged with grout.
impervious to liquids.
Suitable for indoor and outdoor installation.
Not suitable for floors.
How To Make Mosaic Art
For more advice on designing your mosaic project or mounting, cutting, and grouting tile, please see our page of Mosaic Frequently Asked Questions or our Mosaic Information Guide, which lists instructional pages described by topic. We also post new articles about making mosaics at our How to Mosaic Blog.
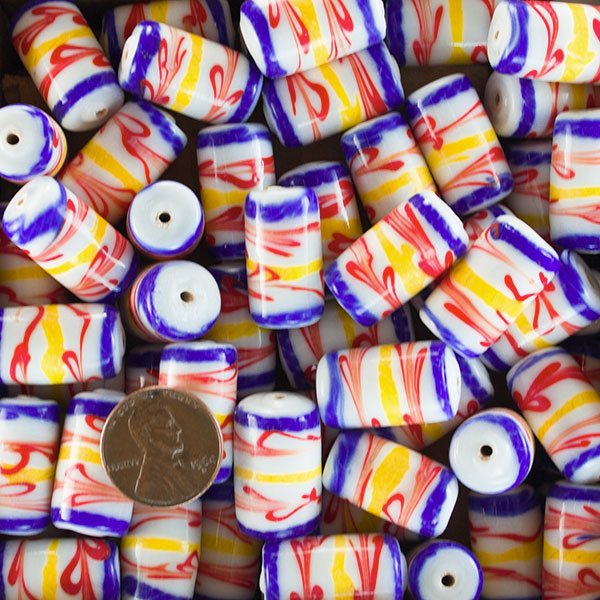
Filigree Cylinder Glass Beads are chunky and roughly 7/8 inch long and sold in 2 ounce lots of approximately 10 pieces. These beads are competitively priced by weight for use in mosaic art, but the diameters of these beads about 1/2 inch, which means they best pressed into thinset mortar or concrete instead of being glued to a flat surface.
Product Coverage
This is a problematic question because beads was intended to be used as an accent instead of as area coverage, and the piece size can vary. One 2-ounce lot covers roughly 3 square inches.
Compatibility
Filigree Cylinder Glass Beads are 1/2 inch in diameter, which is thicker than mosaic of the glass mosaic tile we sell. For this reason, these beads are best used by pressing into a bed of thinset mortar or a stepping stone mold filled with concrete.
Cutting Filigree Cylinder Glass Beads
These beads are too large to be cut using a Mosaic Glass Cutter because they won’t fit into the jaws. These beads are best used uncut. Lampwork beads often break unpredictably when cut with compression tools.
Filigree Cylinder Glass Beads 2oz
Price is per 2 ounces. (Approximately 10 pieces.)
Diameter: ROUGHLY 1/2 inch.
Length: ROUGHLY 7/8 inch.
Coverage: should cover roughly 3 square inches.
Material: glass of varying degrees of translucence.
frost proof if holes filled or plugged with grout.
impervious to liquids.
Suitable for indoor and outdoor installation.
Not suitable for floors.
How To Make Mosaic Art
For more advice on designing your mosaic project or mounting, cutting, and grouting tile, please see our page of Mosaic Frequently Asked Questions or our Mosaic Information Guide, which lists instructional pages described by topic. We also post new articles about making mosaics at our How to Mosaic Blog.
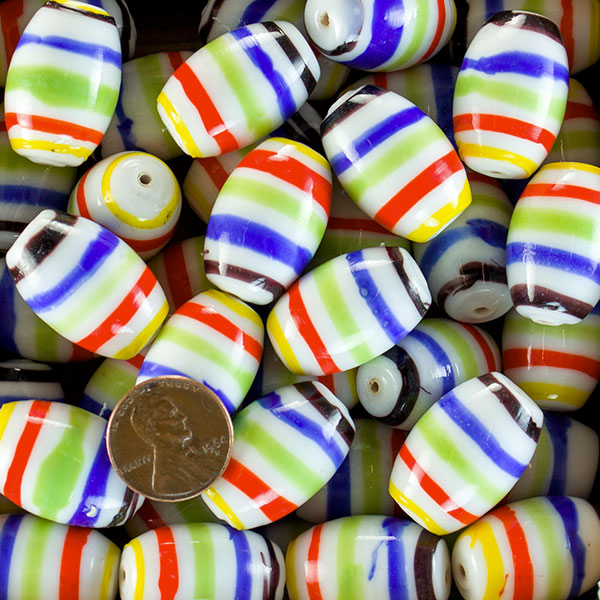
Rainbow Stripe Oval Glass Beads are chunky and roughly 1 inch long and sold in 2 ounce lots of approximately 5 pieces. These beads are competitively priced by weight for use in mosaic art, but the diameters of these beads about 3/4 inch, which means they best pressed into thinset mortar or concrete instead of being glued to a flat surface.
Product Coverage
This is a problematic question because beads was intended to be used as an accent instead of as area coverage, and the piece size can vary. One 2-ounce lot covers roughly 3 square inches.
Compatibility
Rainbow Stripe Oval Glass Beads are 3/4 inch in diameter, which is thicker than mosaic of the glass mosaic tile we sell. For this reason, these beads are best used by pressing into a bed of thinset mortar or a stepping stone mold filled with concrete.
Cutting Rainbow Stripe Oval Glass Beads
These beads are too large to be cut using a Mosaic Glass Cutter because they won’t fit into the jaws. These beads are best used uncut. Lampwork beads often break unpredictably when cut with compression tools.
Rainbow Stripe Oval Glass Beads 2oz
Price is per 2 ounces. (Approximately 8+ pieces.)
Diameter: ROUGHLY 3/4 inch.
Length: ROUGHLY 1 inch.
Coverage: should cover roughly 3 square inches.
Material: glass of varying degrees of translucence.
frost proof if holes filled or plugged with grout.
impervious to liquids.
Suitable for indoor and outdoor installation.
Not suitable for floors.
How To Make Mosaic Art
For more advice on designing your mosaic project or mounting, cutting, and grouting tile, please see our page of Mosaic Frequently Asked Questions or our Mosaic Information Guide, which lists instructional pages described by topic. We also post new articles about making mosaics at our How to Mosaic Blog.
Speckled Yellow Cylinder Glass Beads are chunky and roughly 3/4 inch long and sold in 2 ounce lots of approximately 8+ pieces. These beads are competitively priced by weight for use in mosaic art, but the diameters of these beads about 1/2 inch, which means they best pressed into thinset mortar or concrete instead of being glued to a flat surface.
Product Coverage
This is a problematic question because beads was intended to be used as an accent instead of as area coverage, and the piece size can vary. One 2-ounce lot covers roughly 3 square inches.
Compatibility
Speckled Yellow Cylinder Glass Beads are 1/2 inch in diameter, which is thicker than mosaic of the glass mosaic tile we sell. For this reason, these beads are best used by pressing into a bed of thinset mortar or a stepping stone mold filled with concrete.
Cutting Speckled Yellow Cylinder Glass Beads
These beads are too large to be cut using a Mosaic Glass Cutter because they won’t fit into the jaws. These beads are best used uncut. Lampwork beads often break unpredictably when cut with compression tools.
Speckled Yellow Cylinder Glass Beads 2oz
Price is per 2 ounces. (Approximately 8+ pieces.)
Diameter: ROUGHLY 1/2 inch.
Length: ROUGHLY 3/4 inch.
Coverage: should cover roughly 3 square inches.
Material: glass of varying degrees of translucence.
frost proof if holes filled or plugged with grout.
impervious to liquids.
Suitable for indoor and outdoor installation.
Not suitable for floors.
How To Make Mosaic Art
For more advice on designing your mosaic project or mounting, cutting, and grouting tile, please see our page of Mosaic Frequently Asked Questions or our Mosaic Information Guide, which lists instructional pages described by topic. We also post new articles about making mosaics at our How to Mosaic Blog.
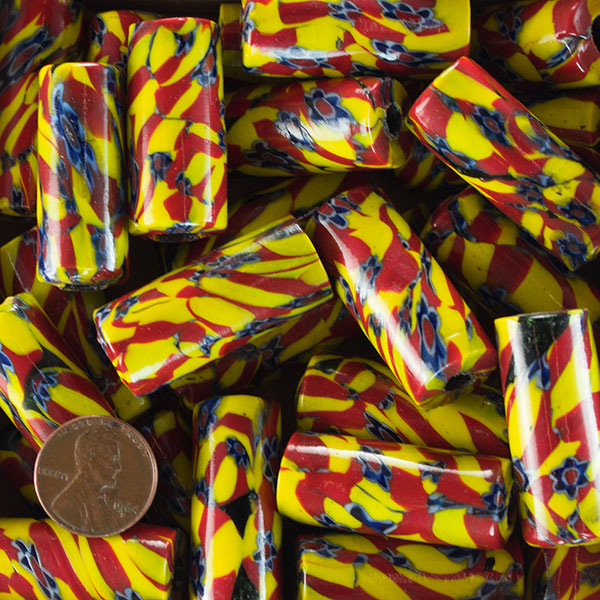
Yellow Cylinder Millefiori Glass Beads are chunky and roughly 1.3 inch long and sold in 2 ounce lots of approximately 4+ pieces. These beads are competitively priced by weight for use in mosaic art, but the diameters of these beads are over 1/2 inch, which means they best pressed into thinset mortar or concrete instead of being glued to a flat surface.
Product Coverage
This is a problematic question because beads was intended to be used as an accent instead of as area coverage, and the piece size can vary. One 2-ounce lot covers roughly 2 square inches.
Compatibility
Yellow Cylinder Millefiori Glass Beads are over 1/2 inch in diameter, which is thicker than mosaic of the glass mosaic tile we sell. For this reason, these beads are best used by pressing into a bed of thinset mortar or a stepping stone mold filled with concrete.
Cutting Yellow Cylinder Millefiori Glass Beads
These beads are too large to be cut using a Mosaic Glass Cutter because they won’t fit into the jaws. These beads are best used uncut. Lampwork beads often break unpredictably when cut with compression tools.
Yellow Cylinder Millefiori Glass Beads 2oz
Price is per 2 ounces. (Approximately 4 pieces.)
Diameter: OVER 1/2 inch.
Length: ROUGHLY 1.3 inch.
Coverage: should cover roughly 2 square inches.
Material: glass of varying degrees of translucence.
frost proof if holes filled or plugged with grout.
impervious to liquids.
Suitable for indoor and outdoor installation.
Not suitable for floors.
How To Make Mosaic Art
For more advice on designing your mosaic project or mounting, cutting, and grouting tile, please see our page of Mosaic Frequently Asked Questions or our Mosaic Information Guide, which lists instructional pages described by topic. We also post new articles about making mosaics at our How to Mosaic Blog.
Most surviving ancient mosaic art is architectural in nature. One instantly thinks of the designs found in Roman baths or Turkish mosques. Today, the interiors of houses are usually made with wood and drywall, and are therefore unsuitable for heavy mosaic art. The sturdy brick and stone architecture of the ancients was ideal for the mosaicists of the time.
To decorate walls we often turn to paintings because they can be easily mounted on a modern interior wall. Mosaic “plaques” fill the same role as a painting. However, as mosaics increase in size their weight can become an issue for not just the wall, but also for themselves. Mosaic art must be very rigid so that cracks don’t appear over time. Larger pieces are more susceptible to warping so they need a sturdier construction.
This mosaic has a reinforced CBB structure behind the glass and frame.
Reinforced Concrete Backer Board
In this tutorial I will describe how to use 1/2 inch Concrete Backer Board (CBB) and wood to build a sturdy foundation for a large wall-mounted mosaic. Mosaics a square foot in size or smaller can be built with a less substantial backer, but this technique should be considered for pieces in the 2 square foot to 8 square-foot range. At 8 square feet and beyond mosaics will become prohibitively heavy and should instead be built into the wall instead of mounted upon the wall.
Getting Started
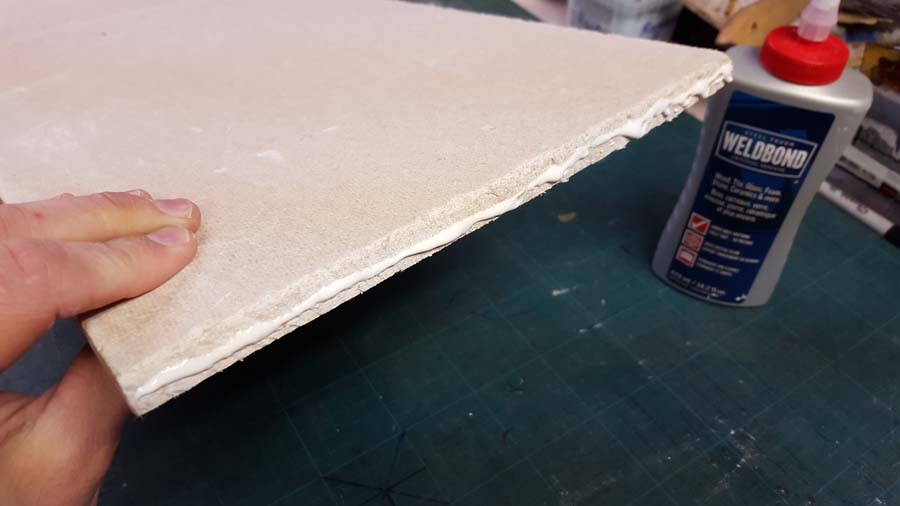
Concrete backer board is notoriously dusty. You should wear a dust mask when cutting it to the size you need. The N95 Dust Masks we sell are suitable. Cut the CBB outdoors if you can. It can be cut by scoring it multiple times with a box cutter or by using a simple hand saw. Once you have it cut to the right size glue the sides with Weldbond.
Concrete Backer Board can be dusty. Seal the edges with Weldbond.
The purpose of the glue is to seal the edges to prevent them from leaving more dust as you work.
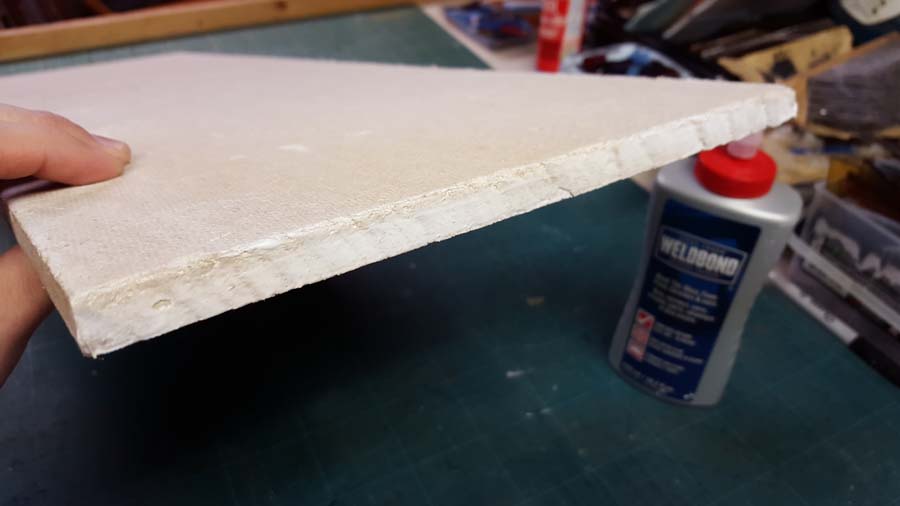
Smooth the bead of glue with your finger.
Smear the glue with your finger until it is a nice flat application as seen above. This should be dry enough to work with very quickly.
Reinforce the Back with Wood
I like to use pine. Any lumber store or big-box home improvement store should have suitable wood. You can also ask a carpenter friend for scraps. What we’re going to do is make a frame-like structure on the back of the CBB by putting wood around the edges. For smaller CBB-backed mosaics it is easier to simply laminate the back of the CBB with plywood to create a decent structure. However, to save weight on larger projects like this we can create a frame which won’t weigh as much but will still help us out. Mounting hardware can’t be affixed directly to the CBB because it can break under the localized stress of the screws. Wood will not break under that pressure. The wood can also support an external frame if desired.
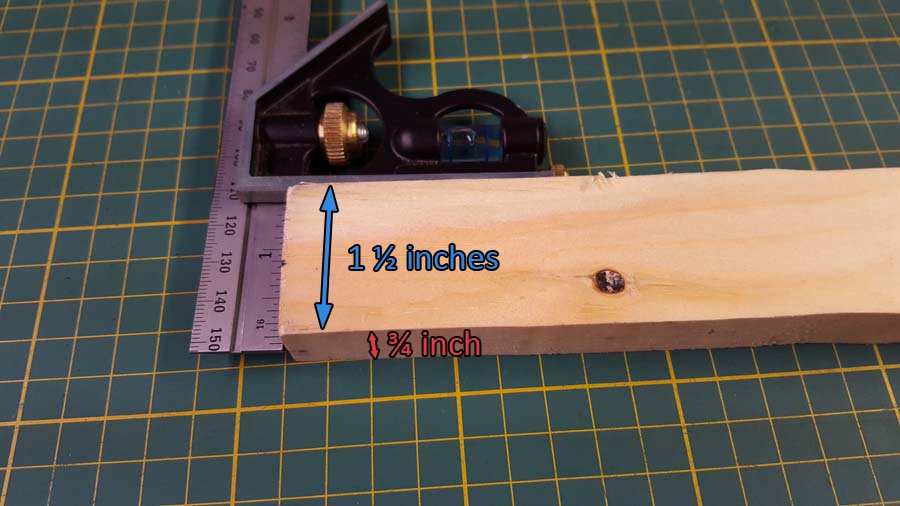
This is 1½” x ¾” pine.
For this mosaic I used pine with actual dimensions of 1.5 inches by 3/4 of an inch. At the lumber store they will call this something else. It comes in a hard edge variety as seen here, or with rounded edges. I prefer the hard edges, but it’s up to you.
Cut the First Piece
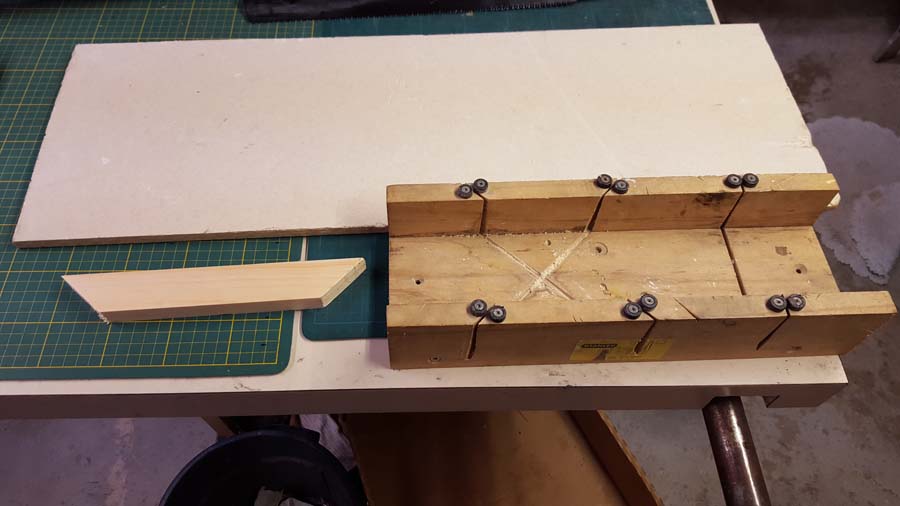
If you don’t have a chop saw you can use a mitre box to get 45° edges.
Choose which side you want to work with and cut a piece. I used mitre cuts because they look nicer, but if you want to do this on the quick you can cut right angles and butt the ends up against eachother.
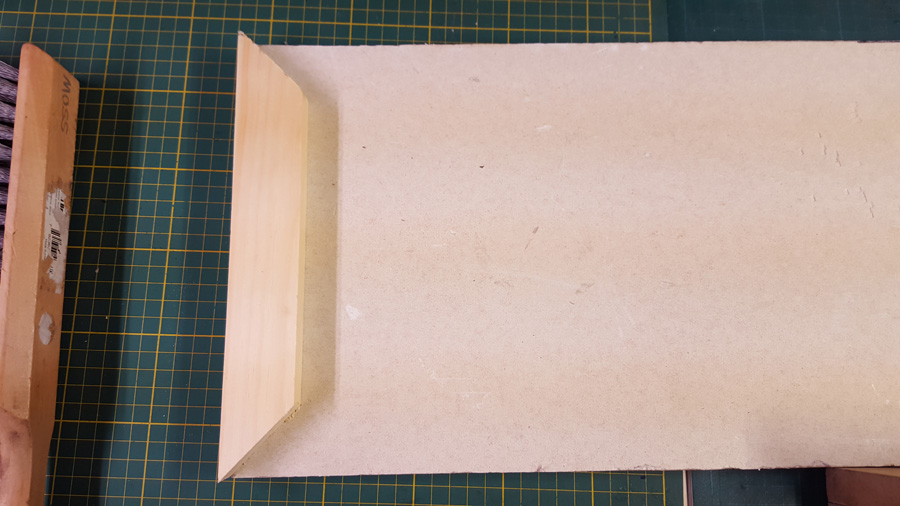
Line up the first piece to ensure a proper fit.
Make sure the wood is placed so it meets or slightly exceeds the dimensions of the concrete backer board. Sometimes CBB can have gnarled corners or uneven edges from sawing it or cutting it. The wood should be either flush with the edges or slightly hang past it.
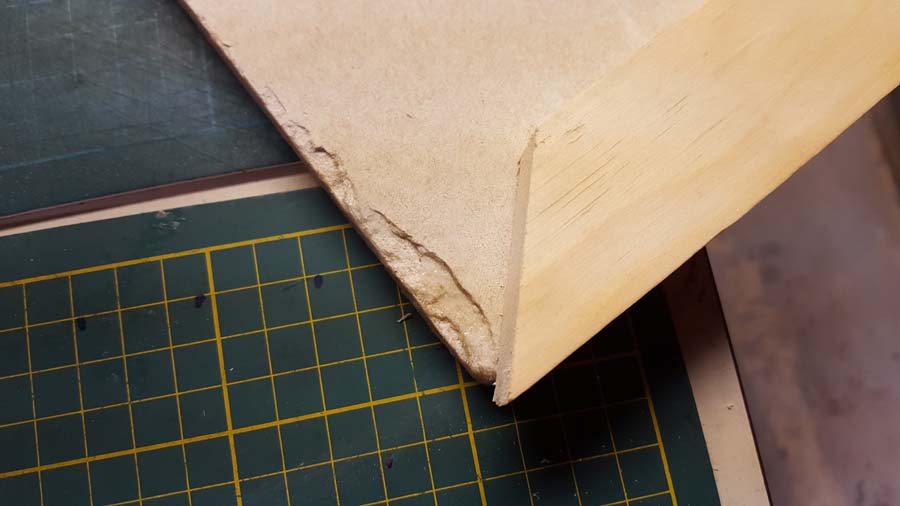
The point may overhang a broken corner.
In this example, one of the corners is broken. Make sure the wood overhangs it enough to form a right angle with the other side.
Cut the Other Pieces
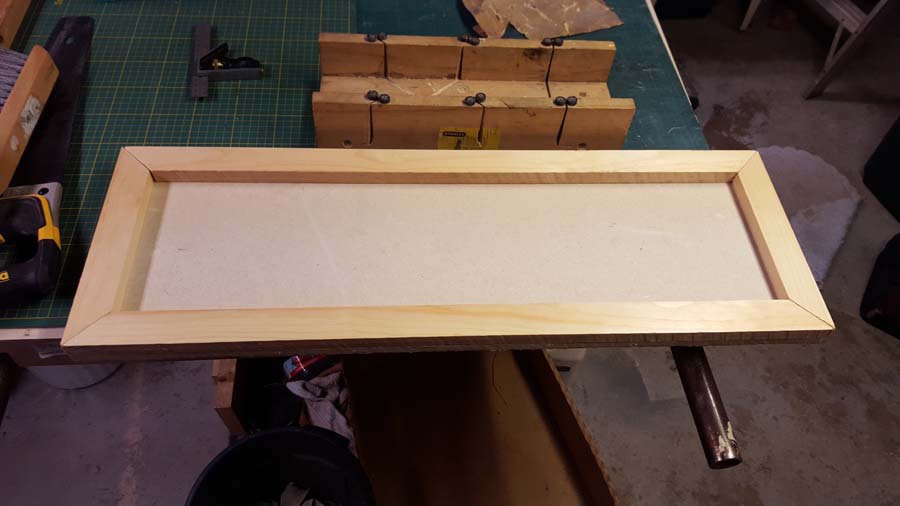
With the fitment of the first piece confirmed cut the other three pieces of wood to the appropriate sizes and try to line them up. It should look like this:
Cut all the pieces and test their fit.
Take a look at each of the corners and make sure everything is lined up well.
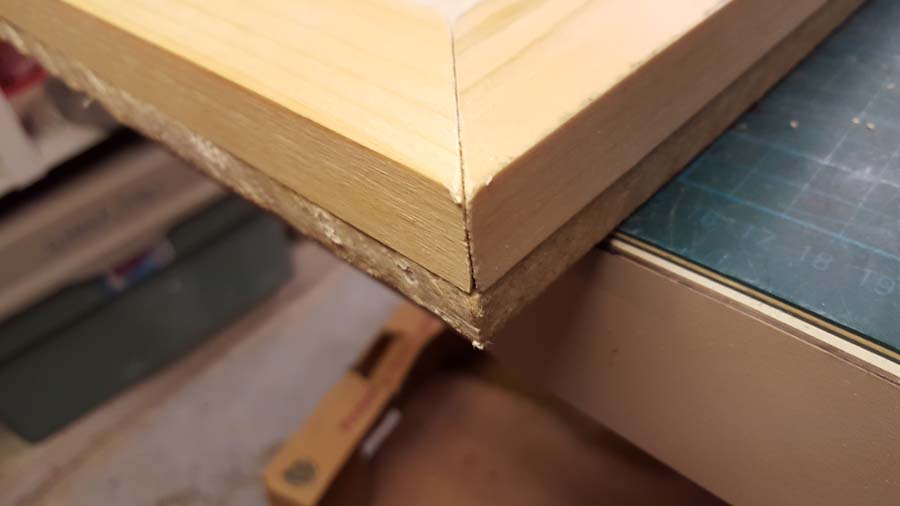
Pay particular attention to the corners, make sure they look good on each side.
Here you can see that the corners of the wood is aligned directly with the corner of the CBB. The wood has the slightest overhang, which you can see in the photo if you look at the shadow where the wood and CBB meet. This overhang is probably only about 1 millimeter, or just over 1/64th of an inch, it is very small, but you can feel it if you touch the sides. It’s okay if they are totally flush, but if it’s hard to make it exact err on the side of making the wood slightly larger than the backer board as in this example.
We’re now almost ready to permanently affix the wood to the backer board. Double-check using a square that all of the angles are correct and then you’re ready to move on.
Attach the First Piece of the Wooden Frame
You’re going to need some screws and some wood glue or Weldbond. Weldbond is an excellent adhesive for this application.
A 1 inch screw will not exceed the thickness of the CBB.
I am going to use these exact screws. Notice how the screw will not protrude from the face of the CBB even if I tighten it a little too far. I want screws with this style of head because they can be screwed just past the surface of the wood which will keep them from scratching the wall once the mosaic is complete. In this case the screws are 1 inch long.
Drill pilot holes first.
These pilot holes are in the middle of the wood, and 2.25 inches in from the sides. This measurement looked nice, but has no other real significance.
Apply a bead of Weldbond before screwing the piece down.
Flip the piece over and add some glue.
The first piece is secure. Make sure the screws are flush with or sunk into the wood.
Put it back in place and screw it down. Now this piece can be used with a square to ensure the next pieces will be at right angles.
Attach the Rest of the Frame
Start by deciding where to put the screws.
This screw will go 2.25 inches from the edge.
Determining the screw positions for the other sides will be a little more tricky because of how long they are. The additional length means they will need more screws to hold them in position. In this case I started with the same 2.25 inch measurement as was used for the screws on the small piece. This will help everything look uniform when it’s completed.
Establish the locations of the middle screws.
With the end screw locations established by using the 2.25 inch measurement we have to decide where to put the other two screws. In this case there was 25.25 inches between the two end screws. Divided into 3 that becomes 8.4166 inches, or just less than 8 and a half inches, so that’s where I put the two central screws.
Making the screws even like this is simply a matter of workmanship. It isn’t essential that you have equal gaps between each screw, but if you want it to look nice then you can do it this way.
Pre-drill all holes and apply glue to the underside of the piece.
Pre-drill everything and apply the glue. I have been using a 7/32 inch drill bit for all of the pilot holes.
Install the second piece in the same manner as before.
Affix the second piece in the same manner as the first.
Finishing Up
Continue with pieces 3 and 4. Don’t forget to check that everything is square.
You can move on to one of the other sides. Use the same measurements for the screw locations. Be sure to check the angles with a square as you go along.
The reinforcements are now finished.
Once you put in the last screw you’re done.
This piece is ready for glass.
Now that this is finished you can make a mosaic and know with confidence that it will survive a very long time. The wood frame gives you some options when selecting hanging hardware that will allow for a flush fit with the wall. This reinforcement also allows for different possibilities when deciding to either frame or mosaic the sides.