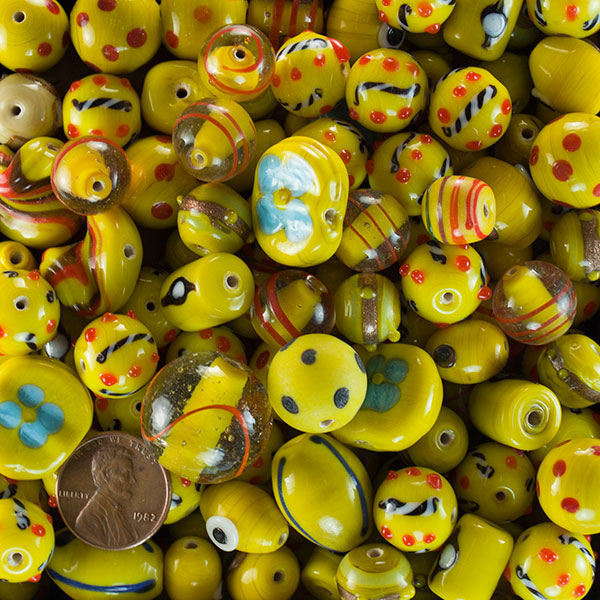
Yellow Dotted Lampwork Glass Beads are large and chunky and sold in 4 ounce assortments of approximately 28+ pieces. These beads are competitively priced by weight for use in mosaic art, but the diameters of most of these beads are 1/2 inch or more, which means they best pressed into mortar or concrete instead of being glued to a flat surface.
Product Coverage
This is a problematic question because beads was intended to be used as an accent instead of as area coverage, and the piece size can vary. One 4-ounce assortment covers roughly 3+ square inches.
Compatibility
The Yellow Dotted Lampwork Glass Beads are usually 3/8 inch or larger in diameter, which is thicker than mosaic of the glass mosaic tile we sell. For this reason, these beads are best used by pressing into a bed of thinset mortar or a stepping stone mold filled with concrete.
Cutting Yellow Dotted Lampwork Glass Beads
These beads are too large to be cut using a Mosaic Glass Cutter because they won’t fit into the jaws. These beads are best used uncut.
Yellow Dotted Lampwork Glass Beads 4oz
- Price is per 4 ounces. (Approximately 28+ pieces.)
- Diameter: ROUGHLY 1/2 inch.
- Length: 0.5 to 1 inch.
- Coverage: should cover roughly 3+ square inches.
- Material: glass of varying degrees of translucence.
- frost proof.
- impervious to liquids.
- Suitable for indoor and outdoor installation.
- Not suitable for floors.
How To Make Mosaic Art
For more advice on designing your mosaic project or mounting, cutting, and grouting tile, please see our page of Mosaic Frequently Asked Questions or our Mosaic Information Guide, which lists instructional pages described by topic. We also post new articles about making mosaics at our How to Mosaic Blog.
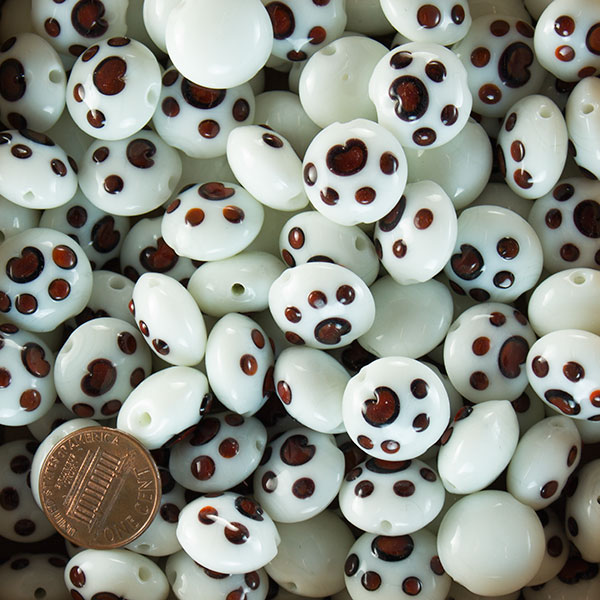
Paw Print JTLU-36 Glass Beads are sold in lots of 5 pieces. The beads are larger and rounded, which means they best pressed into mortar or concrete instead of being glued to a flat surface, but where there is a will, there is a way. You can carve sockets into plywood packers so that the beads do not stick up to high above surrounding tiles.
Product Coverage
Please order these for use as accents not area coverage.
Compatibility
Paw Print JTLU-36 Glass Beads are thicker than mosaic of the glass mosaic tile we sell. For this reason, these beads are best used by pressing into a bed of thinset mortar or a stepping stone mold filled with concrete.
Cutting Paw Print JTLU-36 Glass Beads
These beads are not suitable for cutting.
Paw Print JTLU-36 Glass Beads
- Price is for a lot of 5 beads.
- Diameter: about 15+ mm.
- Material: glass.
- frost proof.
- impervious to liquids.
- Suitable for indoor and outdoor installation.
- Not suitable for floors.
How To Make Mosaic Art
For more advice on designing your mosaic project or mounting, cutting, and grouting tile, please see our page of Mosaic Frequently Asked Questions or our Mosaic Information Guide, which lists instructional pages described by topic. We also post new articles about making mosaics at our How to Mosaic Blog.

Smiley Face JTLU-40 Glass Beads are sold in lots of 5 pieces. The beads are larger and rounded, which means they best pressed into mortar or concrete instead of being glued to a flat surface, but where there is a will, there is a way. You can carve sockets into plywood packers so that the beads do not stick up to high above surrounding tiles.
Product Coverage
Please order these for use as accents not area coverage.
Compatibility
Smiley Face JTLU-40 Glass Beads are thicker than mosaic of the glass mosaic tile we sell. For this reason, these beads are best used by pressing into a bed of thinset mortar or a stepping stone mold filled with concrete.
Cutting Smiley Face JTLU-40 Glass Beads
These beads are not suitable for cutting.
Smiley Face JTLU-40 Glass Beads
- Price is for a lot of 5 beads.
- Diameter: about 15+ mm.
- Material: glass.
- frost proof.
- impervious to liquids.
- Suitable for indoor and outdoor installation.
- Not suitable for floors.
How To Make Mosaic Art
For more advice on designing your mosaic project or mounting, cutting, and grouting tile, please see our page of Mosaic Frequently Asked Questions or our Mosaic Information Guide, which lists instructional pages described by topic. We also post new articles about making mosaics at our How to Mosaic Blog.

Odds and Ends Assorted Millefiori Beads are smaller beads sold in 2 ounce assortments of approximately 50+ pieces. These beads are competitively priced by weight for use in mosaic art, and are generally small enough (6 to 12mm) to be glued to a flat surface.
Product Coverage
This is a problematic question because beads was intended to be used as an accent instead of as area coverage, and the piece size can vary. One 2-ounce assortment covers roughly 2+ square inches.
Compatibility
Odds and Ends Assorted Millefiori Beads are usually smaller than most of our lampwork beads, and this means most of them can be glued to a flat surface with glass mosaic tile without sticking up too far. However, grouting any mosaic made from pieces of uneven thickness requires a little more effort and care than grouting a mosaic of tile of uniform thickness.
Cutting Odds and Ends Assorted Millefiori Beads
These beads are small enough to be used without the need to cut them.
Odds and Ends Assorted Millefiori Beads
- Price is per 2 ounces.
- Size and Shape: varies
- Coverage: 2 ounces should cover roughly 2+ square inches.
- Material: glass of varying degrees of translucence.
- frost proof.
- impervious to liquids.
- Suitable for indoor and outdoor installation.
- Not suitable for floors.
How To Make Mosaic Art
For more advice on designing your mosaic project or mounting, cutting, and grouting tile, please see our page of Mosaic Frequently Asked Questions or our Mosaic Information Guide, which lists instructional pages described by topic. We also post new articles about making mosaics at our How to Mosaic Blog.

Star-Shaped JTPB-1-2-3 Glass Beads are smaller beads sold in 2 ounce assortments of approximately 40+ pieces. These beads are competitively priced by weight for use in mosaic art, and are generally small enough to be glued to a flat surface.
Product Coverage
This is a problematic question because beads was intended to be used as an accent instead of as area coverage, and the piece size can vary. One 2-ounce assortment covers roughly 2+ square inches.
Compatibility
Star-Shaped JTPB-1-2-3 Glass Beads are usually smaller than most of our lampwork beads, and this means most of them can be glued to a flat surface with glass mosaic tile without sticking up too far. However, grouting any mosaic made from pieces of uneven thickness requires a little more effort and care than grouting a mosaic of tile of uniform thickness.
Cutting Star-Shaped JTPB-1-2-3 Glass Beads
These beads are small enough to be used without the need to cut them.
Star-Shaped JTPB-1-2-3 Glass Beads 2oz
- Price is per 2 ounces. (Approximately 40+ pieces.)
- Diameter: 10 to 12mm.
- Coverage: 2 ounces should cover roughly 2+ square inches.
- Material: glass of varying degrees of translucence.
- frost proof.
- impervious to liquids.
- Suitable for indoor and outdoor installation.
- Not suitable for floors.
How To Make Mosaic Art
For more advice on designing your mosaic project or mounting, cutting, and grouting tile, please see our page of Mosaic Frequently Asked Questions or our Mosaic Information Guide, which lists instructional pages described by topic. We also post new articles about making mosaics at our How to Mosaic Blog.

Cathay Millefiori JTMG-20 Glass Beads are smaller beads sold in 2 ounce assortments of approximately 50+ pieces. These beads are competitively priced by weight for use in mosaic art, and are generally small enough (6 to 12mm) to be glued to a flat surface.
Product Coverage
This is a problematic question because beads was intended to be used as an accent instead of as area coverage, and the piece size can vary. One 2-ounce assortment covers roughly 2+ square inches.
Compatibility
Cathay Millefiori JTMG-20 Glass Beads are usually smaller than most of our lampwork beads, and this means most of them can be glued to a flat surface with glass mosaic tile without sticking up too far. However, grouting any mosaic made from pieces of uneven thickness requires a little more effort and care than grouting a mosaic of tile of uniform thickness.
Cutting Cathay Millefiori JTMG-20 Glass Beads
These beads are small enough to be used without the need to cut them.
Cathay Millefiori JTMG-20 Glass Beads 2oz
- Price is per 2 ounces. (Approximately 50+ pieces.)
- Diameter: 6 to 12mm.
- Length: 6 to 12mm.
- Coverage: 2 ounces should cover roughly 2+ square inches.
- Material: glass of varying degrees of translucence.
- frost proof.
- impervious to liquids.
- Suitable for indoor and outdoor installation.
- Not suitable for floors.
How To Make Mosaic Art
For more advice on designing your mosaic project or mounting, cutting, and grouting tile, please see our page of Mosaic Frequently Asked Questions or our Mosaic Information Guide, which lists instructional pages described by topic. We also post new articles about making mosaics at our How to Mosaic Blog.
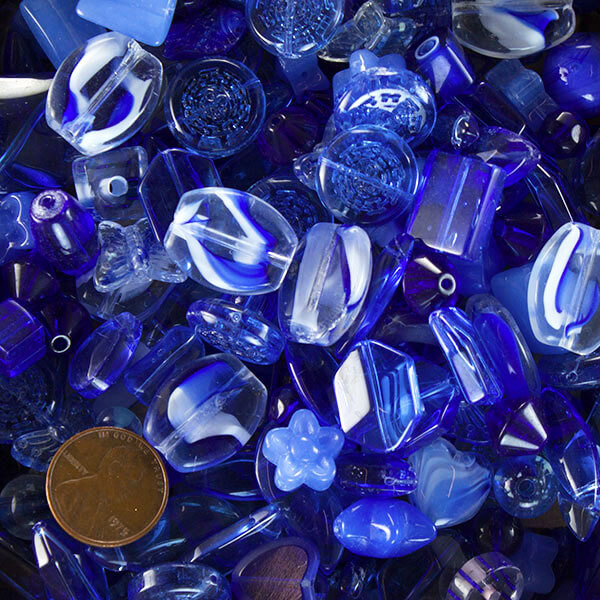
Cathay Blue JTMG-22 Chunky Glass Beads are large and chunky and sold in 4 ounce assortments of approximately 20+ pieces. These beads are competitively priced by weight for use in mosaic art, but the diameters of most of these beads are 1/2 inch or more, which means they best pressed into mortar or concrete instead of being glued to a flat surface.
Product Coverage
This is a problematic question because beads was intended to be used as an accent instead of as area coverage, and the piece size can vary. One 4-ounce assortment covers roughly 3+ square inches.
Compatibility
Cathay Blue JTMG-22 Chunky Glass Beads are usually 3/8 inch or larger in diameter, which is thicker than mosaic of the glass mosaic tile we sell. For this reason, these beads are best used by pressing into a bed of thinset mortar or a stepping stone mold filled with concrete.
Cutting Cathay Blue JTMG-22 Chunky Glass Beads
Some of these beads are too large to be cut using a Mosaic Glass Cutter because they won’t fit into the jaws. These beads are best used uncut.
Cathay Blue JTMG-22 Chunky Glass Beads
- Price is per 4 ounces. (Approximately 20+ pieces.)
- Diameter: mostly 1/2 inch or more.
- Length: up to 1 inch.
- Coverage: should cover roughly 3+ square inches.
- Material: glass of varying degrees of translucence.
- frost proof.
- impervious to liquids.
- Suitable for indoor and outdoor installation.
- Not suitable for floors.
How To Make Mosaic Art
For more advice on designing your mosaic project or mounting, cutting, and grouting tile, please see our page of Mosaic Frequently Asked Questions or our Mosaic Information Guide, which lists instructional pages described by topic. We also post new articles about making mosaics at our How to Mosaic Blog.
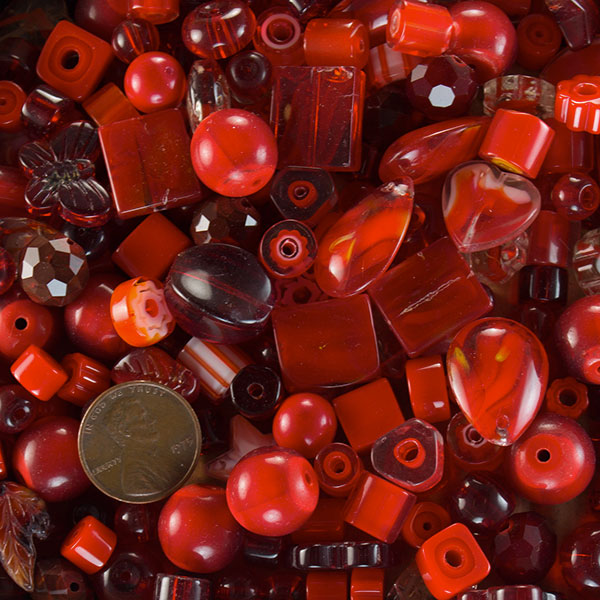
Cathay Red JTMG-24 Chunky Glass Beads are large and chunky and sold in 4 ounce assortments of approximately 20+ pieces. These beads are competitively priced by weight for use in mosaic art, but the diameters of most of these beads are 1/2 inch or more, which means they best pressed into mortar or concrete instead of being glued to a flat surface.
Product Coverage
This is a problematic question because beads was intended to be used as an accent instead of as area coverage, and the piece size can vary. One 4-ounce assortment covers roughly 3+ square inches.
Compatibility
Cathay Red JTMG-24 Chunky Glass Beads are usually 3/8 inch or larger in diameter, which is thicker than mosaic of the glass mosaic tile we sell. For this reason, these beads are best used by pressing into a bed of thinset mortar or a stepping stone mold filled with concrete.
Cutting Cathay Red JTMG-24 Chunky Glass Beads
Some of these beads are too large to be cut using a Mosaic Glass Cutter because they won’t fit into the jaws. These beads are best used uncut.
Cathay Red JTMG-24 Chunky Glass Beads
- Price is per 4 ounces. (Approximately 20+ pieces.)
- Diameter: mostly 1/2 inch or more.
- Length: up to 1 inch.
- Coverage: should cover roughly 3+ square inches.
- Material: glass of varying degrees of translucence.
- frost proof.
- impervious to liquids.
- Suitable for indoor and outdoor installation.
- Not suitable for floors.
How To Make Mosaic Art
For more advice on designing your mosaic project or mounting, cutting, and grouting tile, please see our page of Mosaic Frequently Asked Questions or our Mosaic Information Guide, which lists instructional pages described by topic. We also post new articles about making mosaics at our How to Mosaic Blog.
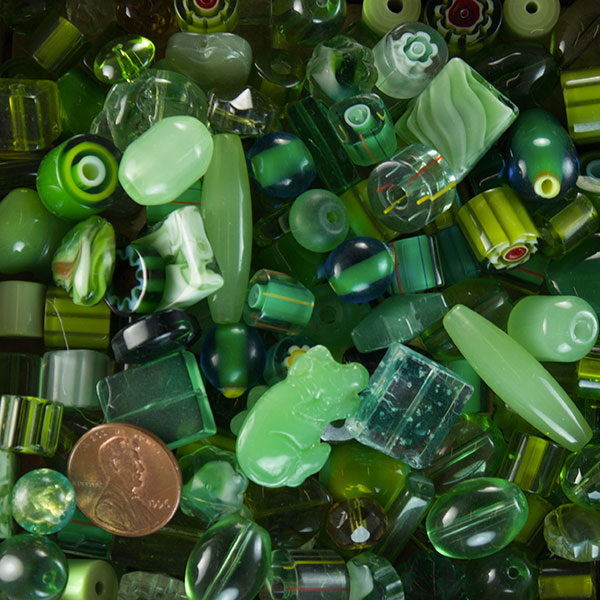
Cathay Green JTMG-3 Chunky Glass Beads are large and chunky and sold in 4 ounce assortments of approximately 20+ pieces. These beads are competitively priced by weight for use in mosaic art, but the diameters of most of these beads are 1/2 inch or more, which means they best pressed into mortar or concrete instead of being glued to a flat surface.
Product Coverage
This is a problematic question because beads was intended to be used as an accent instead of as area coverage, and the piece size can vary. One 4-ounce assortment covers roughly 3+ square inches.
Compatibility
Cathay Green JTMG-3 Chunky Glass Beads are usually 3/8 inch or larger in diameter, which is thicker than mosaic of the glass mosaic tile we sell. For this reason, these beads are best used by pressing into a bed of thinset mortar or a stepping stone mold filled with concrete.
Cutting Cathay Green JTMG-3 Chunky Glass Beads
Some of these beads are too large to be cut using a Mosaic Glass Cutter because they won’t fit into the jaws. These beads are best used uncut.
Cathay Green JTMG-3 Chunky Glass Beads
- Price is per 4 ounces. (Approximately 20+ pieces.)
- Diameter: mostly 1/2 inch or more.
- Length: up to 1 inch.
- Coverage: should cover roughly 3+ square inches.
- Material: glass of varying degrees of translucence.
- frost proof.
- impervious to liquids.
- Suitable for indoor and outdoor installation.
- Not suitable for floors.
How To Make Mosaic Art
For more advice on designing your mosaic project or mounting, cutting, and grouting tile, please see our page of Mosaic Frequently Asked Questions or our Mosaic Information Guide, which lists instructional pages described by topic. We also post new articles about making mosaics at our How to Mosaic Blog.
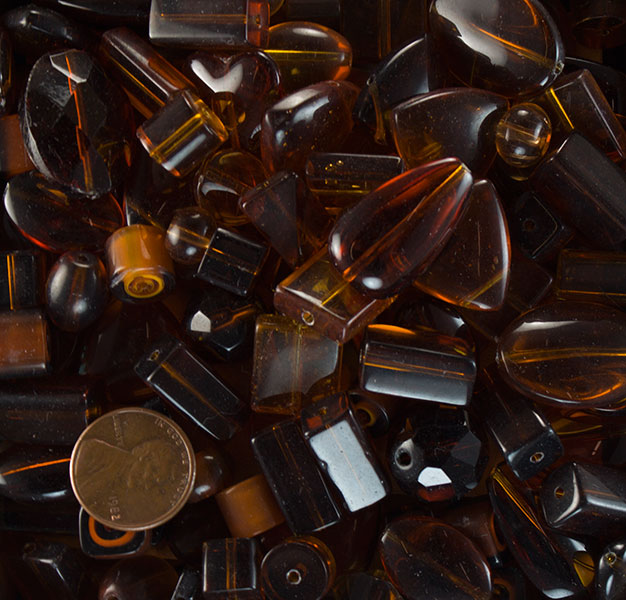
Cathay Brown JTMG-21 Chunky Glass Beads are large and chunky and sold in 4 ounce assortments of approximately 20+ pieces. These beads are competitively priced by weight for use in mosaic art, but the diameters of most of these beads are 1/2 inch or more, which means they best pressed into mortar or concrete instead of being glued to a flat surface.
Product Coverage
This is a problematic question because beads was intended to be used as an accent instead of as area coverage, and the piece size can vary. One 4-ounce assortment covers roughly 3+ square inches.
Compatibility
Cathay Brown JTMG-21 Chunky Glass Beads are usually 3/8 inch or larger in diameter, which is thicker than mosaic of the glass mosaic tile we sell. For this reason, these beads are best used by pressing into a bed of thinset mortar or a stepping stone mold filled with concrete.
Cutting Cathay Brown JTMG-21 Chunky Glass Beads
Some of these beads are too large to be cut using a Mosaic Glass Cutter because they won’t fit into the jaws. These beads are best used uncut.
Cathay Brown JTMG-21 Chunky Glass Beads
- Price is per 4 ounces. (Approximately 20+ pieces.)
- Diameter: mostly 1/2 inch or more.
- Length: up to 1 inch.
- Coverage: should cover roughly 3+ square inches.
- Material: glass of varying degrees of translucence.
- frost proof.
- impervious to liquids.
- Suitable for indoor and outdoor installation.
- Not suitable for floors.
How To Make Mosaic Art
For more advice on designing your mosaic project or mounting, cutting, and grouting tile, please see our page of Mosaic Frequently Asked Questions or our Mosaic Information Guide, which lists instructional pages described by topic. We also post new articles about making mosaics at our How to Mosaic Blog.
