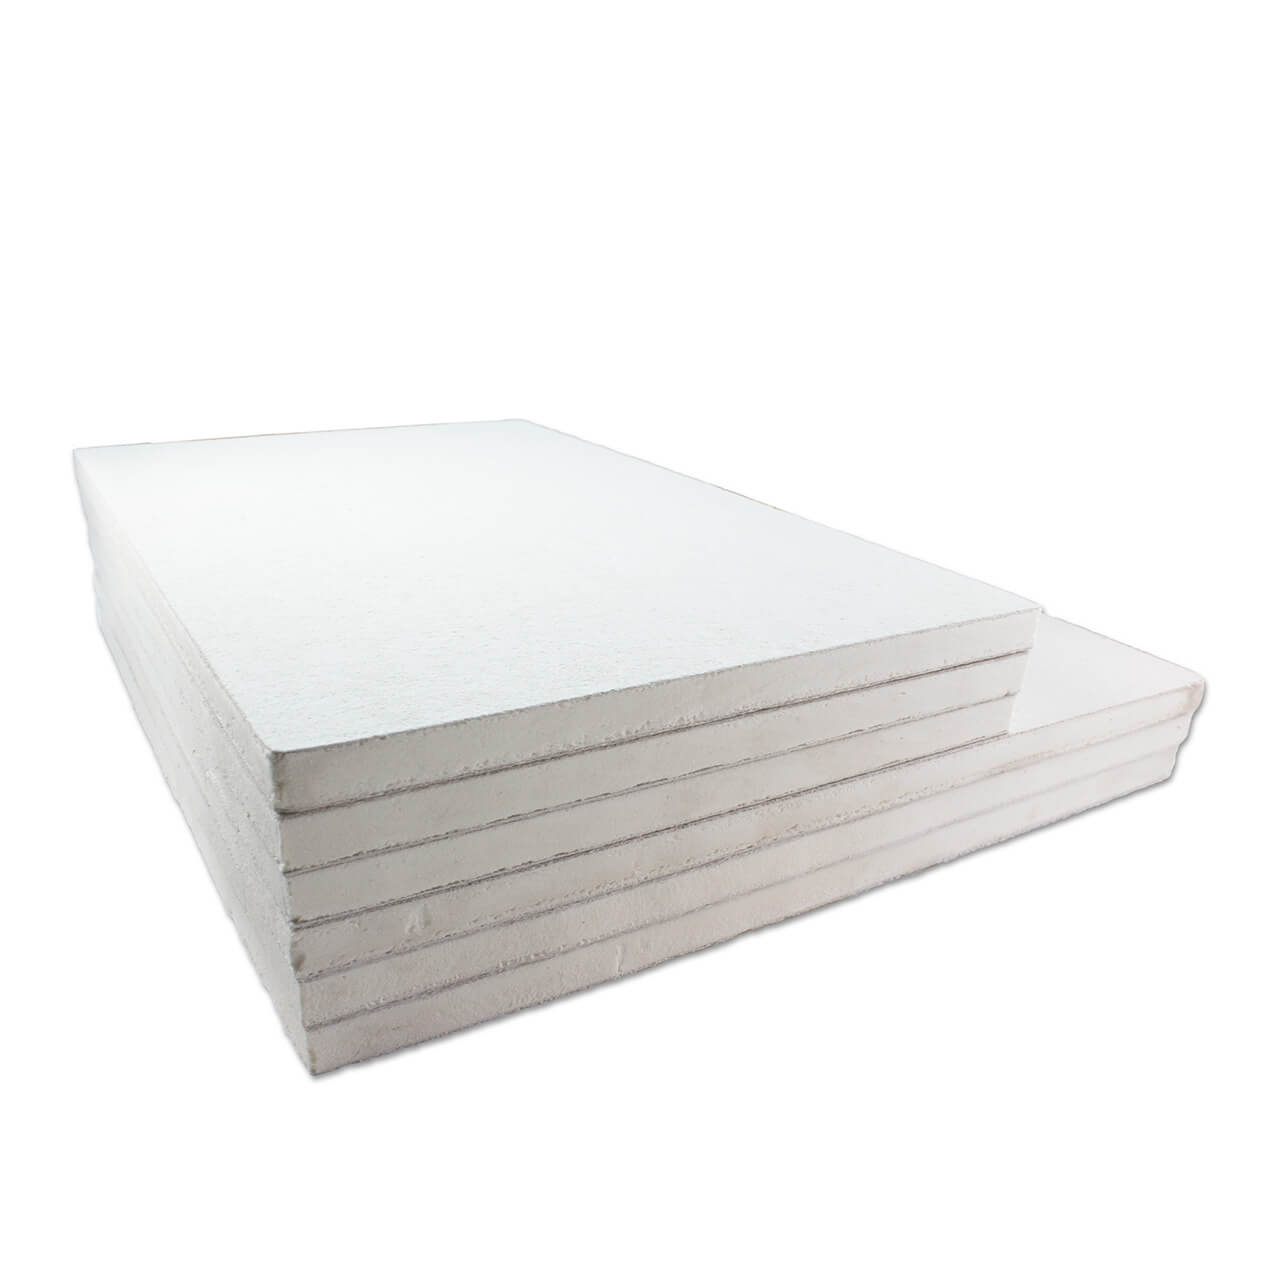
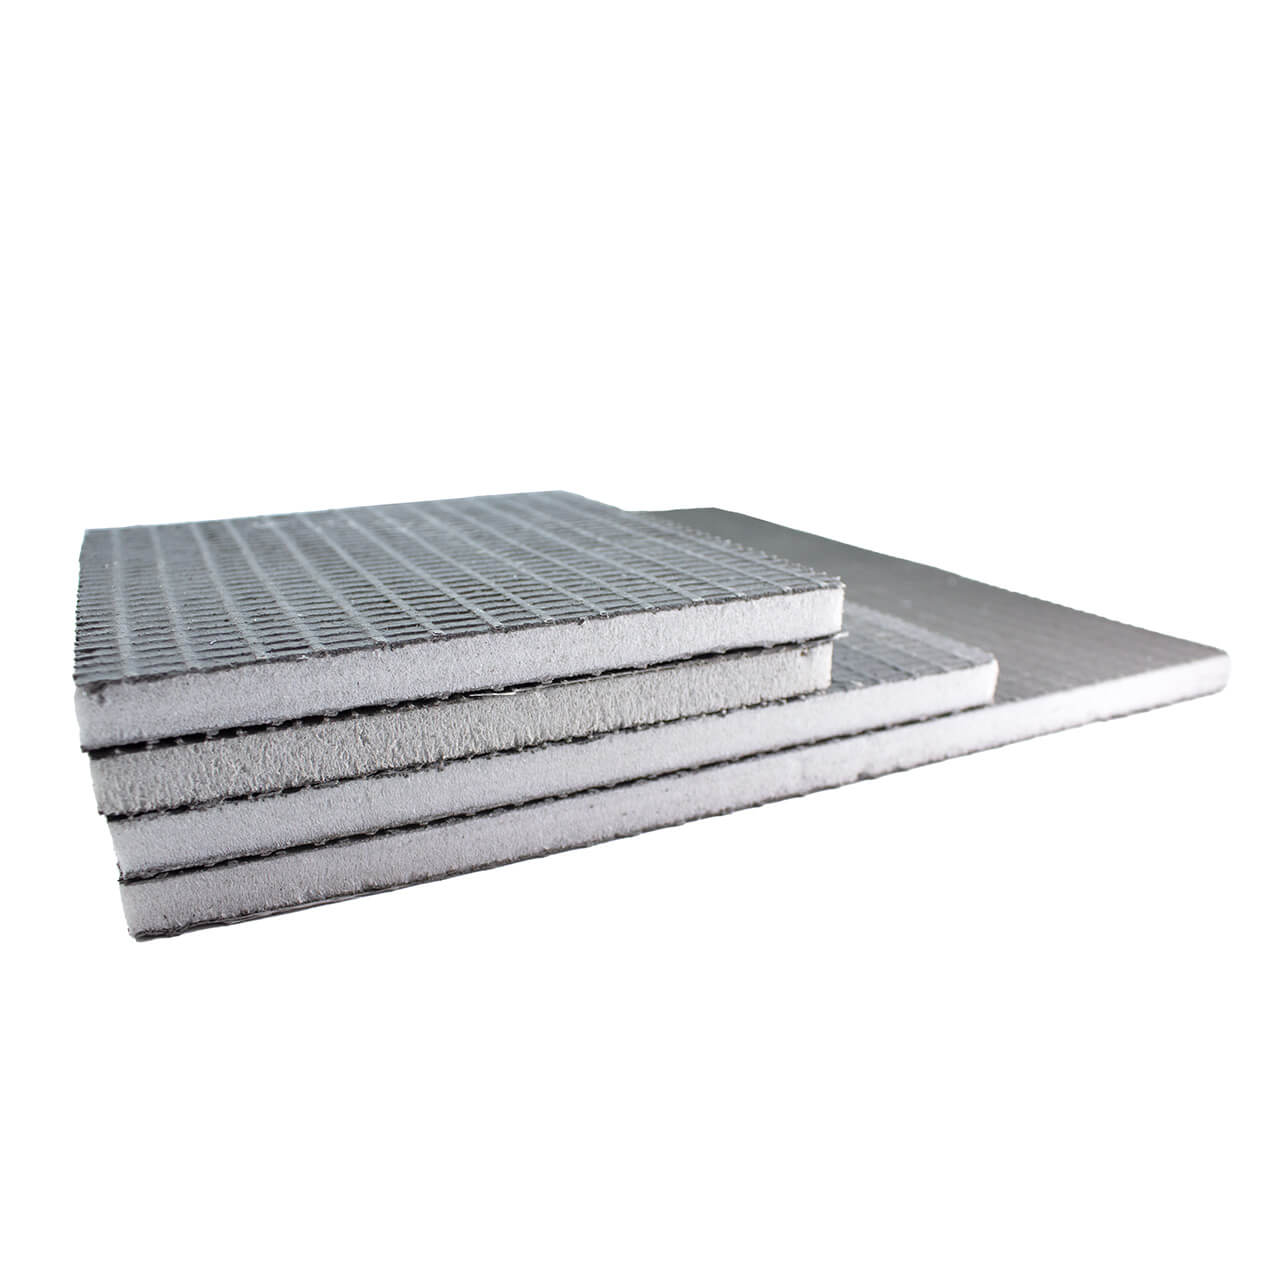
Foam-Core Mosaic Backer Board JM GoBoard

Foam-Core Mosaic Backer Board is 1/2-inch foam core backer manufactured by Johns Manville and branded as “GoBoard” that has been hand-cut to size. Dimensions can vary by approximately 1/16-inch. The edges are unfinished cuts, which can be painted with a neutral color of acrylic paint our enclosed by a frame, such as can be made with miter-cut wooden molding.

The faces of some boards may have small imperfections or printing from the factory, but these will be covered by the mosaic.

Foam-Core Mosaic Backer Board JM GoBoard

  • Material: polyisocyanurate foam laminated with fibreglass facing
  • Dimensions: as stated
  • Tolerance: within 1/16 inch of nominal dimensions.
  • Thickness: Nominally 1/2 inch, exact is 15/32 of an inch

Backers for Mosaic Art Projects

Using Foam-Core Mosaic Backer

May irritate skin; wear nitrile gloves while handling if you have sensitive skin.

This material is more rigid than plywood or MDF and has been rated for use in wet locations such as showers. It should NOT be used in permanently-submerged installations such as pools or bird baths. It should NOT be used for floor-mounted mosaics in areas with even semi-frequent foot traffic, unless you use durable tiles and it is supported with a proper sub-floor. Not for commercial installations. We would recommend the smaller cut pieces we sell to be used as plaques for mosaic wall art, or for a light-duty installation like the inset top of a small decorative end table. The main advantages this material has over plywood backers is the lighter weight, and suitability for use in humid environments.

Make sure that your tile doesn’t stick out beyond the edge of the backer, which would make it particularly vulnerable to being knocked loose or chipped by random blows over time.

Indoor Vs Outdoor Mosaics

Outdoors

This material should NOT be used as a base for mosaic stepping stones. It’s rigid, but not strong enough to be walked on without a proper subfloor beneath it.

Indoors

Indoor wall-art mosaics can be made using this material instead of plywood to save weight. For dry indoor installations, the tiles can be mounted using a white PVA adhesive such as Weldbond and then grouted.

How To Make Mosaic Art

For more advice on designing your mosaic project or mounting, cutting, and grouting tile, please see our page of Mosaic Frequently Asked Questions or our Mosaic Information Guide, which lists instructional pages described by topic. We also post new articles about making mosaics at our How to Mosaic Blog.

Pommel-Grip Mini Cutter

The Pommel-Grip Mini Cutter is a premium stained-glass hand-tool for making long cuts, either straight or curved, onto the surface of stained glass or larger glass tiles. This cutter is smaller than all the others, measuring about 4.75″ end to end. Weighing only 2.0 oz, it is the lightest stained glass cutter we sell, even lighter than the Economy Pistol Grip Cutter which weighs 2.3 oz. If you have smaller hands or are concerned about hand fatigue, this mini cutter could be your go-to glass scoring tool. The cutting wheel is tungsten carbide, and is meant for glass that is between 3mm and 6mm thick, such as the stained glass we sell. The body of the handle is made of solid polyamid, and has a brass striker at the end of the handle. This cutter does NOT contain a cutting oil reservoir. The tool can be used with one hand when the glass sheet is laid on a non-slip surface.

No Cutting Oil Reservoir

Pommel-Grip Mini Cutter does NOT contain an oil reservoir. If you prefer to use oil, you can have a little tray next to your work area, and pour a small amount of cutting oil into the bottom. Then, as you make cuts, you can periodically dip the mini cutter into the tray.

Comfort Pistol-Grip Cutter

  • scoring tool for cutting sheet glass
  • 135° tungsten carbide cutting wheel
  • ideal for glass 3mm to 6mm thick
  • no oil reservoir!
  • polyamide comfort hand grip
  • narrower “neck” portion makes tool easy to hold
  • brass fittings
  • weight: 2oz
  • handle diameter: 1.125″
  • total length: 4.75″

Do You Need This Tool For Mosaic Art?

The Pommel-Grip Mini Cutter is a traditional stained glass tool, and is used for making long cuts. If you want to divide up a sheet of stained glass into fairly uniform square tiles, you could use this tool and a straight-edge ruler to cut the sheet into long strips and then cut the strips into tiles with a Mosaic Glass Cutter. However, mosaic art usually looks better when tiles aren’t uniform but instead are more irregular, and irregularly-shaped rectangles and triangles could be made using a Mosaic Glass Cutter without a stained glass cutter. In other words, this tool is not NEEDED for traditional mosaic work. On the other hand, if you want to make curved-shaped cuts in stained glass, this is the tool to use.

Snapping Apart Scored Glass

Stained glass cutters, like the Pommel-Grip Mini Cutter only score the glass; you need to snap the glass apart along the score. The best tool made for snapping apart scored glass is the Running Pliers hand tool, which has curved, padded jaws.

How To Make Mosaics

For more advice on designing your mosaic project or mounting, cutting, and grouting tile, please see our page of Mosaic Frequently Asked Questions or our Mosaic Information Guide, which lists instructional pages described by topic. We also post new articles about making mosaics at our How to Mosaic Blog.

Stylus Stained Glass Cutter

The Stylus Stained Glass Cutter is a premium stained-glass hand-tool for making long cuts, either straight or curved, onto the surface of stained glass or larger glass tiles. The cutting wheel is tungsten carbide, and is meant for glass that is between 3mm and 6mm thick, such as the stained glass we sell. The body of the stylus is made of aluminum, and has a brass neck and cutting oil reservoir cap. The tool can be used with one hand when the glass sheet is laid on a non-slip surface.

Cutting Oil Not Required

We don’t typically use cutting oil, but for artists who prefer to use oil, this tool has a reservoir in the pen body. The reservoir is accessible by twisting off the cap at the end.

Stylus Stained Glass Cutter

  • scoring tool for cutting sheet glass
  • 135° tungsten carbide cutting wheel
  • ideal for glass 3mm to 6mm thick
  • aluminum tube body serves as cutting oil reservoir
  • brass fittings
  • light weight: less than 3oz
  • approx 6.8″ long

Do You Need This Tool For Mosaic Art?

The Stylus Stained Glass Cutter is a traditional stained glass tool, and is used for making long cuts. If you want to divide up a sheet of stained glass into fairly uniform square tiles, you could use this tool and a straight-edge ruler to cut the sheet into long strips and then cut the strips into tiles with a Mosaic Glass Cutter. However, mosaic art usually looks better when tiles aren’t uniform but instead are more irregular, and irregularly-shaped rectangles and triangles could be made using a Mosaic Glass Cutter without a stained glass cutter. In other words, this tool is not NEEDED for traditional mosaic work. On the other hand, if you want to make curved-shaped cuts in stained glass, this is the tool to use.

Snapping Apart Scored Glass

Stained glass cutters, like the Stylus Stained Glass Cutter only score the glass; you need to snap the glass apart along the score. The best tool made for snapping apart scored glass is the Running Pliers hand tool, which has curved, padded jaws.

How To Make Mosaics

For more advice on designing your mosaic project or mounting, cutting, and grouting tile, please see our page of Mosaic Frequently Asked Questions or our Mosaic Information Guide, which lists instructional pages described by topic. We also post new articles about making mosaics at our How to Mosaic Blog.

Comfort Pistol-Grip Cutter

The Comfort Pistol-Grip Cutter is a premium stained-glass hand-tool for making long cuts, either straight or curved, onto the surface of stained glass or larger glass tiles. If you like pistol-grip style cutters, and you do a lot of cutting, then this is the tool for you. The smooth handle body feels much nicer in the hand than the hollow plastic pistol grip cutters commonly available on the market. The cutting wheel is tungsten carbide, and is meant for glass that is between 3mm and 6mm thick, such as the stained glass we sell. The body of the handle is made of solid polyamid, and contains a cutting oil reservoir accessible at the end of the handle. The tool can be used with one hand when the glass sheet is laid on a non-slip surface.

Cutting Oil Not Required

We don’t typically use cutting oil, but for artists who prefer to use oil, this tool contains a small reservoir. The reservoir is accessible at the back of the tool with a flat-head screwdriver (not included).

Comfort Pistol-Grip Cutter

  • scoring tool for cutting sheet glass
  • 135° tungsten carbide cutting wheel
  • ideal for glass 3mm to 6mm thick
  • polyamide comfort hand grip serves as cutting oil reservoir
  • narrower “neck” portion makes tool easy to hold
  • brass fittings
  • weighs less than 4oz

Do You Need This Tool For Mosaic Art?

The Comfort Pistol-Grip Cutter is a traditional stained glass tool, and is used for making long cuts. If you want to divide up a sheet of stained glass into fairly uniform square tiles, you could use this tool and a straight-edge ruler to cut the sheet into long strips and then cut the strips into tiles with a Mosaic Glass Cutter. However, mosaic art usually looks better when tiles aren’t uniform but instead are more irregular, and irregularly-shaped rectangles and triangles could be made using a Mosaic Glass Cutter without a stained glass cutter. In other words, this tool is not NEEDED for traditional mosaic work. On the other hand, if you want to make curved-shaped cuts in stained glass, this is the tool to use.

Snapping Apart Scored Glass

Stained glass cutters, like the Comfort Pistol Grip Cutter only score the glass; you need to snap the glass apart along the score. The best tool made for snapping apart scored glass is the Running Pliers hand tool, which has curved, padded jaws.

How To Make Mosaics

For more advice on designing your mosaic project or mounting, cutting, and grouting tile, please see our page of Mosaic Frequently Asked Questions or our Mosaic Information Guide, which lists instructional pages described by topic. We also post new articles about making mosaics at our How to Mosaic Blog.

Free Mosaic Pattern Christmas Tree

christmas-tree-mosaic-pattern

Free Mosaic Pattern Christmas Tree is a gridded design that can be used without transferring the pattern to the backer. The rows and columns of the pattern are numbered, which allows the user to check a position merely by counting. No carbon paper or other transfer techniques are needed.

Also, the pattern doesn’t even need to be printed.

Free Mosaic Pattern

Free Mosaic Patterns are available as PDF downloads for customers who checkout using the normal shopping cart checkout process. Other materials do not have to be ordered.

Tile

This pattern is designed for Morjo™ 8mm Glass Mosaic Tile, but it could be used for tile of any size.

Backer Size

This design fits on a 12×12-inch backer when executed in 8mm tile with a hairs-width grout gap between the tiles. Without a tiny grout gap, there may be a slight gap at the edge on a 12×12-inch backer. If so, make sure the mosaic is centered on the backer.

To center a mosaic, position 1 row and 1 column of tile without gluing down the tiles. Evaluate any leftover gap at the edges and center the mosaic accordingly.

Displaying Mosaics Unframed

Many books and authorities recommend NOT extending the tiles all the way to the edge of a backer because it makes those tiles vulnerable to damage by impact and by leaning the mosaic on its edge. We have observed that the 6×6-inch size is small and light enough to be handled without these types of damage being as much of an issue provided the mosaic is handled with care. Also, we think the raw mosaic edge is a vital part of the look and feel when displaying the finished artwork. The make great objects d’art when displayed unframed in the easels used for displaying china plates.

How To Make Mosaics

For more advice on designing your mosaic project or cutting and grouting tile, please see our Mosaic Frequently Asked Questions page or our How To Mosaic blog or our Mosaic Information Guide.

Free Mosaic Pattern Autumn Tree

autumn-tree-fall-mosaic-pattern-v2

Free Mosaic Pattern Autumn Tree is a gridded design that can be used without transferring the pattern to the backer. The rows and columns of the pattern are numbered, which allows the user to check a position merely by counting. No carbon paper or other transfer techniques are needed.

Also, the pattern doesn’t even need to be printed.

Free Mosaic Pattern

Free Mosaic Patterns are available as PDF downloads for customers who checkout using the normal shopping cart checkout process. Other materials do not have to be ordered.

Tile

This pattern is designed for Morjo™ 12mm Glass Mosaic Tile, but it could be used for tile of any size.

Backer Size

This design fits on a 15×15-inch backer when executed in 12mm tile with a hairs-width grout gap between the tiles. Without a tiny grout gap, there may be a slight gap at the edge on a 15×15-inch backer. If so, make sure the mosaic is centered on the backer.

To center a mosaic, position 1 row and 1 column of tile without gluing down the tiles. Evaluate any leftover gap at the edges and center the mosaic accordingly.

Displaying Mosaics Unframed

Many books and authorities recommend NOT extending the tiles all the way to the edge of a backer because it makes those tiles vulnerable to damage by impact and by leaning the mosaic on its edge. We have observed that the 6×6-inch size is small and light enough to be handled without these types of damage being as much of an issue provided the mosaic is handled with care. Also, we think the raw mosaic edge is a vital part of the look and feel when displaying the finished artwork. The make great objects d’art when displayed unframed in the easels used for displaying china plates.

How To Make Mosaics

For more advice on designing your mosaic project or cutting and grouting tile, please see our Mosaic Frequently Asked Questions page or our How To Mosaic blog or our Mosaic Information Guide.

Free Mosaic Pattern Halloween Jack-O-Lantern

Jack-o-Lantern-Mosaic-Pattern-10mm-Tiles

Free Mosaic Pattern Halloween Jack-O-Lantern is a gridded design that can be used without transferring the pattern to the backer. The rows and columns of the pattern are numbered, which allows the user to check a position merely by counting. No carbon paper or other transfer techniques are needed.

Also, the pattern doesn’t even need to be printed.

Free Mosaic Pattern

Free Mosaic Patterns are available as PDF downloads for customers who checkout using the normal shopping cart checkout process. Other materials do not have to be ordered.

Tile

This pattern is designed for Morjo™ 10mm Vitreous Glass Mosaic Tile, but it could be used for tile of any size.

Backer Size

This design fits on a 12×12-inch backer when executed in 10mm tile with no grout gap between the tiles, but there may be a slight gap at the edge. For professional results, make sure the mosaic is centered on the backer.

To center a mosaic, position 1 row and 1 column of tile without gluing down the tiles. Evaluate any leftover gap at the edges and center the mosaic accordingly.

Displaying Mosaics Unframed

Many books and authorities recommend NOT extending the tiles all the way to the edge of a backer because it makes those tiles vulnerable to damage by impact and by leaning the mosaic on its edge. We have observed that the 6×6-inch size is small and light enough to be handled without these types of damage being as much of an issue provided the mosaic is handled with care. Also, we think the raw mosaic edge is a vital part of the look and feel when displaying the finished artwork. The make great objects d’art when displayed unframed in the easels used for displaying china plates.

How To Make Mosaics

For more advice on designing your mosaic project or cutting and grouting tile, please see our Mosaic Frequently Asked Questions page or our How To Mosaic blog or our Mosaic Information Guide.

Free Mosaic Pattern Halloween Cat

Halloween-Cat-Mosaic-Pattern-10mm-Tiles-v4

Free Mosaic Pattern Halloween Cat is a gridded design that can be used without transferring the pattern to the backer. The rows and columns of the pattern are numbered, which allows the user to check a position merely by counting. No carbon paper or other transfer techniques are needed.

Also, the pattern doesn’t even need to be printed.

Free Mosaic Pattern

Free Mosaic Patterns are available as PDF downloads for customers who checkout using the normal shopping cart checkout process. Other materials do not have to be ordered.

Tile

This pattern is designed for Morjo™ 10mm Vitreous Glass Mosaic Tile, but it could be used for tile of any size.

Backer Size

This design fits on a 12×12-inch backer when executed in 10mm tile with no grout gap between the tiles, but there may be a slight gap at the edge. For professional results, make sure the mosaic is centered on the backer.

To center a mosaic, position 1 row and 1 column of tile without gluing down the tiles. Evaluate any leftover gap at the edges and center the mosaic accordingly.

Displaying Mosaics Unframed

Many books and authorities recommend NOT extending the tiles all the way to the edge of a backer because it makes those tiles vulnerable to damage by impact and by leaning the mosaic on its edge. We have observed that the 6×6-inch size is small and light enough to be handled without these types of damage being as much of an issue provided the mosaic is handled with care. Also, we think the raw mosaic edge is a vital part of the look and feel when displaying the finished artwork. The make great objects d’art when displayed unframed in the easels used for displaying china plates.

How To Make Mosaics

For more advice on designing your mosaic project or cutting and grouting tile, please see our Mosaic Frequently Asked Questions page or our How To Mosaic blog or our Mosaic Information Guide.

Free Mosaic Pattern Halloween Ghost

Ghost-Mosaic-Pattern-10mm-Tiles

Free Mosaic Pattern Halloween Ghost is a gridded design that can be used without transferring the pattern to the backer. The rows and columns of the pattern are numbered, which allows the user to check a position merely by counting. No carbon paper or other transfer techniques are needed.

Also, the pattern doesn’t even need to be printed.

Free Mosaic Pattern

Free Mosaic Patterns are available as PDF downloads for customers who checkout using the normal shopping cart checkout process. Other materials do not have to be ordered.

Tile

This pattern is designed for Morjo™ 10mm Vitreous Glass Mosaic Tile, but it could be used for tile of any size.

Backer Size

This design fits on a 12×12-inch backer when executed in 10mm tile with no grout gap between the tiles, but there may be a slight gap at the edge. For professional results, make sure the mosaic is centered on the backer.

To center a mosaic, position 1 row and 1 column of tile without gluing down the tiles. Evaluate any leftover gap at the edges and center the mosaic accordingly.

Displaying Mosaics Unframed

Many books and authorities recommend NOT extending the tiles all the way to the edge of a backer because it makes those tiles vulnerable to damage by impact and by leaning the mosaic on its edge. We have observed that the 6×6-inch size is small and light enough to be handled without these types of damage being as much of an issue provided the mosaic is handled with care. Also, we think the raw mosaic edge is a vital part of the look and feel when displaying the finished artwork. The make great objects d’art when displayed unframed in the easels used for displaying china plates.

How To Make Mosaics

For more advice on designing your mosaic project or cutting and grouting tile, please see our Mosaic Frequently Asked Questions page or our How To Mosaic blog or our Mosaic Information Guide.

Fall Mini Mix 3/8-Inch (10mm) 1-lb

The Fall Mosaic Tile Mini Mix is an autumn inspired 1-lb mix of 3/8-inch vitreous glass tiles. This curated assortment mixes greens with yellows, oranges, reds, and browns.

3/8-Inch Fall Mosaic Tile Mini Mix 1 lb

  • tile size: 3/8 inch (10mm)
  • thickness: 1/8 nominal (4mm)
  • sales unit: 1 pound (approximately 675 pieces)
  • material: glass
  • variety: mostly vitreous, some low-grain
  • pigments: colorfast, UV resistant
  • durability: frost-proof, impervious to liquid
  • usage: suitable for indoor and outdoor use

Fall Assortment Colors:

    MiniGee:
  • D94N Yellow
  • Morjo Mini Vitreous (10MV):
  • 10MV-A026 Deep Green
  • 10MV-A034 Brown Tint 1
  • 10MV-A035 Brown
  • 10MV-A036 Dark Brown
  • 10MV-A095 Orange-Red (low grain)
  • 10MV-A096 Primary Red (low grain)

Coverage

Each 1-pound bag will cover approximately .90 square feet assuming a standard grout gap of approximately 1/32 inch. Most Mosaic Mounting Paper is 1.15 square feet and requires 841 tiles (29 tiles x 29 tiles). Use our tile estimator to calculate how much you need for your project.

Compatibility

Tile thickness is 1/8 inch nominal, the same as most of the glass mosaic tile we sell, which means that these can mix and match with other types and brands.

Cutting Glass Tile

We recommend the Mosaic Glass Cutter for cutting all types of glass mosaic tile including these. Note, however, that there is a limit to how small they can be cut. Due to their tapered edges, small pieces will tend to tip over. We advise cutting halves, quarters, and diagonal triangles, and not much smaller than that. For creating outlines and other details, check out our Rectangle Border Tiles or our Outliners Mosaic Sticks.

Mounting Tiles

Weldbond adhesive works well for mounting dry indoor mosaics. However, for outdoor and wet mosaics, use thinset mortar.

Use in Mosaic Art

The affordability, ease of use and durability of these tiles makes them suitable for children’s crafts projects and outdoor home décor. The pigment quality lends itself equally well to photorealistic mosaic images and fine art. The advantage of this material is that you can use tiles from different manufacturers if you find you need additional colors.

How To Make Mosaics

For more advice on designing your mosaic project or mounting, cutting, and grouting tile, please see our page of Mosaic Frequently Asked Questions or our Mosaic Information Guide, which lists instructional pages described by topic. We also post new articles about making mosaics at our How to Mosaic Blog.